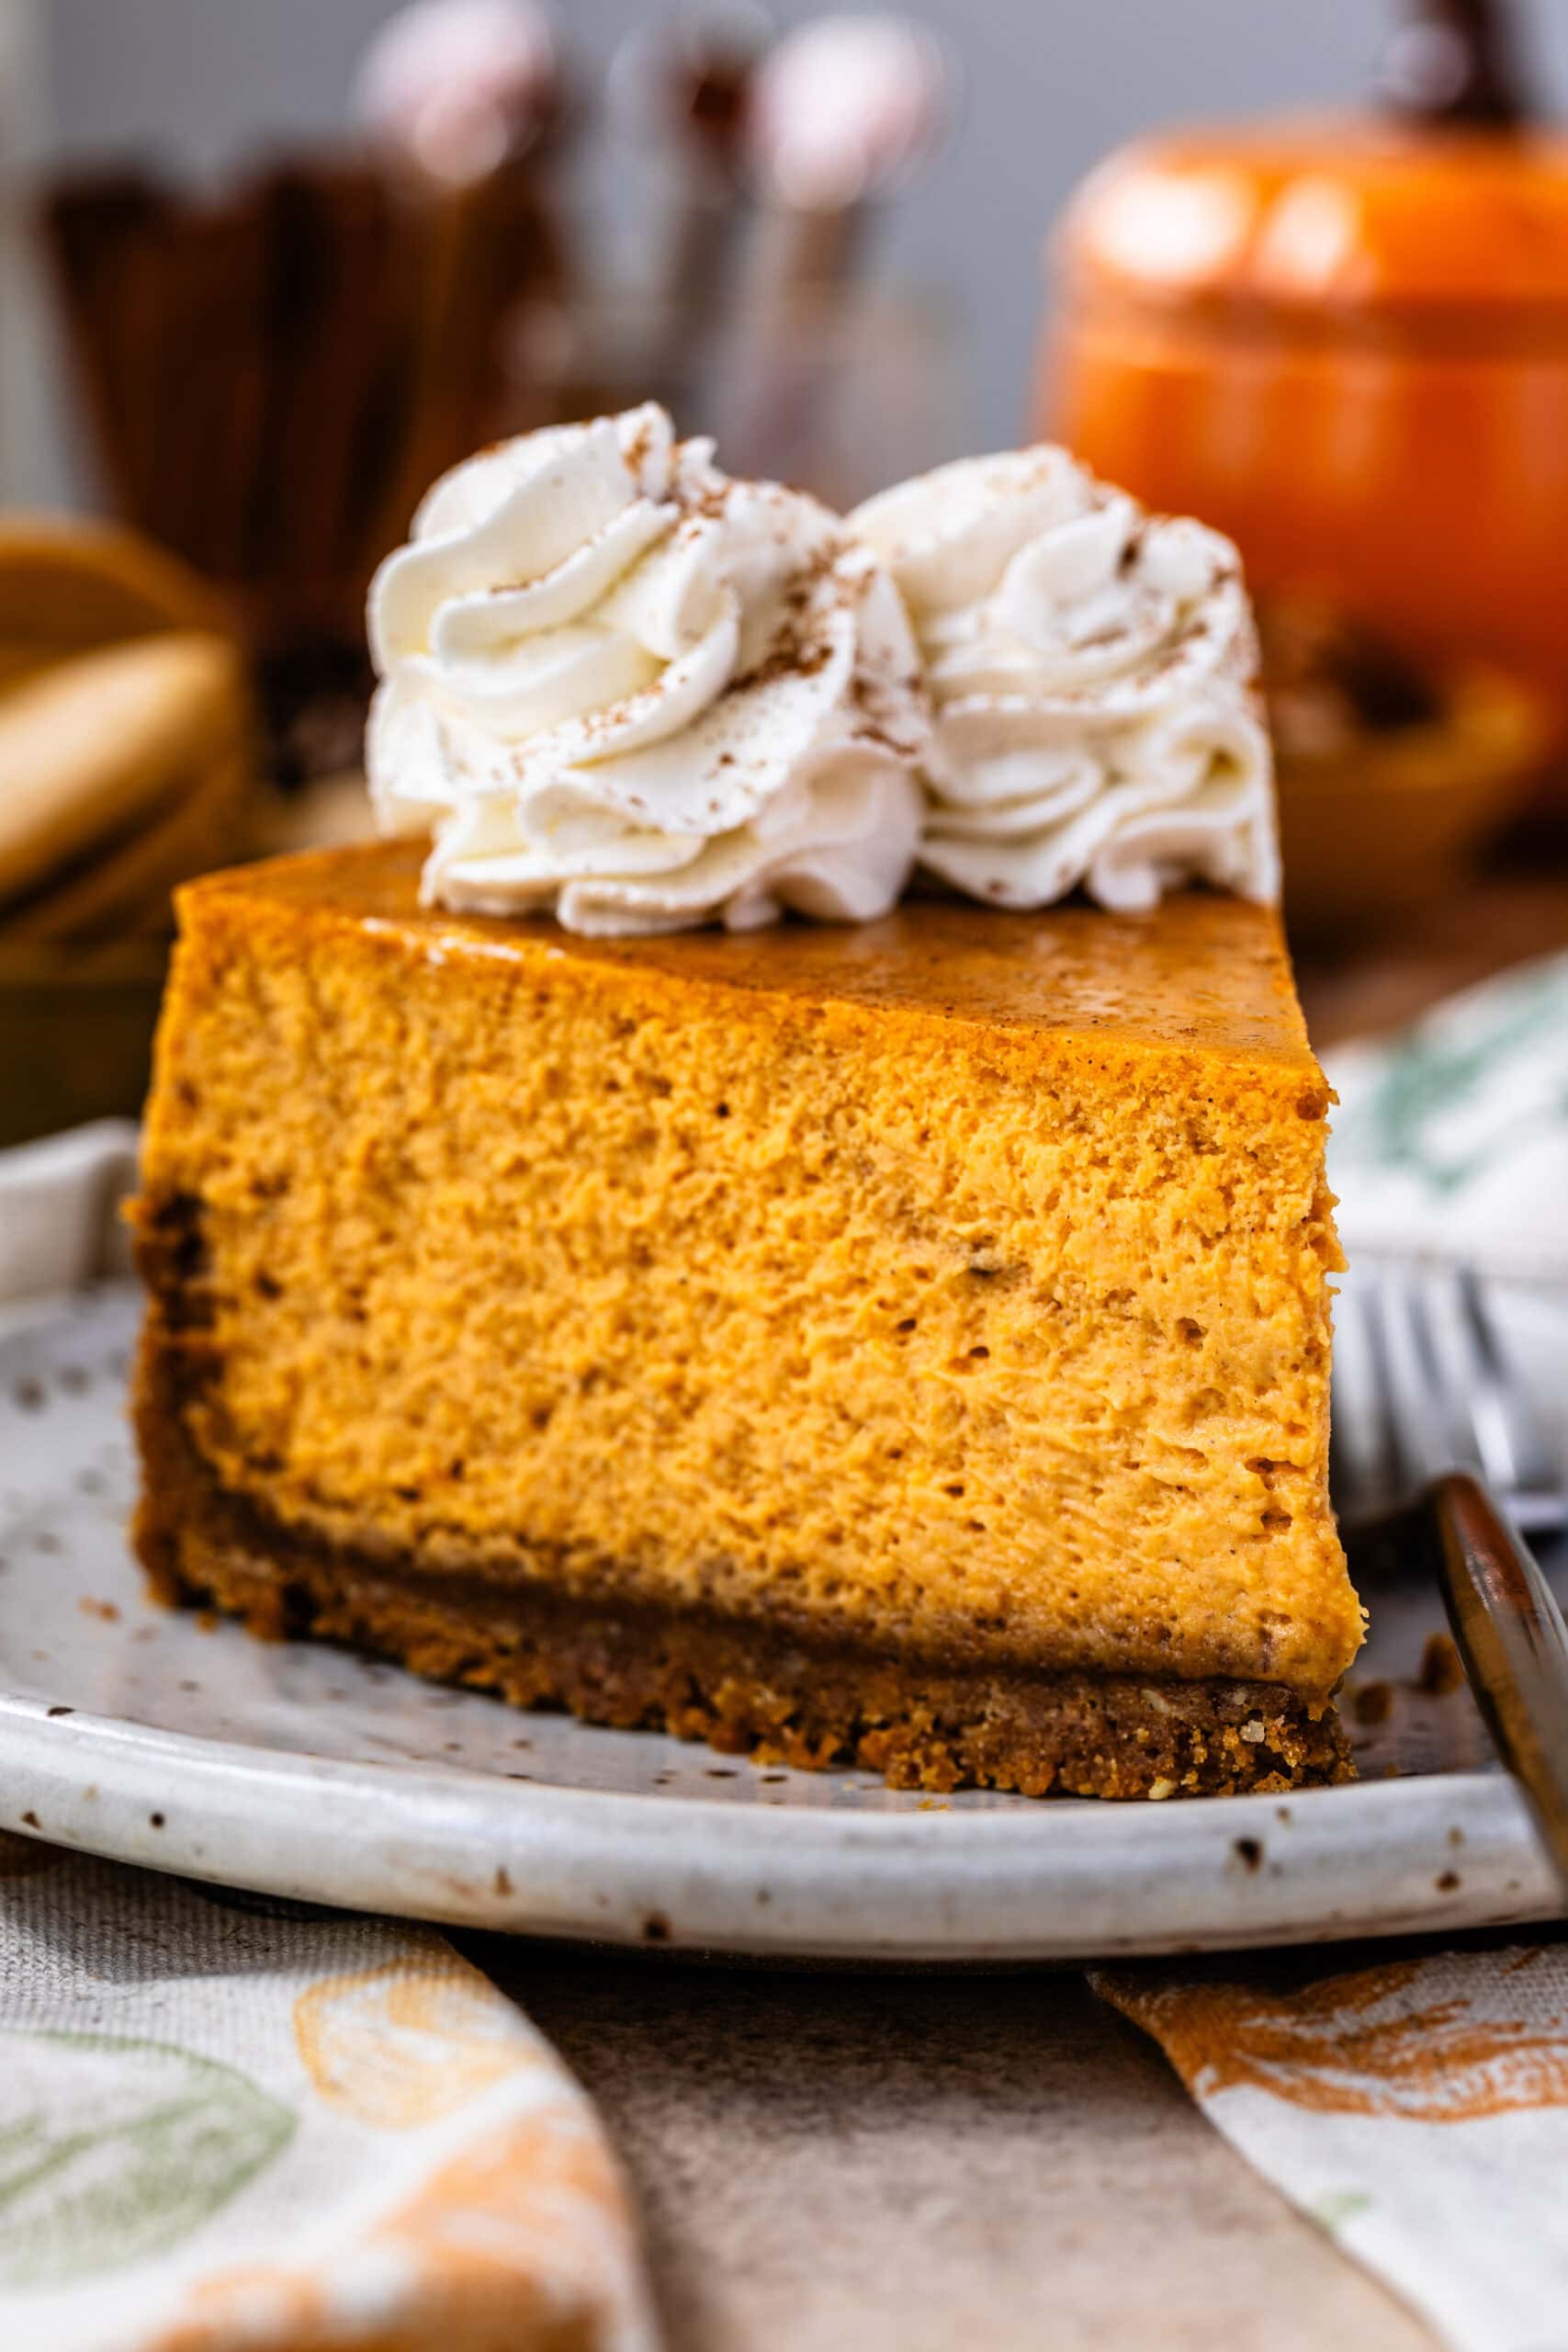
Pumpkin Cheesecake
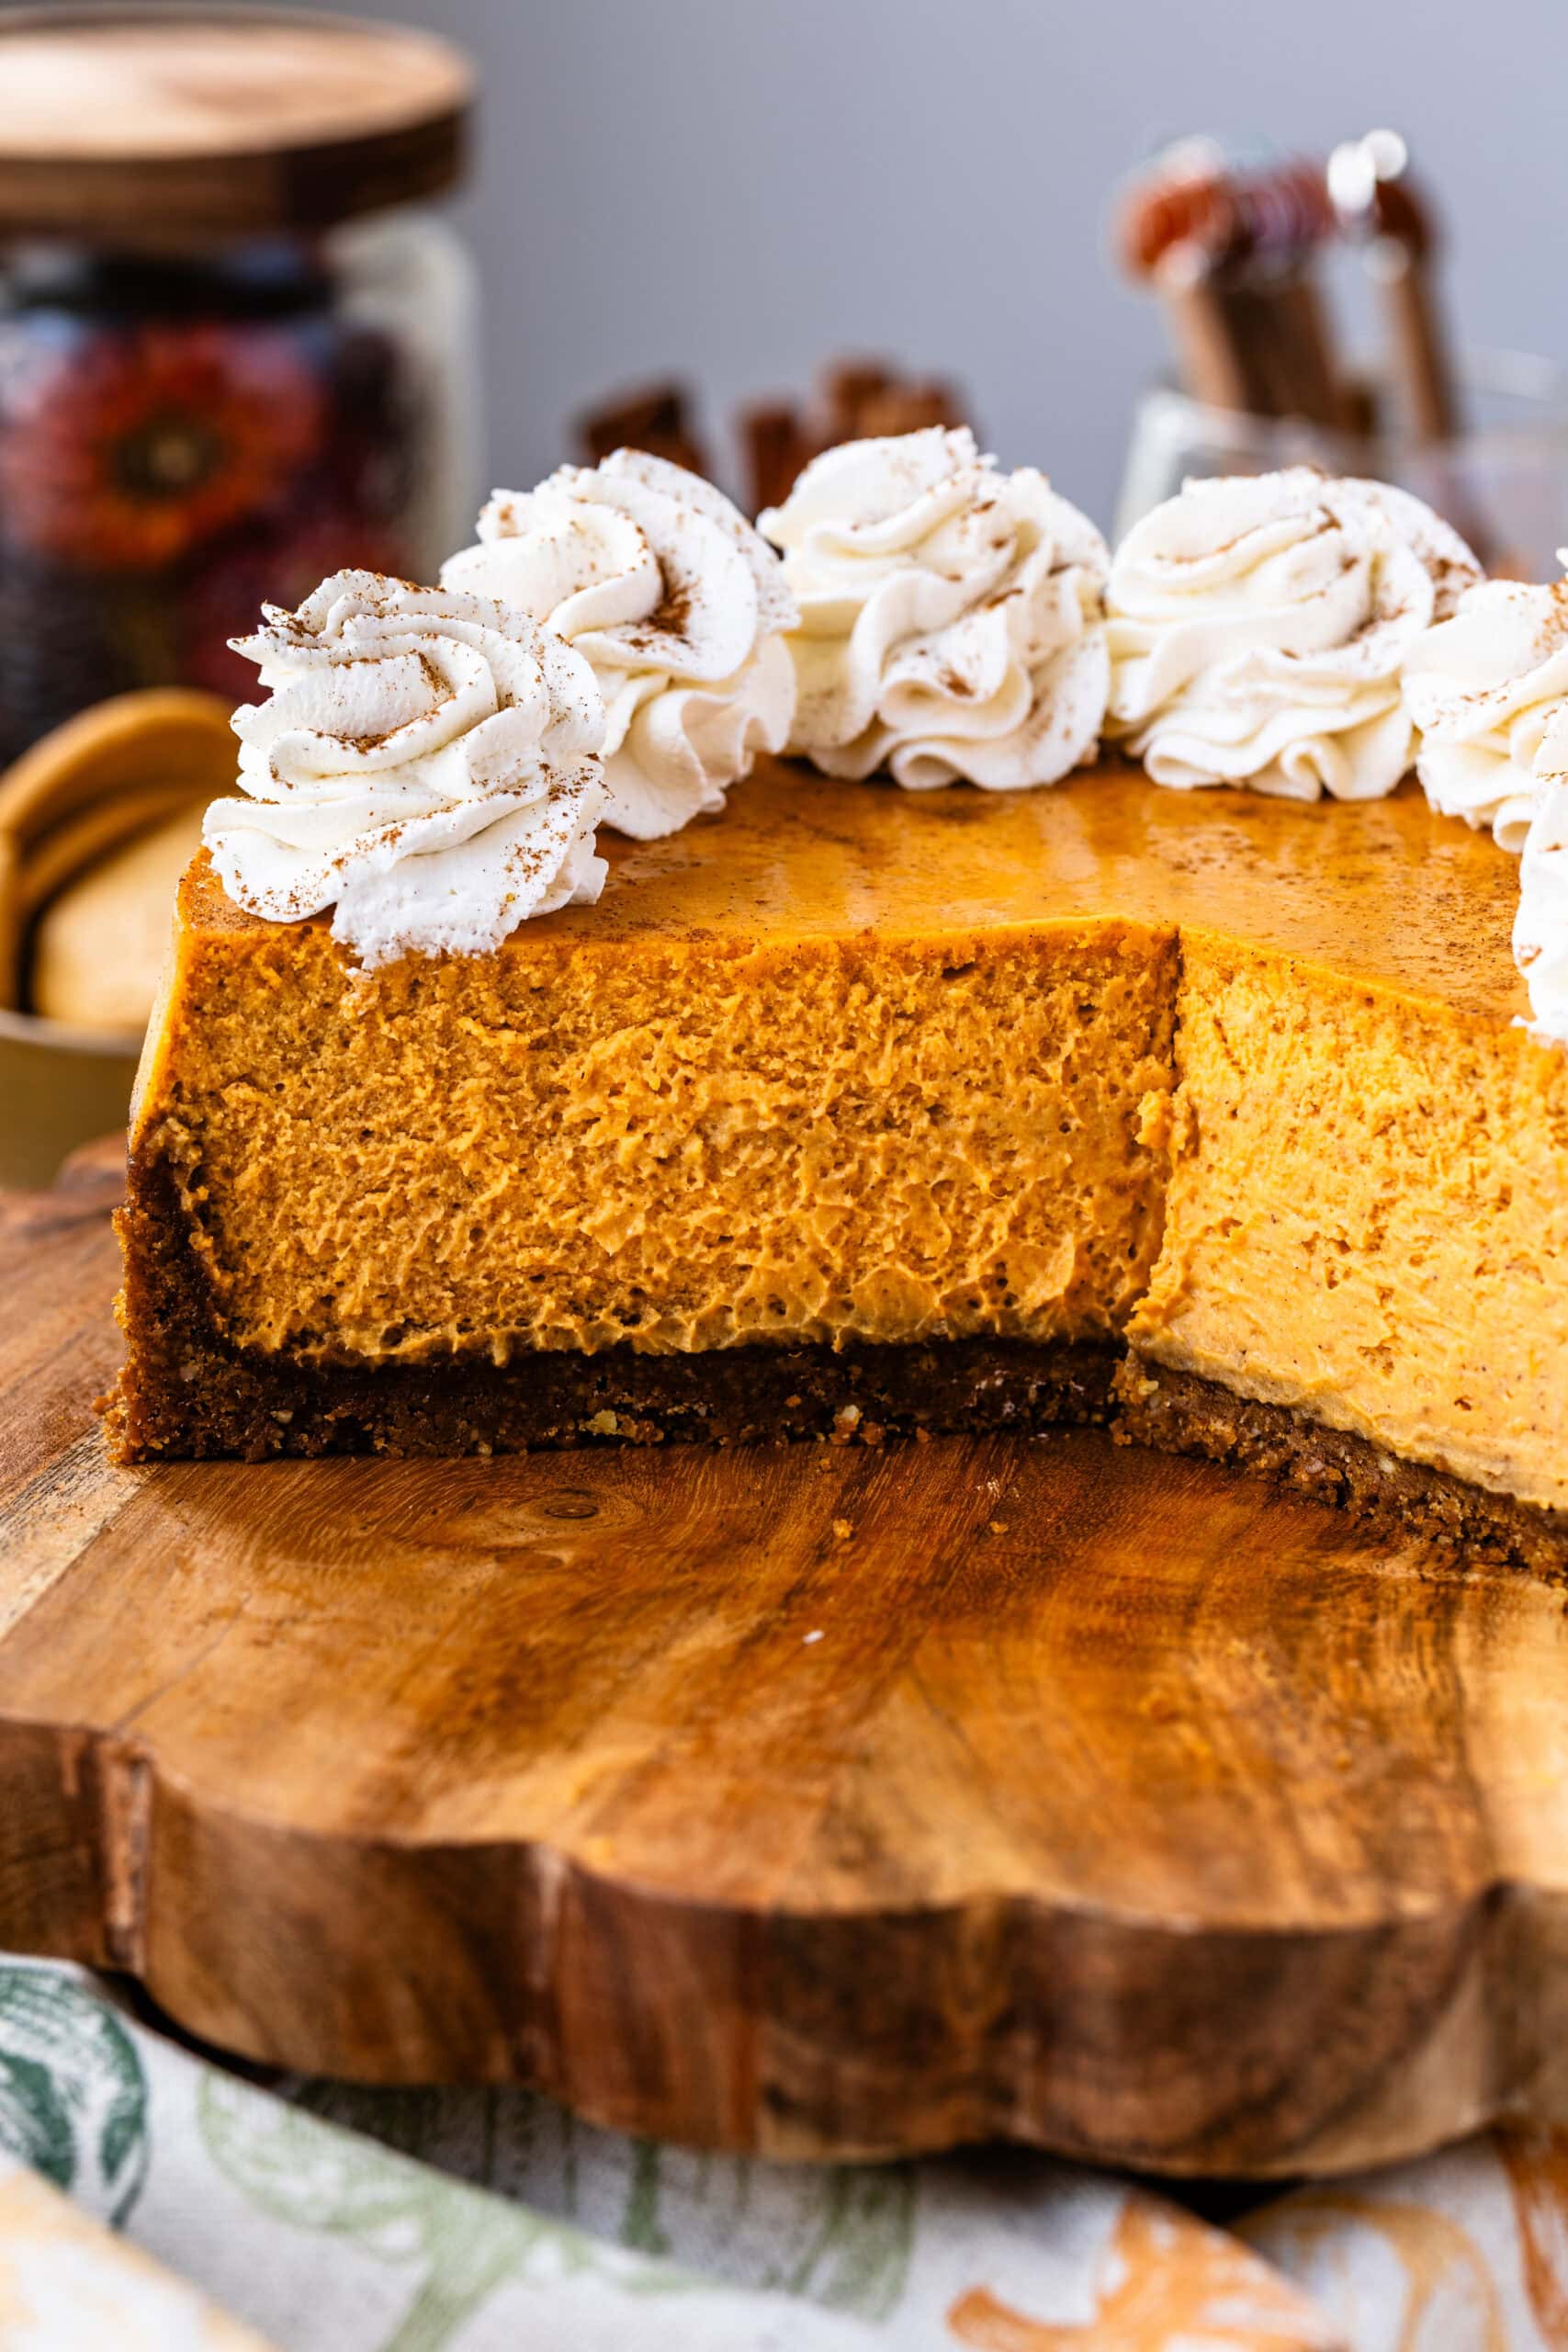
I’ve made a lot of pumpkin cheesecakes over the years, and most of them fall into one of two camps: rich but heavy, or light but a little flat. This version is the one I actually come back to because it’s neither of those things! The texture stays smooth and creamy, the pumpkin flavor is clear without being muddy, and it slices cleanly once chilled. It’s the kind of cheesecake I want to serve for Thanksgiving and enjoy the leftovers the next day.
Why I Love This Cheesecake
If you’ve ever cooked with pumpkin puree, you know that it can be tricky because of the added water content. This cheesecake works because:
- Drained pumpkin purée keeps the filling creamy instead of dense.
- The pecan gingersnap crust adds texture without overpowering the filling.
- Gentle mixing prevents cracks and keeps the crumb velvety.
- Whipped cream finishes the cheesecake without making it feel heavy.
Key Ingredients & Why I Use Them
Pumpkin purée – I always drain it first. It’s a small step that dramatically improves texture.
Cream cheese – Fully softened so it blends smoothly without adding excess air.
Brown sugar – Adds warmth and depth that works better with pumpkin than white sugar alone.
Pecan gingersnap crust – Buttery, spiced, and sturdy enough to support the filling.
This post may contain affiliate links. I earn a commission from qualified purchases. Please read our Privacy policy here.
My Best Cheesecake Tips
If you’re new to cheesecake baking—or want consistent, crack-free results—make sure to check out Best Cheesecake Tips before you begin. It covers all the essentials that help any cheesecake turn out perfectly.
What Pan Should I Use?
For this recipe, use an 8-inch or 9-inch springform pan. If choosing an 8-inch pan, make sure it’s at least 3 inches deep. A springform pan is ideal because it releases the cheesecake cleanly without damaging the crust. I use the Fat Daddio’s Springform Pan.
How To Make This Cheesecake
The full recipe card is below, but here’s how I make it step by step with photos so you can track your progress along with mine.
Step 1: Make the Pecan Gingersnap Crust
Preheat your oven to 325ºF. Pulse the gingersnap cookies and pecans into fine crumbs. Then I mix in the brown sugar and pumpkin spice. Next pulse in the melted butter until the mixture resembles wet sand.
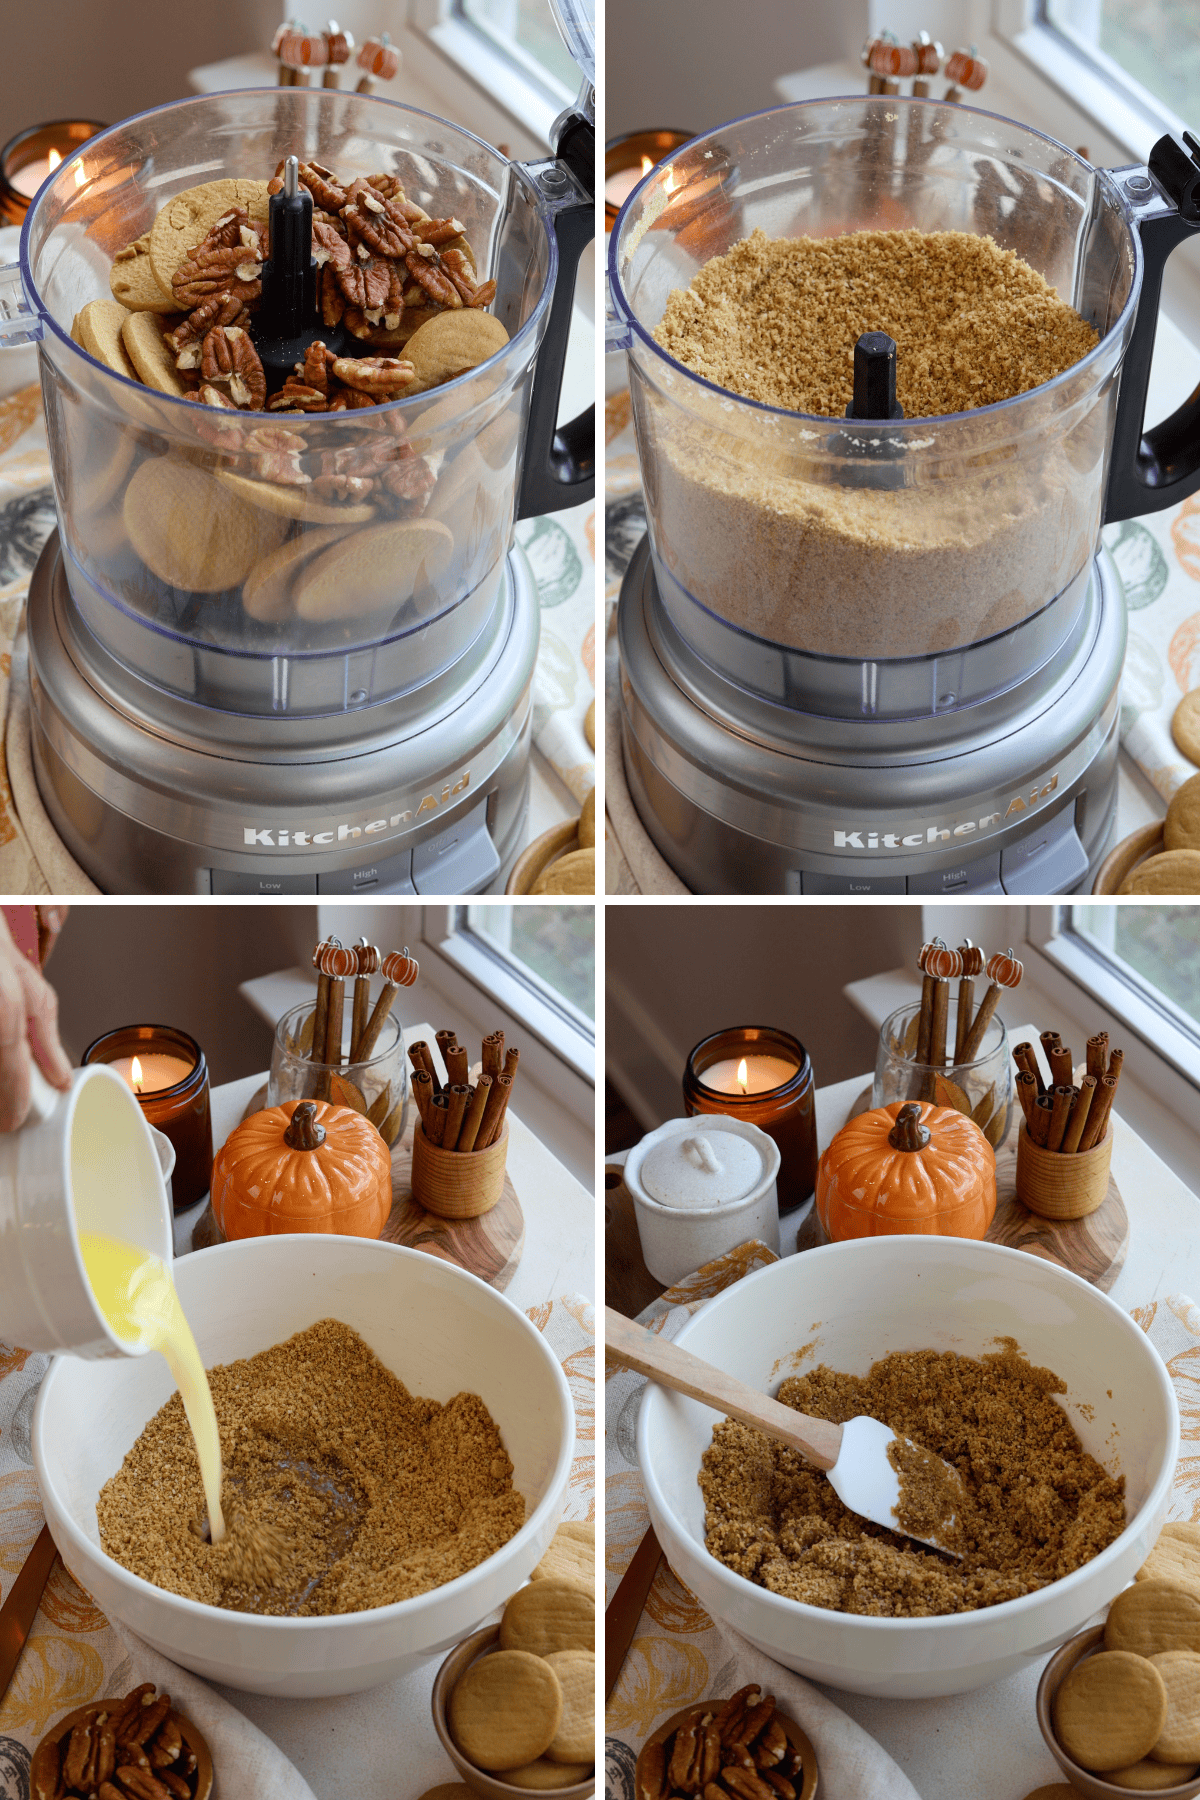
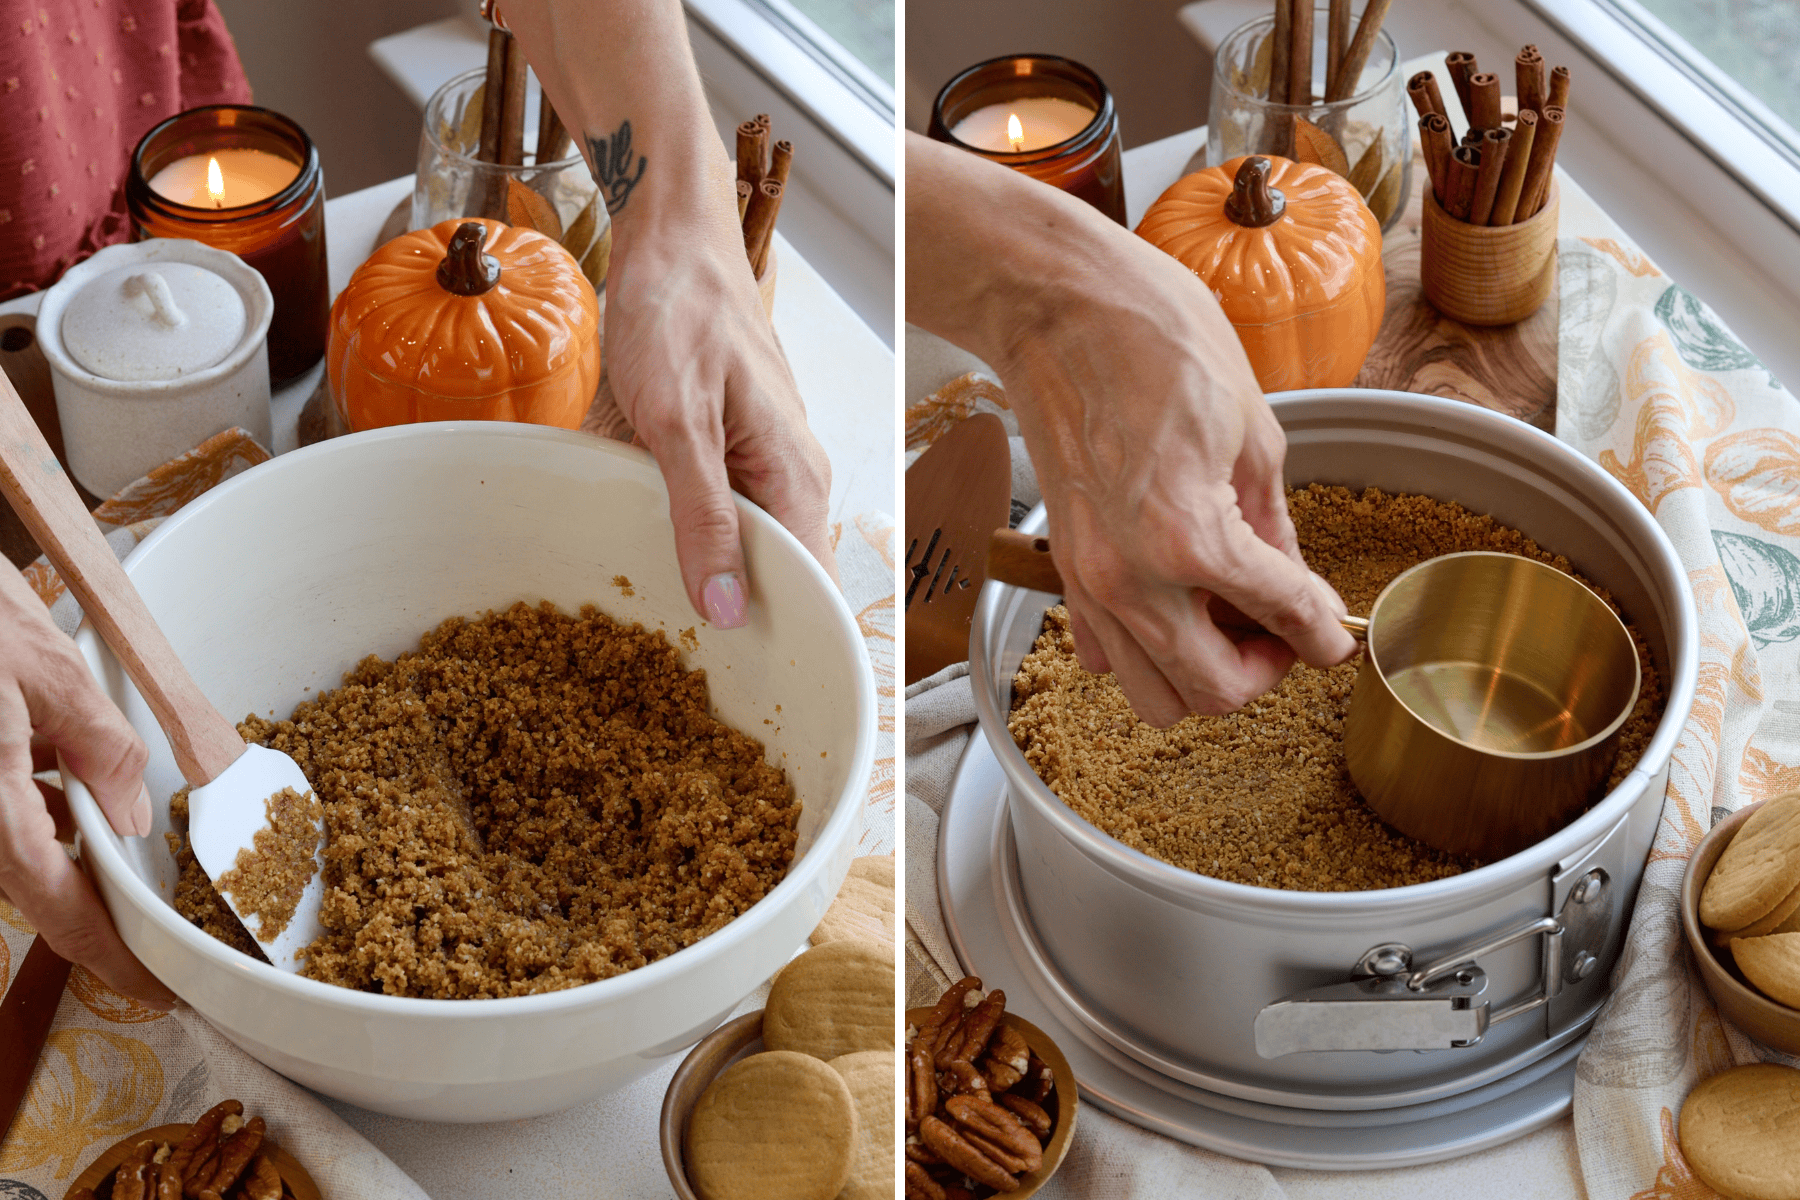
Press this mixture into the bottom of your prepared pan and up the sides, ensuring it’s even and compact. I use the bottom of a measuring cup to get it in an even layer. Bake the crust until it’s slightly golden brown (around 10-15 minutes), then remove it from the oven and let it cool.
Step 2: Drain the Pumpkin Purée (This Matters)
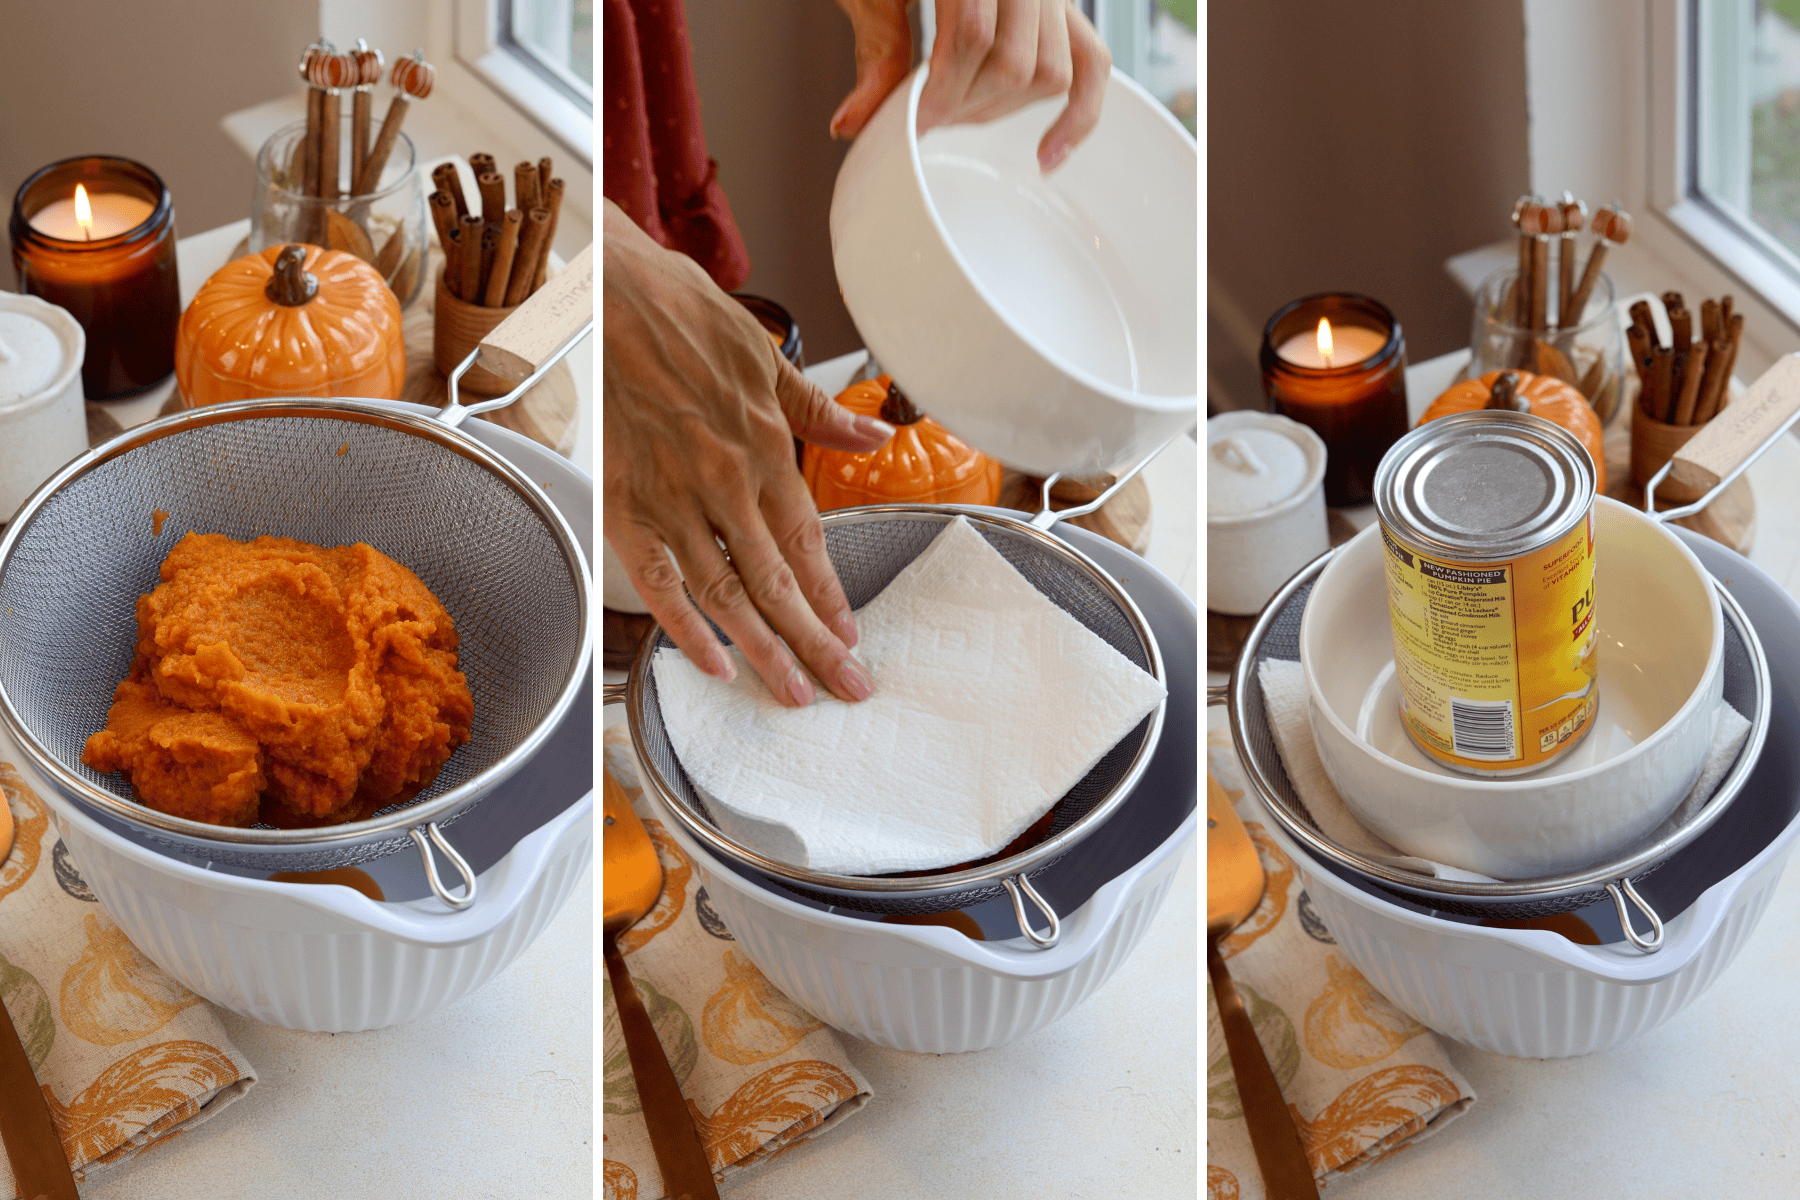
While the crust is cooling, prepare the pumpkin puree by draining excess liquid using a fine mesh strainer or cheesecloth. Removing excess liquid from pumpkin purée is essential for this recipe because it prevents your cheesecake from getting watery.
Place the purée in a fine mesh sieve or cheesecloth over a bowl. Lay a paper towel on top and set something heavy over it. After about 30 minutes, discard the liquid and move on to the batter. You can always do this step first, too, if that’s easier.
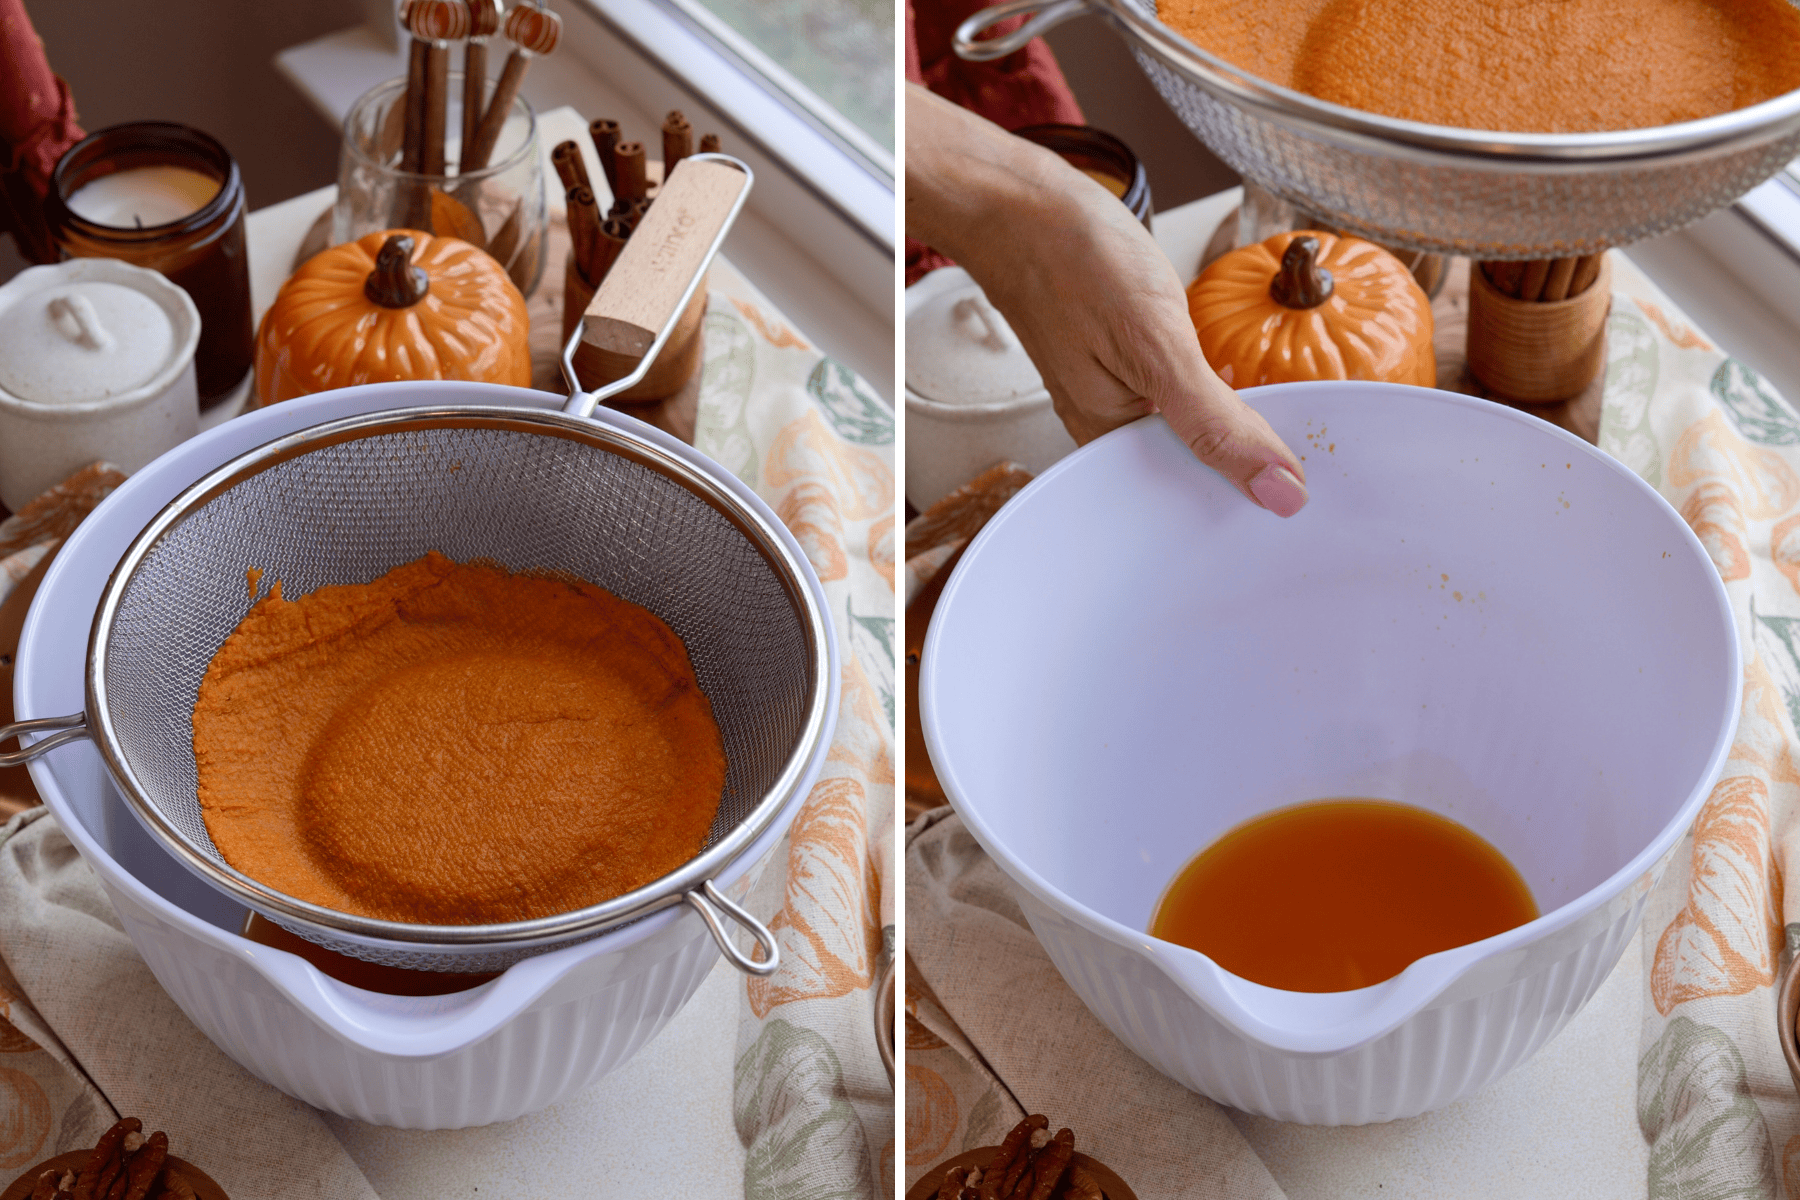
After about 30 minutes, the puree should have drained enough. You can also press down on the weight to help squeeze the excess water out.
Step 3: Make the Cheesecake Batter
While the purée drains, I bring a large pot of water to a boil for the water bath for baking later.
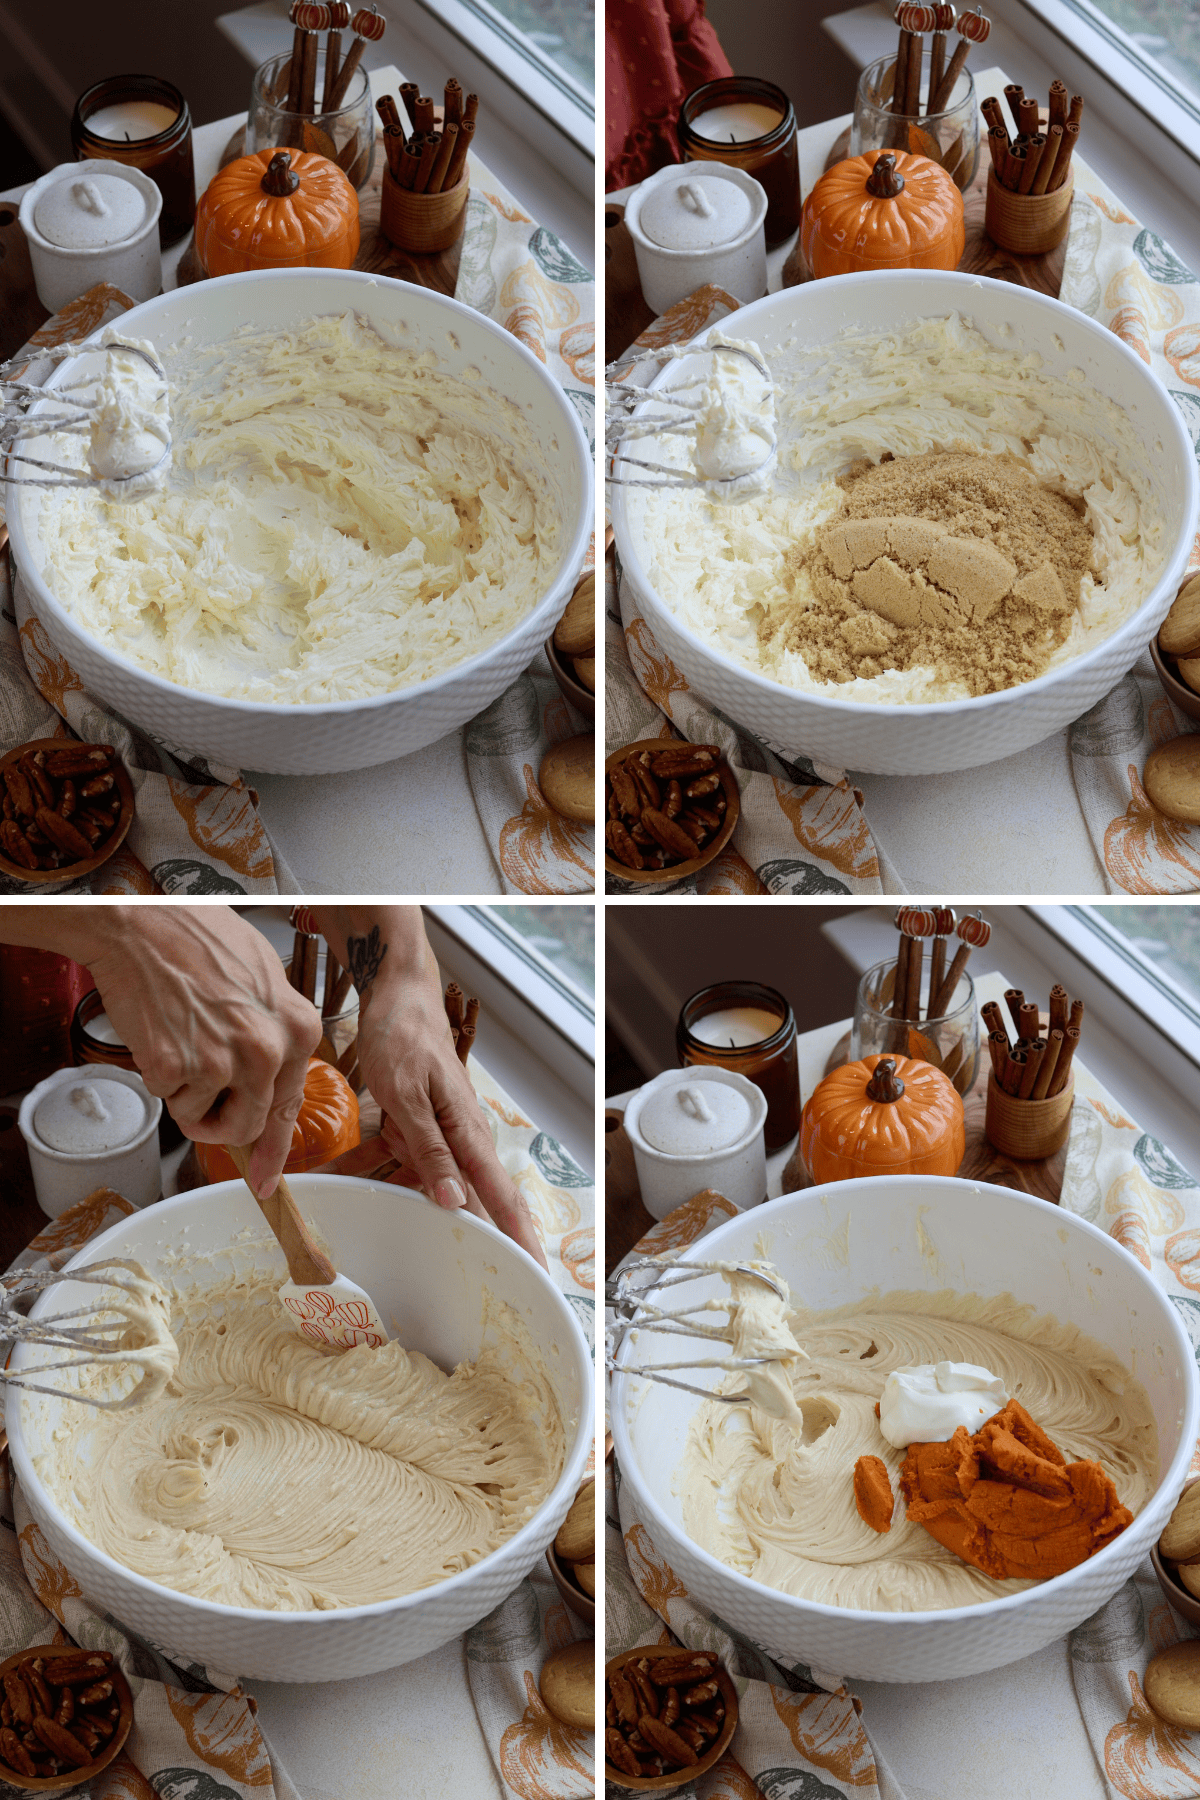
Then, with a hand mixer and a large bowl, I beat the cream cheese until smooth, and mix in the brown sugar just until combined. Then, I add the drained pumpkin purée and sour cream then mix gently.
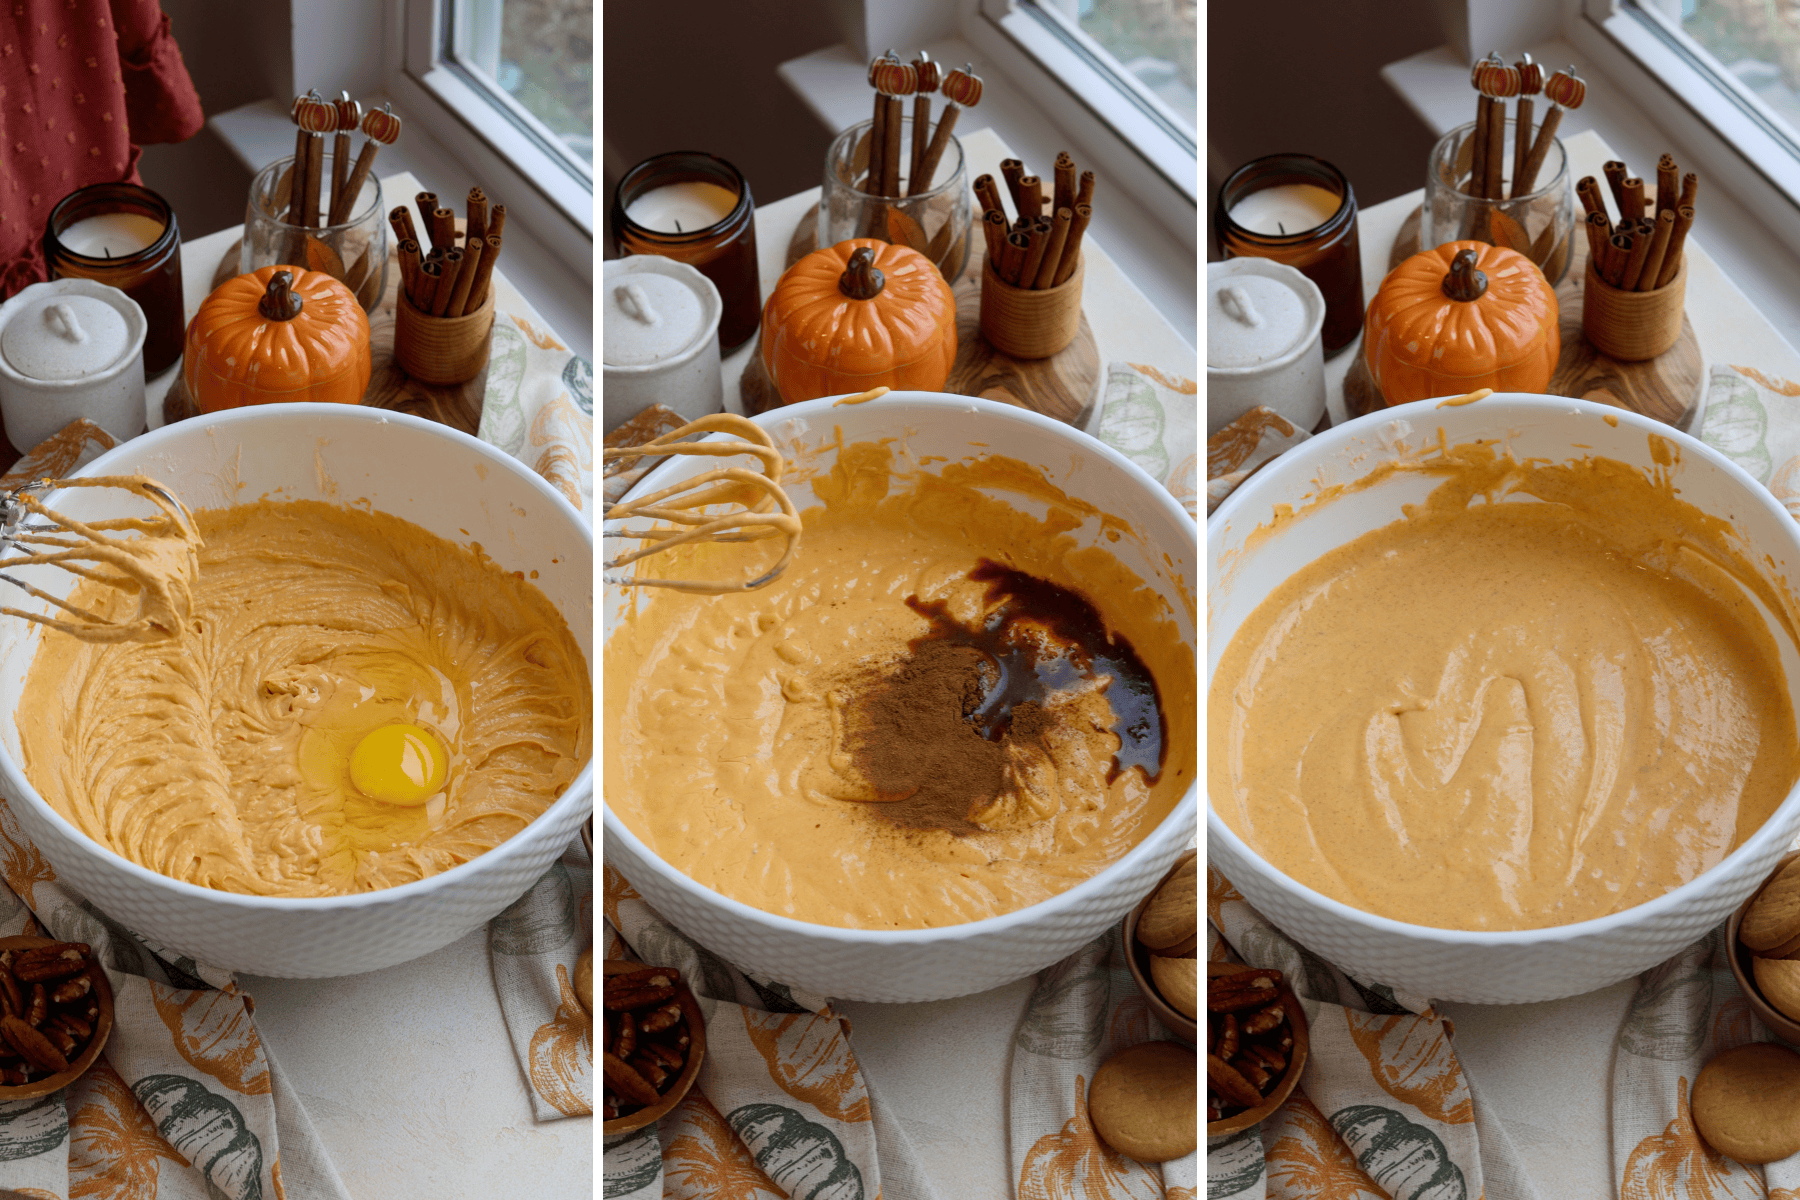
The eggs go in one at a time, and I stop mixing as soon as each is incorporated. This is the point where I’m most careful — too much air here almost guarantees cracks.
Finally, stir in the vanilla extract, pumpkin spice, and salt.
Step 4: Assemble and Bake
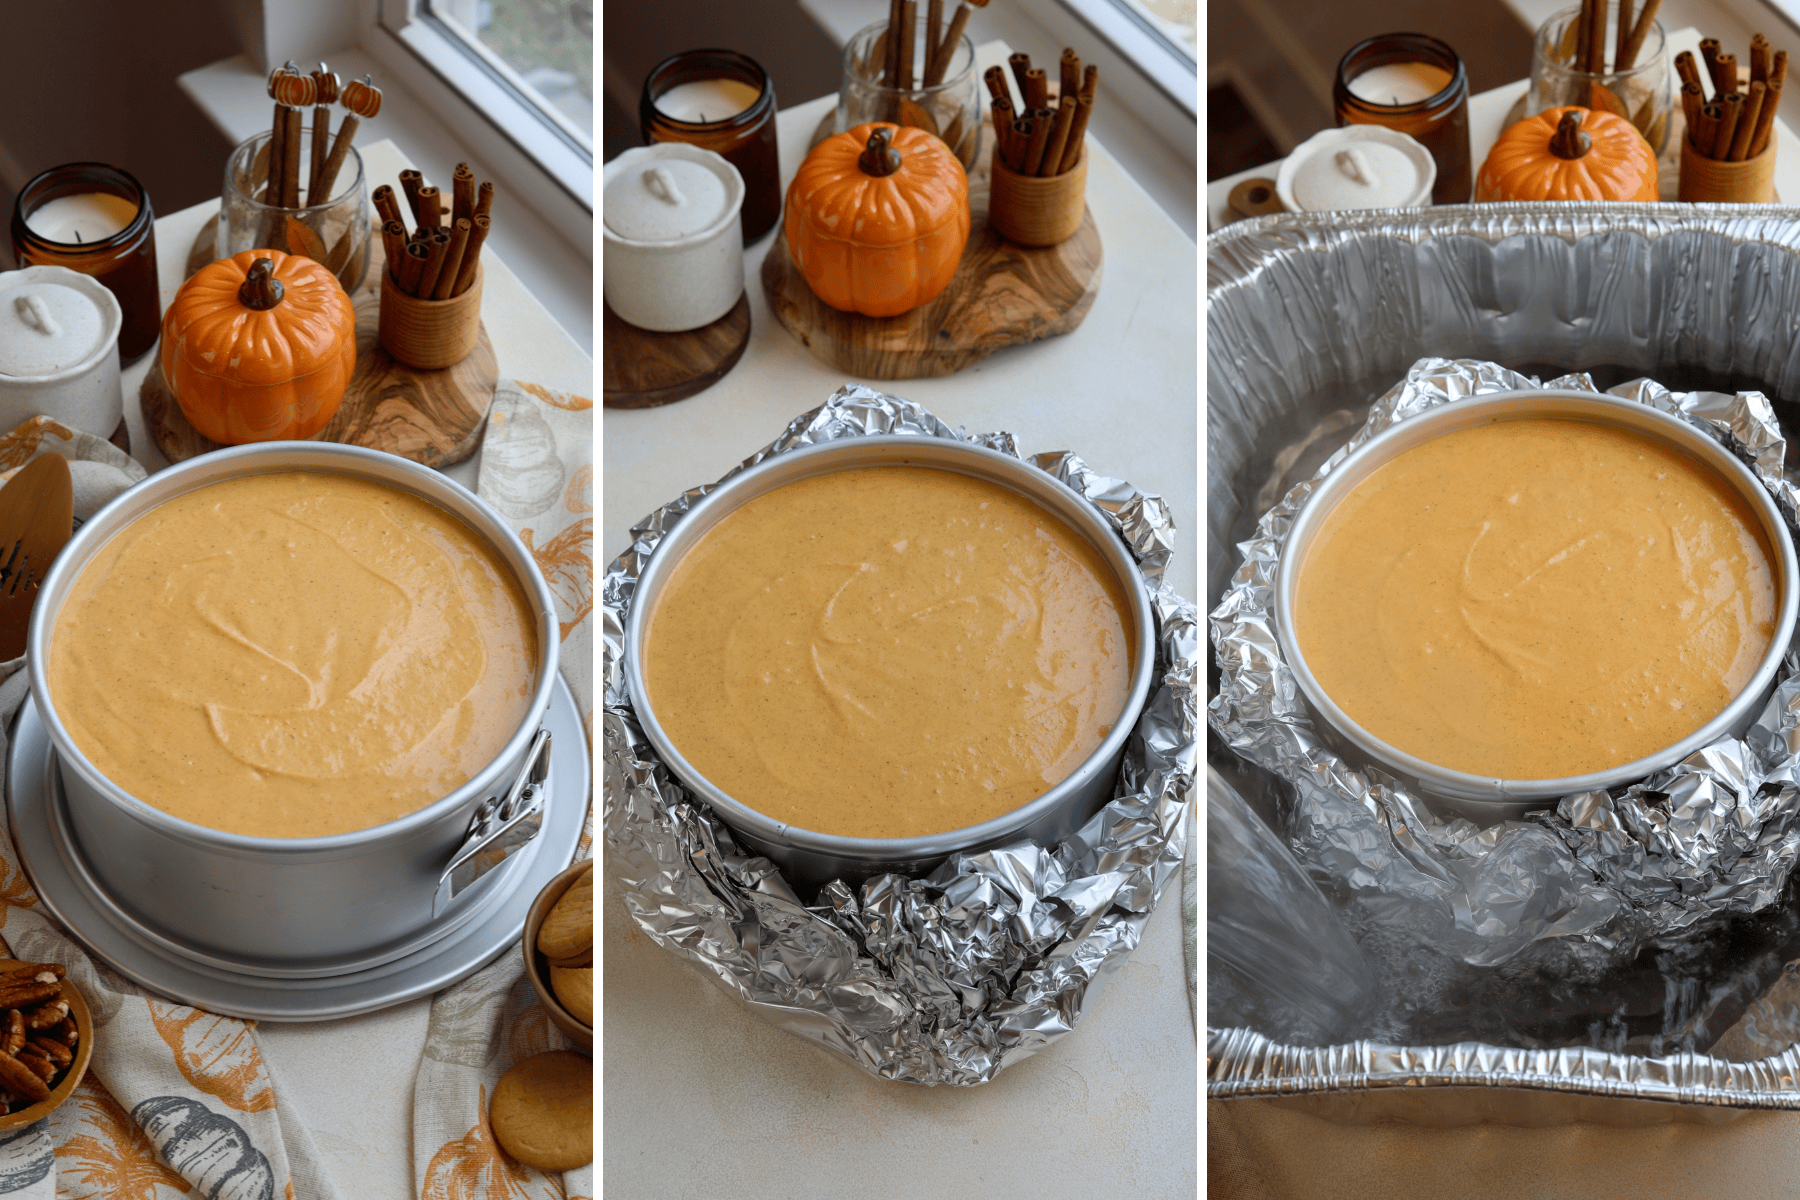
Wrap the bottom of the pan (with the crust) in a few layers of aluminum foil to prevent water from leaking in. Then, pour the cheesecake batter over the cooled crust.
Place the pan in a larger roasting pan and add the boiling water to create a water bath. This helps prevent the cheesecake from cracking by giving gentle/even heat.
Bake the cheesecake in the 325ºF preheated oven for 60 to 75 minutes. The cheesecake should jiggle slightly in the center but look set around the edges when it’s finished. Turn the oven off and leave the cheesecake in the oven for 1 hour to cool gradually. You can slightly prop open the oven door if you like.
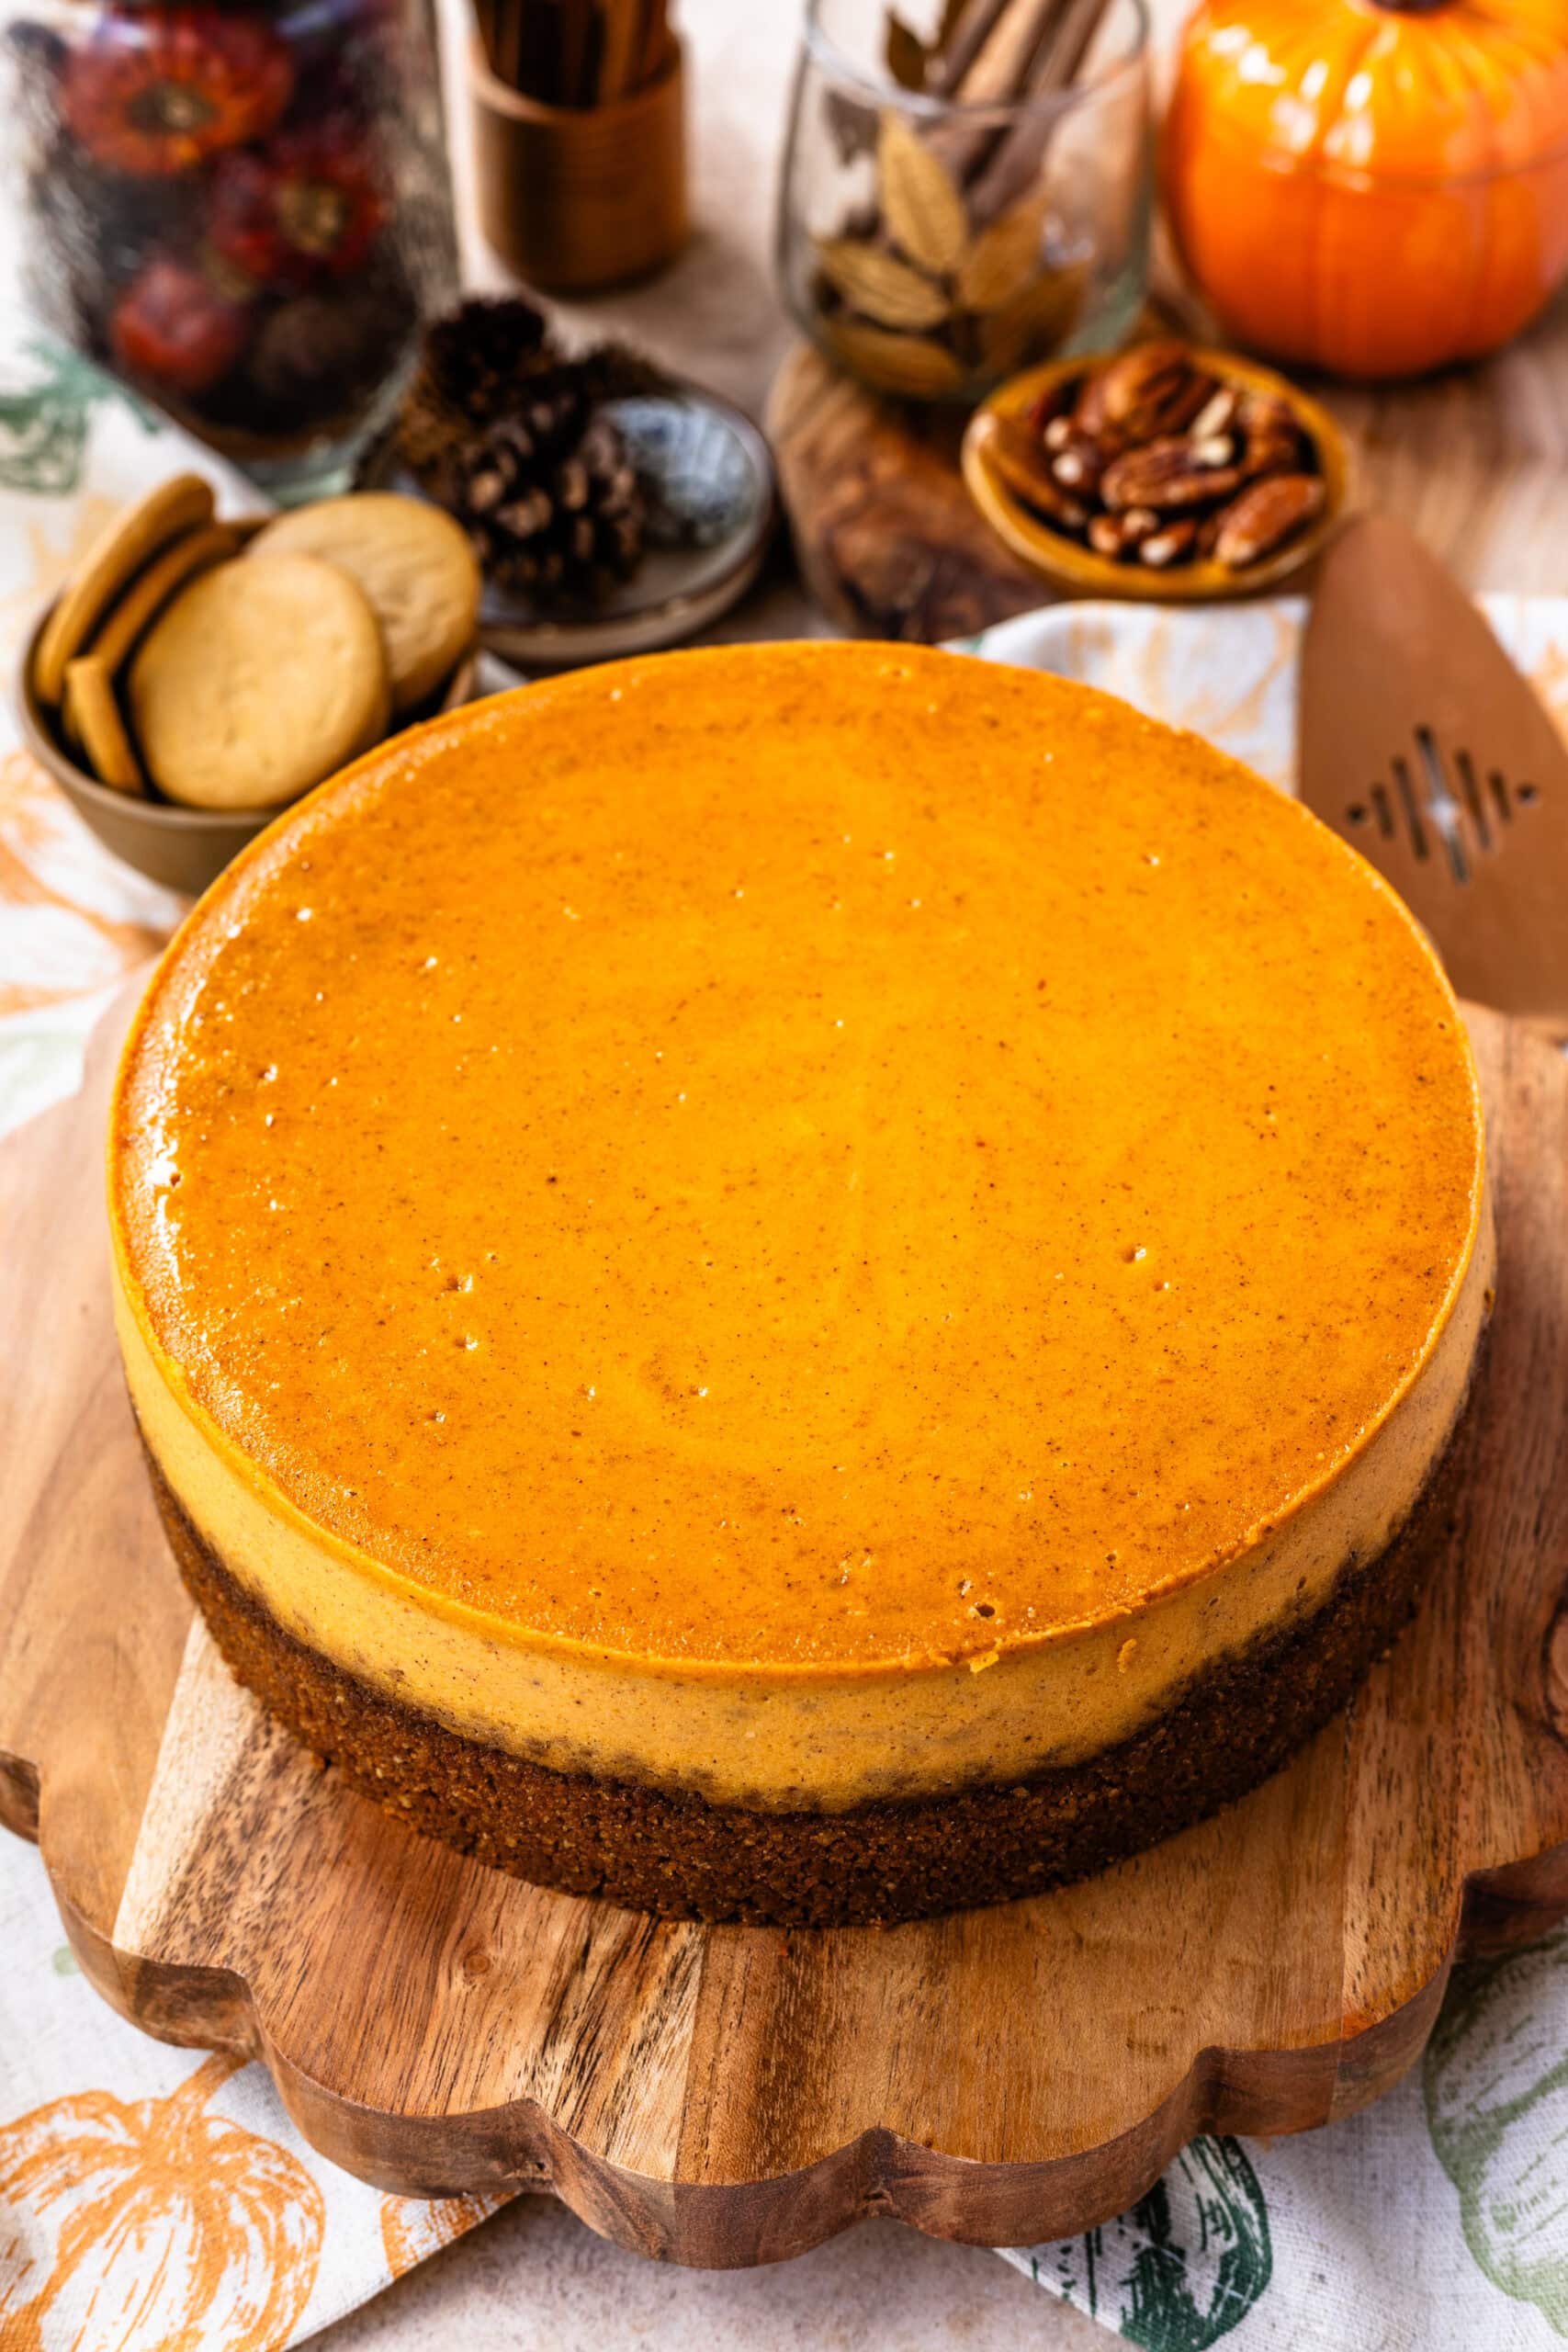
Once fully cooled, I refrigerate it for at least six hours — overnight is ideal — before removing the pan ring.
Step 5: Make the Spiced Whipped Cream
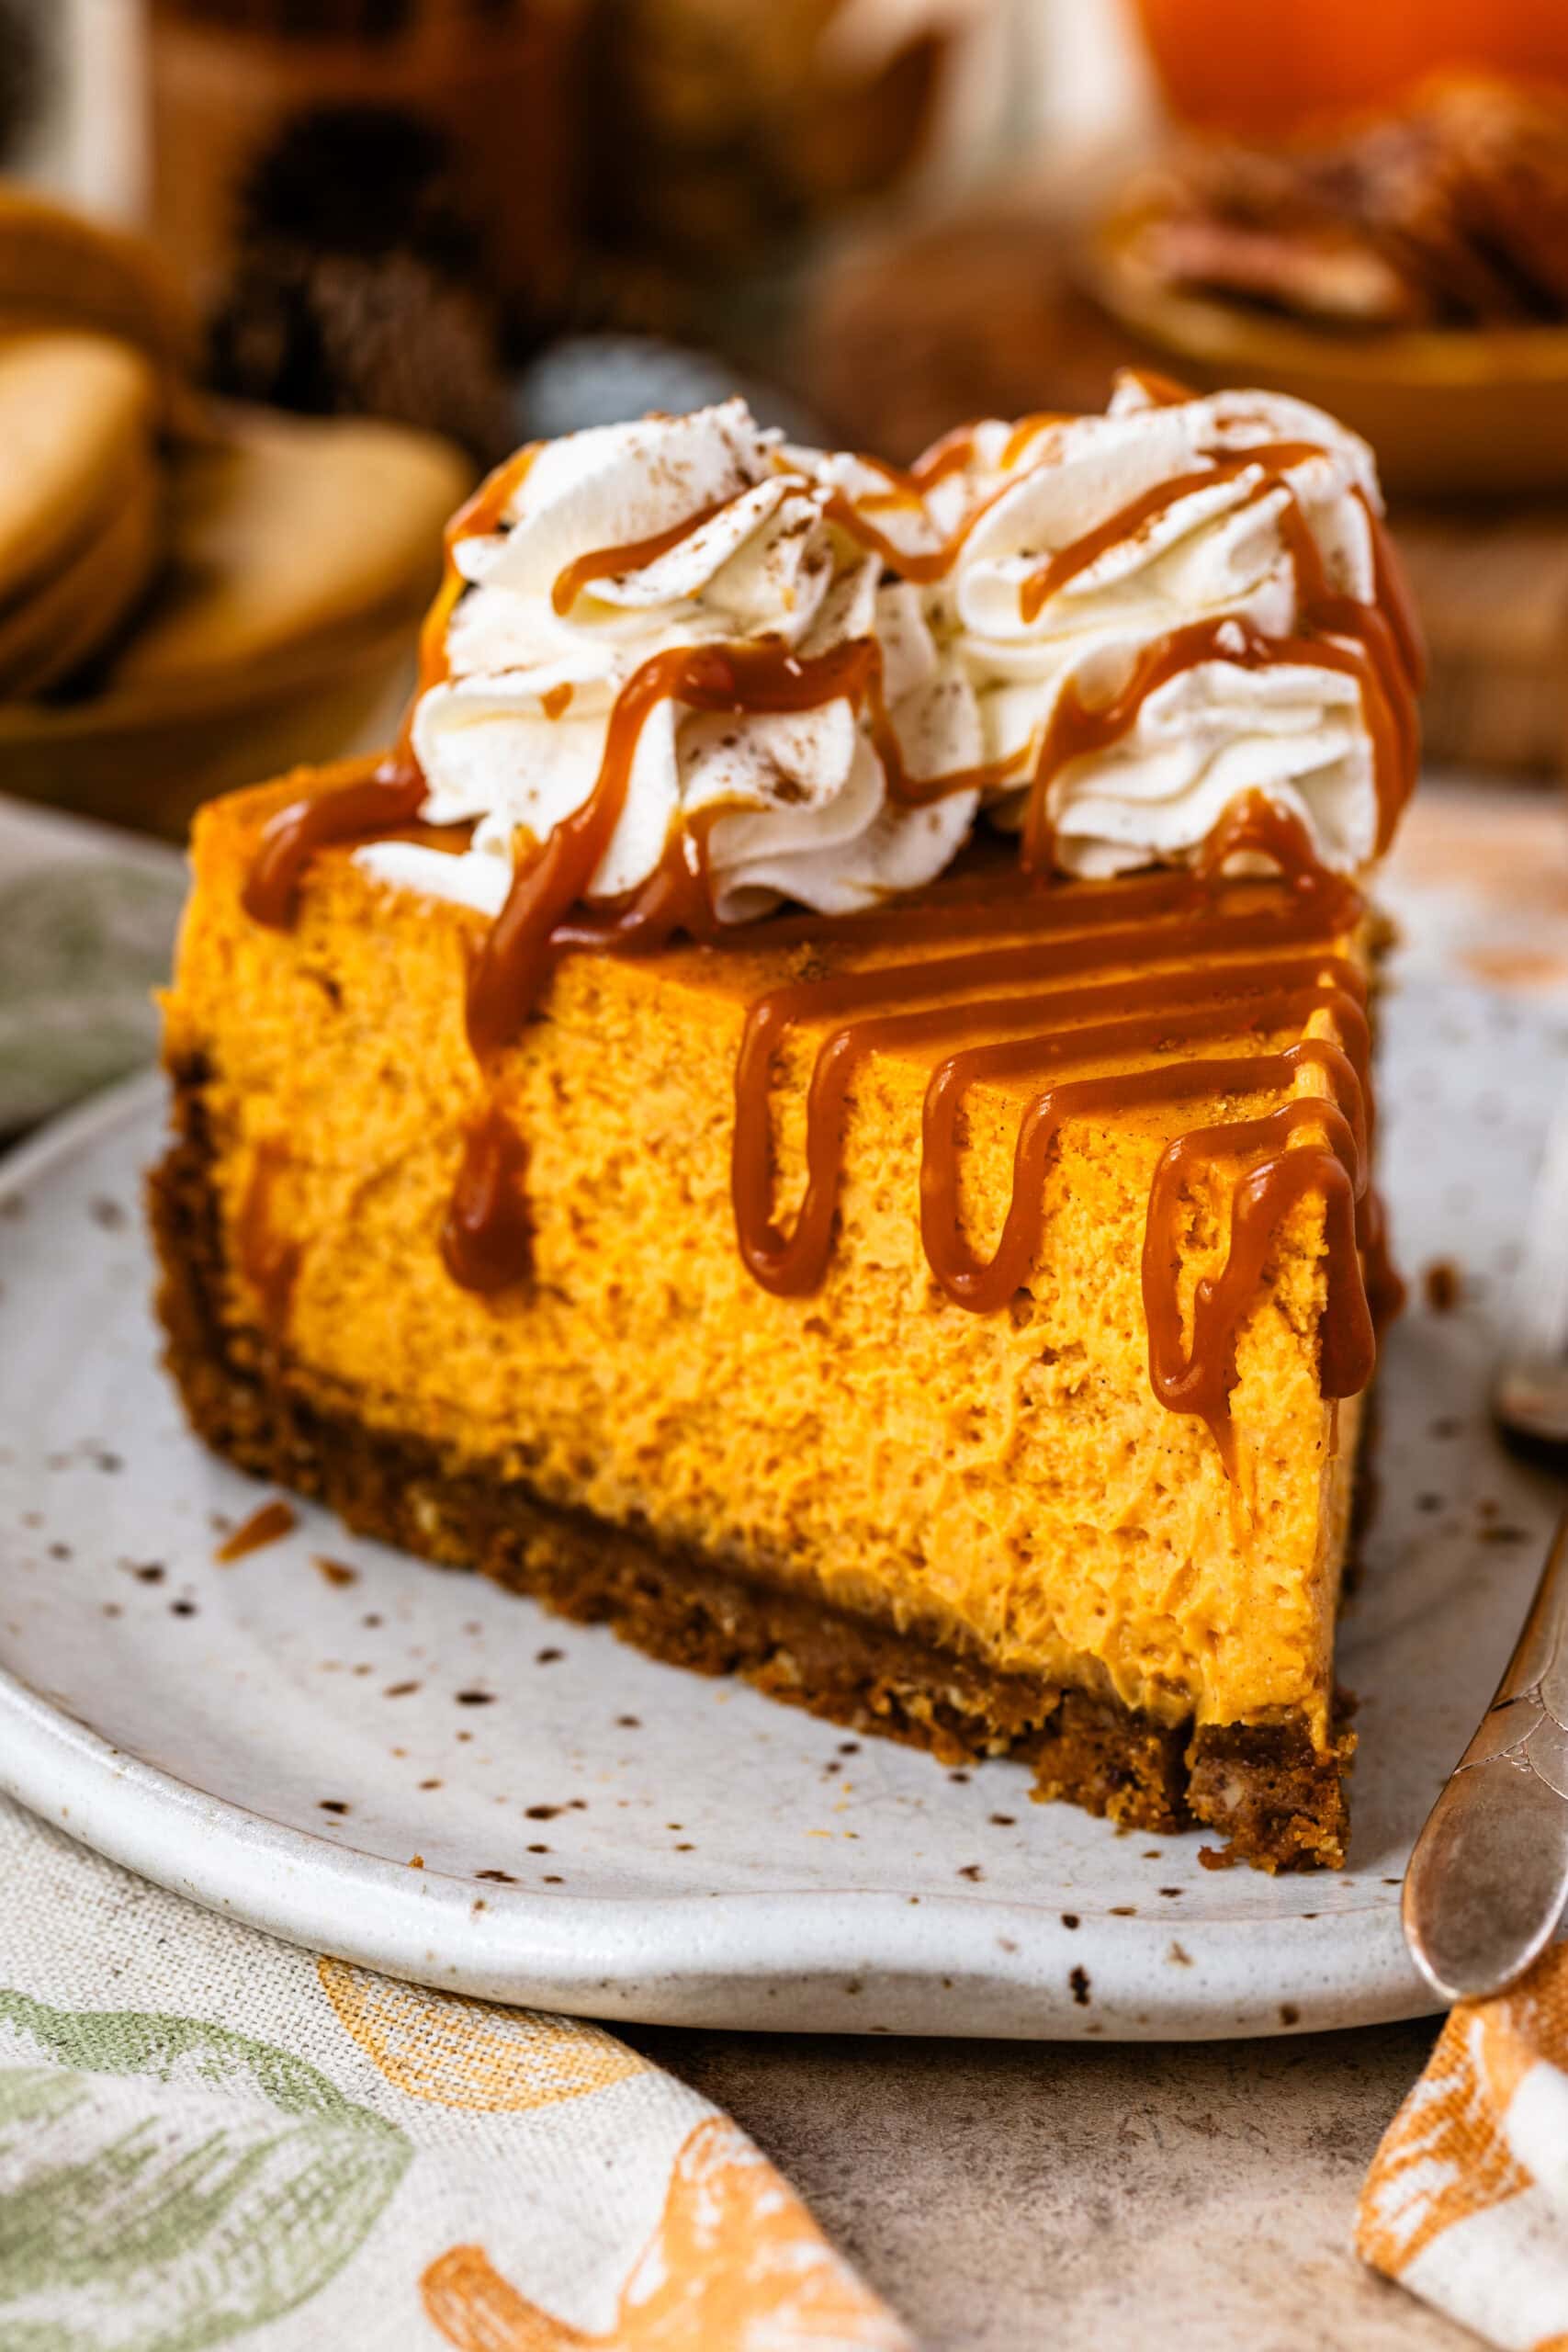
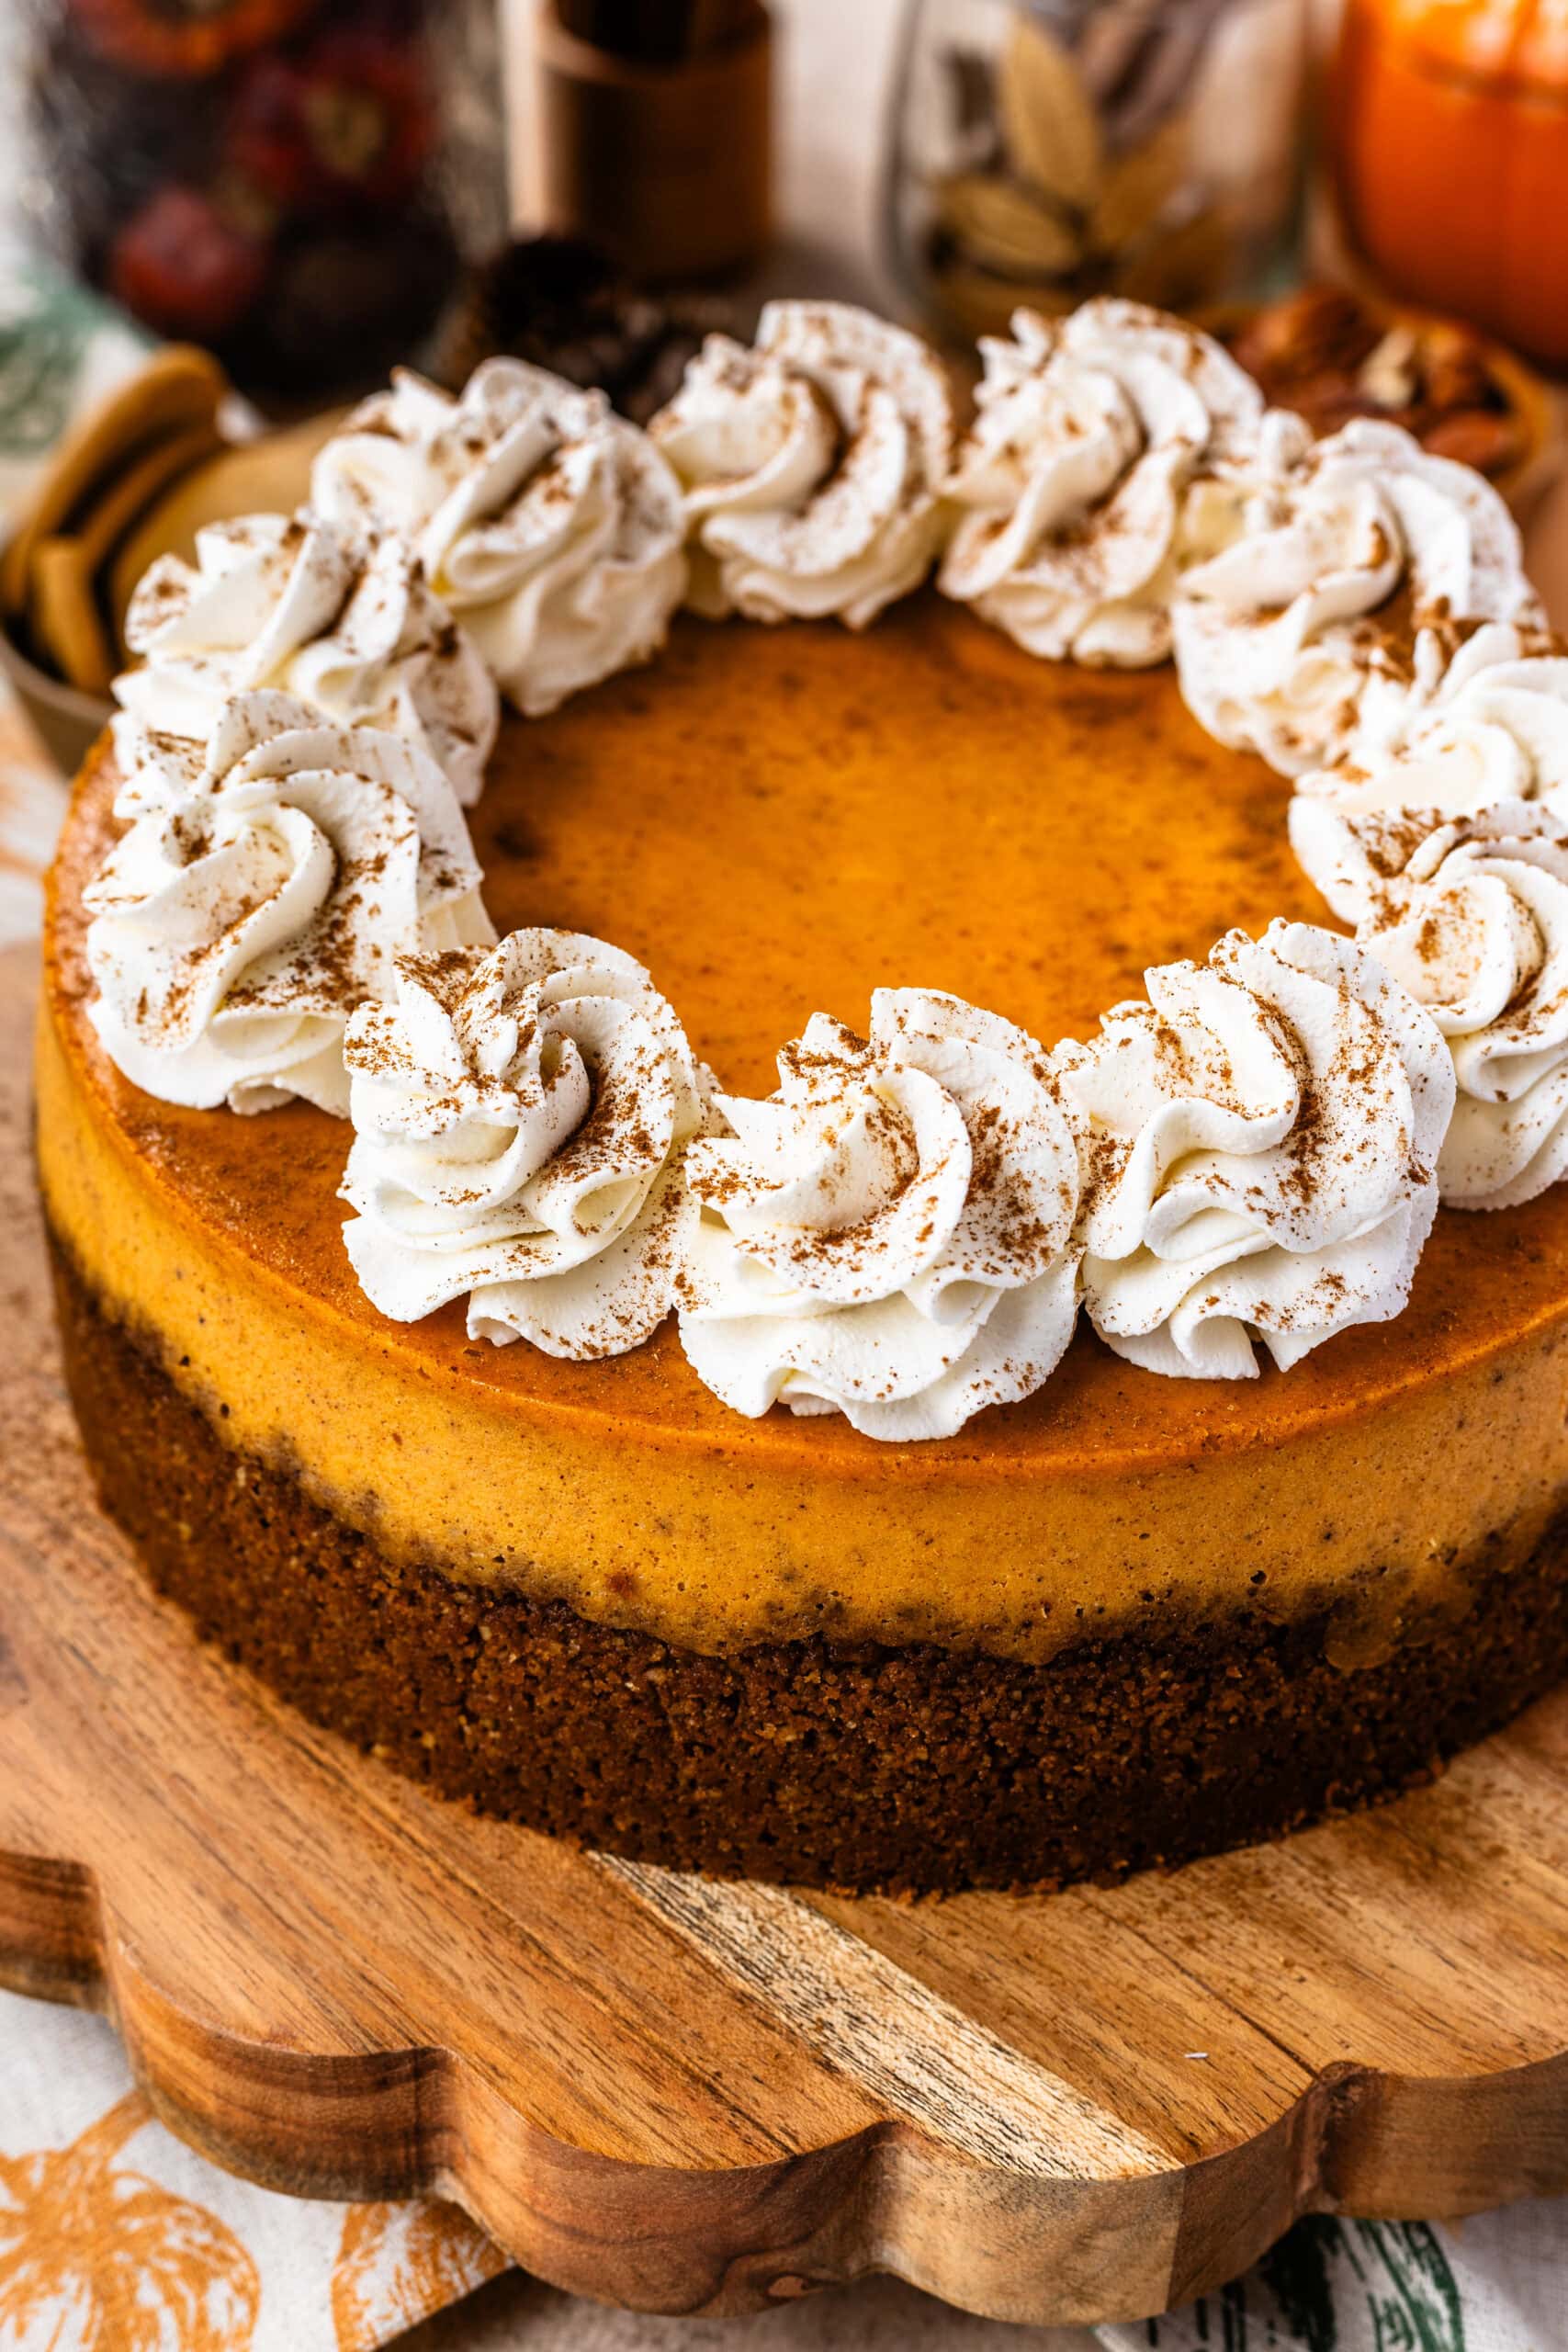
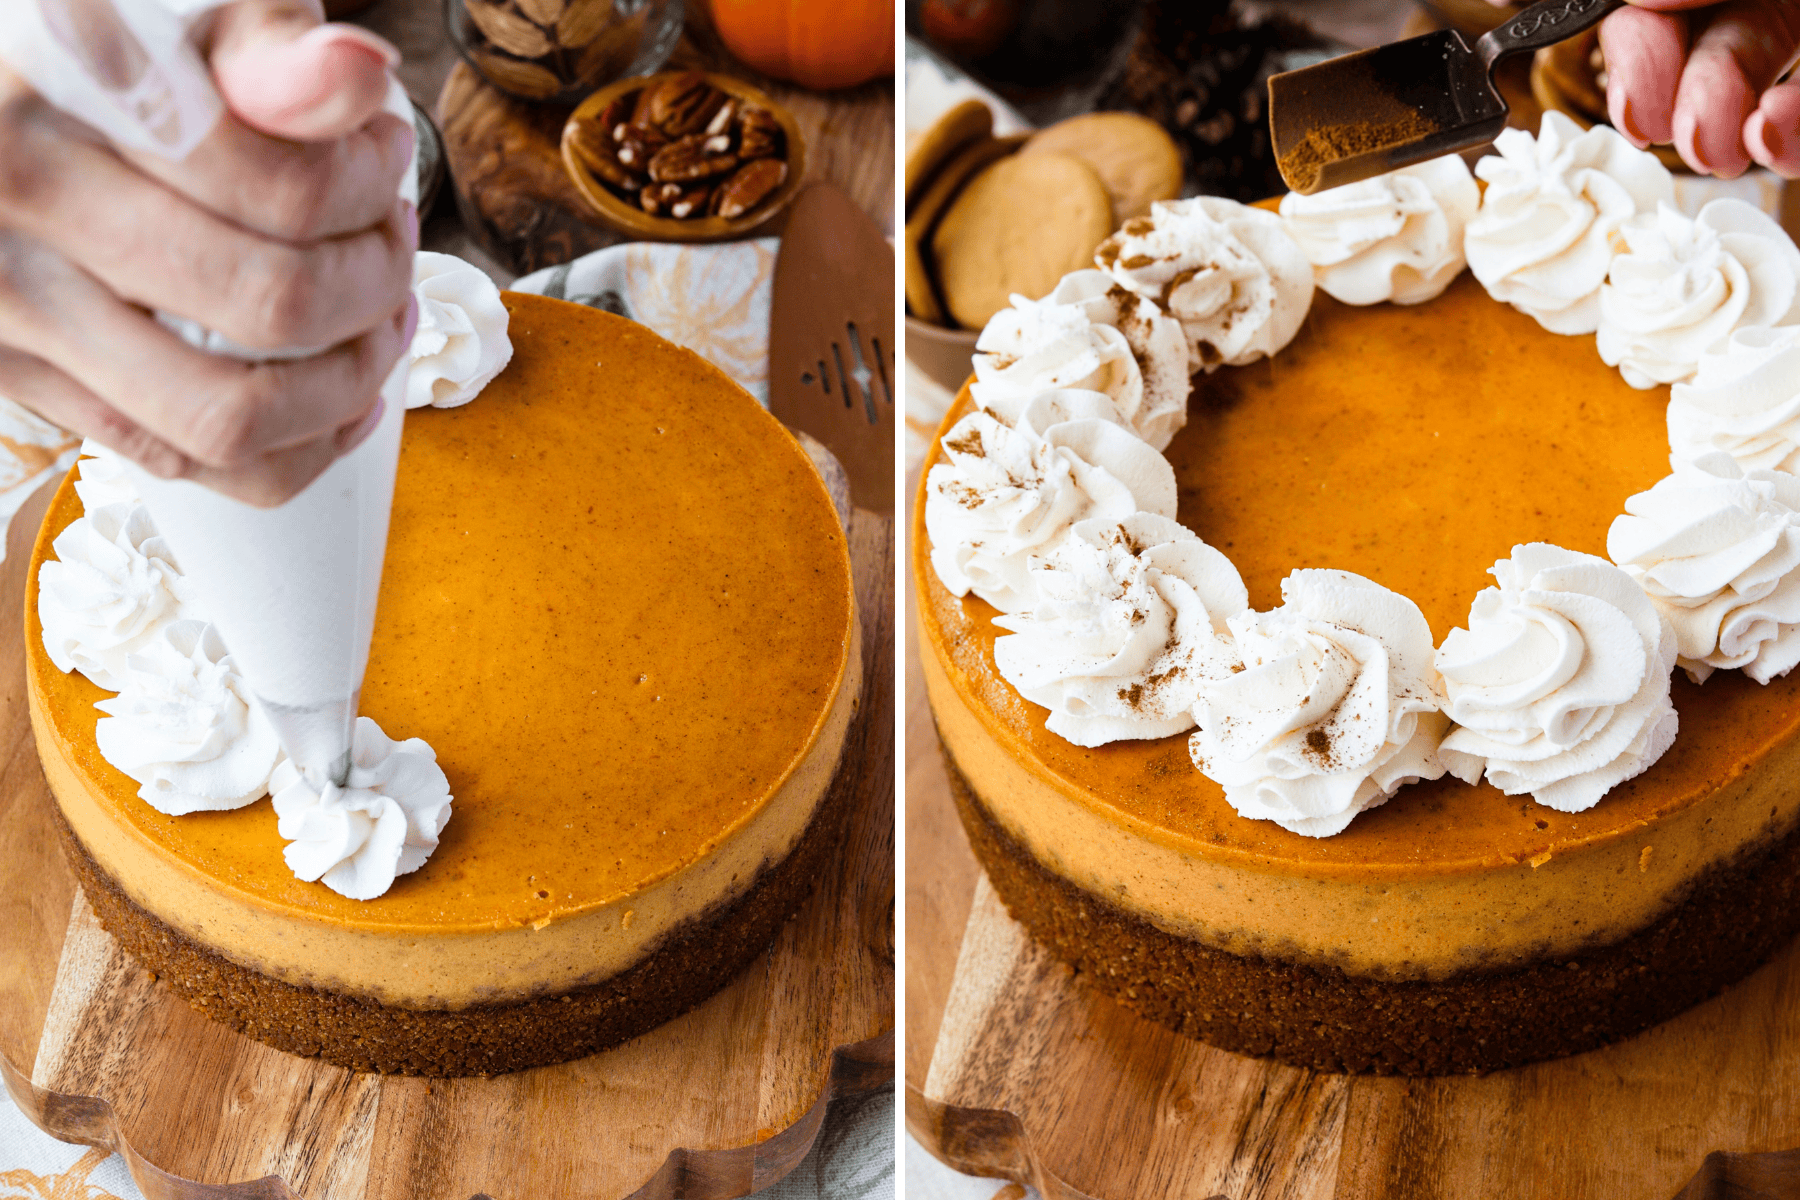
Right before serving, I whip cold heavy cream with powdered sugar and pumpkin spice until stiff peaks form. transfer the whipped cream to a piping bag fitted with your desired tip, and pipe it onto the chilled cheesecake. I used a tip 1M. Other piping tips I like to use are 2D and 4B. Finish the cheesecake by sprinkling a bit more pumpkin spice on top, if desired.
If you want, drizzle caramel sauce or melted Biscoff cookie butter over the whipped cream, and serve. I also have this wonderful pumpkin caramel sauce recipe you might want to try on this cheesecake.
Expert Tips
I already mentioned my Best Cheesecake Tips guide, but here are some more ways to get this recipe right!
- Tap the pan once before baking: After pouring in the batter, I gently tap the pan on the counter to release any large air bubbles. It’s a small step that helps keep the surface smooth.
- Check doneness by watching the edges, not the timer: I start checking early and focus on the outer ring — once it looks set and slightly puffed, the center will finish setting as it cools.
- Run a thin knife around the edge after baking: Once the cheesecake comes out of the oven and is still warm, I gently loosen the edge from the pan. This reduces tension as it cools and helps prevent cracks.
FAQs
No. Pumpkin pie filling has added sugar and spices, which would throw off the texture and flavor. Use pure pumpkin purée only.
Cracks usually come from over-mixing, over-baking, or skipping the water bath. Mix the batter just until combined—especially after adding the eggs. Bake until the edges are set, but the center still jiggles slightly, and always cool the cheesecake gradually in the oven.
I highly recommend you do. Pumpkin purée holds a lot of moisture, and excess liquid can make the cheesecake dense, gummy, or wet in the center. Draining for 20–30 minutes improves texture and prevents the filling from separating.
You can use a graham cracker crust, or a biscoff crust from this recipe.
Absolutely. In fact, cheesecake tastes best when chilled overnight. You can make it 1–2 days ahead and add the whipped cream just before serving.
If you make this pumpkin cheesecake, I’d love to know how it turned out. Leave a comment or rating below — it helps other bakers know what to expect. And if you share it on Instagram, feel free to tag me so I can see your bake.
Pumpkin Cheesecake Recipe
Ingredients
Pecan Gingersnap Crust
- 2 cups gingersnap crumbs 292 grams
- 1/2 cup pecans 50 grams
- 1/4 cup brown sugar 55 grams
- 1/4 tsp pumpkin spice
- 5 tbsp unsalted butter 70 grams
Pumpkin Cheesecake Batter
- 1 1/2 cup pumpkin puree 340 grams
- 680 grams cream cheese room temperature (3 packages of 8 oz)
- 1 1/4 cup brown sugar 275 grams
- 3 large eggs room temperature
- 1 large yolk
- 1/3 cup sour cream 80 grams
- 2 tsp pumpkin spice
- 1 tbsp vanilla
- 1/2 tsp salt
Spiced Whipped Cream
- 1 cup heavy whipping cream
- 1 tbsp powdered sugar
- 1/2 tsp pumpkin pie spice
Topping
- Caramel sauce recipe here
Instructions
Pecan Gingersnap Crust
- Pre-heat the oven to 325ºF.
- Place the gingersnap cookies in a food processor along with the pecans, and process to obtain fine crumbs. Transfer to a large bowl, add the brown sugar and the pumpkin spice and stir to combine.
- Melt the butter in the microwave and pour in the bowl with the cookie crumbs. Stir to combine.
- Press the mixture on the bottom of an 8” or 9” cheesecake pan. If using an 8” pan, it must be deep.
- Bake the crust in the oven for 15 minutes, or until slightly golden brown.
- Remove it from the oven and let it cool down.
Pumpkin Cheesecake Batter
- Measure out the pumpkin puree, pour it on a fine mesh strainer, it must be fine. If you don’t have a fine mesh strainer, you can use a regular strainer lined with cheesecloth. Place a couple of layers of paper towels on top of the puree, and place something heavy on top, like a small plate topped with a can of pumpkin puree, a can of beans, or a bowl filled with water to put some weight on top of the pumpkin puree. Set aside for at least 30 minutes, you can press down occasionally to help drain the puree. This will eliminate any excess liquid and prevent the cheesecake from becoming watery.
- Bring a large pot of water to a boil as you start making the cheesecake, to make the water bath.
- Beat the cream cheese for 3 minutes with a mixer at medium speed, until creamy.
- Add the brown sugar to the cream cheese and beat for another 2 minutes at medium speed.
- Scrape the bowl and beat for another 30 seconds.
- Add the pumpkin puree and the sour cream, and mix to combine.
- Make sure to scrape the bowl a few times during the mixing process, to avoid the cream cheese from forming lumps in the batter.
- Add the eggs to the batter, one at a time, mixing until incorporated before adding the next egg. Avoid over mixing once the eggs are added, to prevent cracking of the cheesecake.
- Add the vanilla, pumpkin spice, and salt. Mix to combine.
- Grease the sides of the cheesecake pan.
- Pour the cheesecake batter in the pan, over the baked and cooled crust. Wrap the bottom of the pan with a few layers of foil.
- Place the pan in a larger roasting pan, and add hot water to the roasting pan, to form a water bath. This is very important so the cheesecake doesn’t crack.
- Bake the cheesecake in the pre-heated 325ºF oven for 60 to 70 minutes.
- To check if the cheesecake is done baking, give the pan a little wiggle, it should jiggle slightly in the center, but the edges should look set. Time baking depends on your oven, and if it runs low or high in temperature.
- Turn the oven off, and leave the cheesecake in there for 1 hour.
- Remove the cheesecake from the oven and place it in the fridge for at least 6 hours. Don’t remove the ring from the pan until after the cheesecake is done chilling.
Spiced Whipped Cream
- Right before serving the cheesecake, beat the cold whipping cream with the powdered sugar and pumpkin spice in the bowl of a mixer for about 2 to 3 minutes, or until stiff peaks form.
- Place it in a piping bag lined with the tip of your choice, I used tip 1M.
To Decorate/Top
- Pipe the whipped cream on top of the cheesecake, sprinkle more pumpkin spice on top if desired.
- Serve with caramel sauce, or melted Biscoff cookie butter.
This turned out sooo good!!
I’m so happy to hear that 🙂
I made this yesterday to serve today for Thanksgiving. I got multiple compliments! Thank you!!
That’s so awesome. I love to hear that! Thank you!
I accidentally used pumpkin pie can not pumpkin puree….. I got two but one must’ve been mixed in on the shelf…. is this going to ruin the cheesecake?
It should be just fine.
What are your thoughts on making these into individual cupcake cheesecakes? Do you have any recommendations on how to so?
Steps for Individual Cupcake Cheesecakes
Crust:
Prepare the crust as instructed
Portion the Crust: Line a muffin tin with cupcake liners and press about 1–2 tablespoons of the crust mixture into the bottom of each liner. Use the back of a spoon or a small glass to press it down firmly.
Pre-Bake: Bake the crusts in a preheated 325°F oven for about 5–7 minutes. Let them cool while you prepare the batter.
Cheesecake Batter:
Prepare the Batter: Follow the recipe to make the batter, ensuring the cream cheese and eggs are at room temperature to avoid lumps.
Portion the Batter: Divide the batter evenly among the cupcake liners, filling each about 3/4 full.
Baking:
Use a Water Bath (Optional): Place the muffin tin inside a larger baking pan and pour hot water into the larger pan, creating a water bath. This helps prevent cracking but can be skipped for convenience with cupcakes.
Bake: Bake in a 325°F oven for about 20–25 minutes. The centers should jiggle slightly when you gently shake the tin, but the edges should be set.
Cool Gradually: Turn off the oven and crack the door open, allowing the cheesecakes to cool slowly for 30 minutes. Then transfer them to a wire rack to cool completely.
Chilling:
Refrigerate the mini cheesecakes for at least 4–6 hours or overnight before serving to ensure they are set.
Topping:
Prepare the spiced whipped cream as per the recipe and pipe it onto the cooled cheesecakes using a piping bag fitted with your favorite tip.
Drizzle caramel sauce or melted Biscoff cookie butter on top for a finishing touch.
Notes:
Yield: This recipe should yield approximately 24–30 mini cheesecakes, depending on how much batter you use per liner.
Storage: Store the mini cheesecakes in an airtight container in the fridge for up to 4–5 days or freeze for up to 2 months.
By making them into cupcakes, you get perfectly portioned desserts that are great for serving at gatherings or gifting!
The cupcake version turned out amazing and was huge hit at the office gathering. I’m going to make another batch for my family Christmas gathering. This time I will be making them jumbo size cupcakes using fancy liners. Thank you so much sharing the conversation suggestion.
Merry Christmas!
Any recommendations on how I’d this would work with sugar free substitutions?
Here’s how you might adapt this recipe with sugar-free substitutions:
Pecan Gingersnap Crust
Gingersnap Crumbs: Look for sugar-free gingersnaps (often available in specialty stores or online), or make a keto-friendly alternative if you’re open to it.
Brown Sugar Substitute: Use a sugar-free brown sugar replacement, such as Swerve Brown or Lakanto Golden, at a 1:1 ratio. – I will say though, that I have not experimented with these sugar substitutes for this recipe, and I have no idea if it will taste great.
Pumpkin Spice & Butter: These can stay the same, as they don’t contain sugar.
Pumpkin Cheesecake Batter
Pumpkin Purée, Cream Cheese, Sour Cream, Pumpkin Spice, Vanilla, Salt, Eggs, and Yolks: These ingredients don’t contain sugar, so they don’t need substitution.
Brown Sugar Substitute: Again, use Swerve Brown or Lakanto Golden for the 1 1/4 cups of brown sugar.
Spiced Whipped Cream
Powdered Sugar Substitute: Replace the powdered sugar with a sugar-free powdered sweetener like Swerve Confectioners or Lakanto Powdered.
I made this recipe this weekend with the crust made out of Biscoff. The filling is a very creamy texture. A perfect cheesecake with a fall twist. If you like pumpkin pie you will like this one.
Yay!! I’m so glad to hear!! Thank you Stacy!!
Delicious! All other pumpkin cheesecakes I’ve tried always felt like something was missing but this was a 10/10.
That’s awesome to hear Lucy!! Thank you!
Camila, how do I make the pumpkin puree at home? Just blend it..? The weight of puree in the recipe is before or after removing extra liquid, please? Thank you!
My crust seems to always get stuck in the pan when I slice the cheesecake. Any thoughts on why?
It could be the pan you are using.
Rose, I cut a circle of parchment to fit the removable bottom of the springform pan for easy removal. Spray the bottom of the pan with nonstick cooking spray, place the parchment circle down, then make the crust as directed.