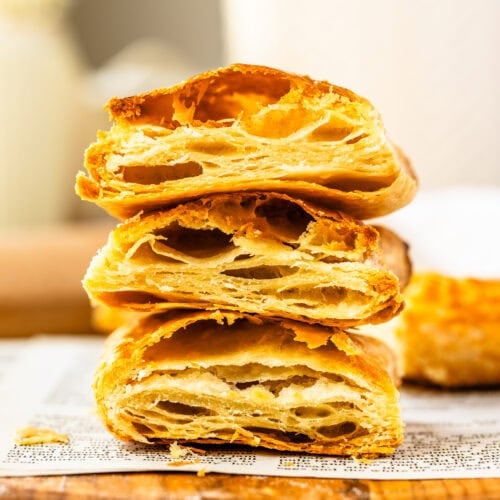
Puff Pastry Dough
Hello friends! Today, I’m sharing with you a classic recipe for homemade Puff Pastry Dough, a labor of love that results in buttery, flaky layers perfect for both sweet and savory dishes. Whether you’re making a fruit tart, a savory pie crust, or delicious pastries, this versatile dough will elevate any recipe. With just a few simple ingredients and a little patience, you can create your own puff pastry that rivals store-bought puff pastry.
This recipe pairs perfectly with a bunch of other puff pastry recipes I have on the blog. If you’re new to making puff pastry, I have an all inclusive Puff Pastry Guide that gives you all the details on getting the perfect puff every time!

Best Homemade Puff Pastry Dough Recipe
In this post, I’ll guide you step-by-step through making puff pastry from scratch. You’ll learn the importance of cold butter, proper folding techniques, and tips to ensure the dough turns out light and flaky. I’ll also provide some handy storage tips and variations to inspire your baking adventures.
This post may contain affiliate links. I earn a commission from qualified purchases. Please read our Privacy policy here.
Full recipe ingredients and instructions can be found on the bottom of this post! This recipe yields about 1 pound of dough.
Mixing the Dough
Start by placing the butter in the freezer for about 15 minutes. This ensures it remains cold while working it into the dough, which is essential for creating those flaky layers in the puff pastry.
Meanwhile, mix the flour, sugar, and salt in a large bowl. Once the butter is cold, use a cheese grater to grate it directly over the flour mixture. (Alternatively, you can use a food processor—see the notes below for details.) Use a fork or spatula to gently combine the butter with the flour mixture.

Next, slowly add 7 tablespoons of ice cold water, gently stirring with a spatula to bring the dough together. If there’s still dry flour in the bowl, add another tablespoon of water. The dough should still look crumbly, but when pressed, it should begin to hold together.

Transfer the crumbly dough to a lightly floured work surface and pat it down. Use a bench scraper to cut the dough in half, stack one half on top of the other, and repeat this process five times. Although the dough will look quite rough at first, it will begin to come together with each fold.
After the final fold, pat the dough into a rough square, wrap it in plastic, and place it in the fridge to chill for 30 minutes.

Dough Folding
Once the dough has chilled for 30 minutes, remove it from the fridge and place it on a floured surface. Roll the dough into a rectangle that’s about 10 inches long. Fold it into thirds, like folding a letter.

Rotate the dough 90 degrees and repeat the rolling and folding process six times. If the dough sticks to the surface, change out the parchment paper or add just a little more flour to prevent sticking.
After the final fold, press the dough gently to pack it together, then wrap it in parchment paper followed by plastic wrap. Chill the dough for at least 2 hours, or overnight if possible.
After chilling, the puff pastry is ready to use in any recipe that calls for puff pastry.

The puff pastry dough can be stored in the fridge for up to 3 days. For longer storage, place the dough in a ziploc bag and freeze it for up to 2 months. When ready to use, simply thaw the dough overnight in the fridge.
When ready to use, remove from the fridge and portion out the amount of dough you need for the recipe. This recipe makes about 1 lb. of dough.

Tips & Tricks
- Keep Everything Cold: Cold ingredients are key to flaky puff pastry. If the butter or dough gets too warm while you’re working, pop it in the fridge/freezer for 10-15 minutes to firm up before continuing. Warm butter will melt into the dough rather than creating distinct layers.
- For the best results, use high-quality butter: Avoid margarine, as it won’t give you the same flaky, flavorful results.
- Using a Food Processor: For a quicker method, you can use a food processor to make the dough. Before freezing, cut the butter into small cubes and freeze them. Then, place the flour, sugar, and salt in the food processor and pulse a few times to combine. Add the frozen butter cubes and pulse about 10 to 15 times, until the mixture resembles coarse crumbs. Add the ice water and pulse a few more times, being careful not to over-process the dough. From there, proceed with the instructions as written, starting from the step where the dough is transferred to the counter for folding.
- Use Flour Sparingly: While you need some flour to prevent sticking, too much can make the dough tough. Lightly flour your work surface and rolling pin, and brush off excess flour with a pastry brush before folding.
- Resting Time is Crucial: After each set of folds, allow the dough to rest in the fridge. This lets the gluten relax and keeps the butter firm, which is essential for achieving the flaky layers puff pastry is known for.

How to Use Homemade Puff Pastry Dough
Homemade puff pastry is a game-changer in the kitchen. Once you’ve mastered making this flaky, buttery dough, the possibilities are endless. Here’s how to put your homemade puff pastry to delicious use:
- Savory Pies and Tarts: Puff pastry makes an excellent base for savory pies, tarts, and quiches, such as this Tomato Tart recipe (coming soon). You can line a pie tin or tart pan with the dough, fill it with your favorite ingredients such as sautéed spinach and feta, mushrooms and gruyère, or a simple ham and cheese combo, then bake until the pastry is golden and crisp. The light, flaky layers will add a buttery richness to any savory dish.
- Sweet Pastries and Danishes: For a sweet treat, puff pastry is your best friend. Here are many ideas for Puff Pastry Desserts you can make. You can roll it out and fill it with fruit compote, chocolate, or sweetened cream cheese, then fold and bake for an easy yet impressive dessert. Add a sprinkle of sugar or a brush of egg wash for a golden finish. Classics like apple turnovers or homemade Danishes are elevated with the use of freshly made puff pastry. I have many ideas for homemade puff pastry here.
- Appetizers and Finger Foods: Puff pastry is a versatile option for appetizers and small bites. Cut it into squares, fill with cheese and herbs, or wrap it around sausage for a delicious twist on pigs in a blanket. You can also create delicate cheese straws by rolling the dough with grated cheese and baking them until crisp. These make for perfect party snacks that are sure to impress. Check out this delicious Spinach and Bacon Puffs recipe (coming soon).
- Galettes and Rustic Pies: If you’re looking for a more casual approach, roll out your puff pastry to make a rustic galette. Simply place your filling in the center of the dough, fold the edges over the filling, and bake. You can use the filling from this Strawberry Rhubarb Galette, or this Mixed Berry Galette.
Using your homemade puff pastry elevates any dish, offering the rich, buttery layers that store-bought versions often lack. Whether sweet or savory, your freshly made dough will bring a flaky, crisp texture to every bite. Keep a batch in your freezer to pull out whenever inspiration strikes, and you’ll always have the base for something delicious!

Use this Puff Pastry Dough in these recipes:
- Cream Cheese Puff Pastry
- Puff Pastry Pinwheels
- Blueberry Puff Pastry
- Cherry Turnovers
- Boston Cream Puff Pastry
- Mascarpone Puff Pastry
- Key Lime Puff Pastry
This homemade puff pastry recipe is a bit of a time commitment, but the flaky, buttery layers you’ll achieve are absolutely worth it! Perfect for light and crisp appetizers, decadent desserts, or savory pastries, this recipe is a must-have in your baking repertoire. Enjoy the process, and let your next baking project shine with this foolproof method for delicious puff pastry!
If you make this recipe please leave a comment or a review! I also love seeing your creations on Instagram!
Puff Pastry Dough
Ingredients
- 12 tbsp unsalted butter cold
- 1 1/2 cup all-purpose flour 191 grams
- 1 tsp granulated sugar
- 1/2 tsp salt
- 7 to 8 tbsp ice water
Instructions
- Place the butter in the freezer 15 minutes before making the recipe.
- In a large bowl, place the flour, sugar, and salt. Mix to combine.
- Use a cheese grater to grate the cold butter over the flour mixture. (Find the food processor method below on the notes)
- Use a fork or a spatula to combine the butter with the flour.
- Add 7 tablespoons of ice water. Stir with a spatula to bring it together. If there’s too much dry flour still in the mixture, add another tablespoon of water. The mixture will still look very crumbly.
- Transfer the mixture to the counter. Pat it down, and use a bench scraper to cut in half, then take one half and place on top of the other. There will be many crumbs falling off, and that’s ok. Just keep doing this until the dough comes together, about 5 times.
- Pat the dough into a rough square.
- Wrap the dough in plastic, and place in the fridge for 30 minutes.
- Once the 30 minutes have passed, remove the dough from the fridge.
- Place the dough on top of a piece of parchment or wax paper. Using a rolling pin coated in flour, roll the dough into a rectangle where the bottom measures 10”. If needed, use floured hands to press down on the dough gently, but don’t add too much flour to the dough.
- Fold the dough into thirds, similar to folding a letter. Start by taking the bottom third of the dough and folding it up toward the center. Then, take the top third and fold it down over the first fold, so the dough is neatly layered in three parts.
- Rotate the dough 90 degrees, then flour the rolling pin, and roll the dough again until the larger side is 10”.
- Do the letter fold again, folding the bottom third of the dough toward the center, and then folding the upper third over the middle.
- Turn the dough 90 degrees, roll it out, and repeat the fold. Do this for a total of 6 times.
- If the dough is sticking to the parchment too much, change the parchment to a new one, or add very little flour to prevent sticking. Try to add as little flour as possible.
- After the final fold, press down on the dough to pack it gently, and wrap it in the parchment paper. Then wrap the little dough package into plastic.
- Chill in the fridge for at least 2 hours, preferably overnight.
- Then you can proceed to use the dough as you would use in any recipes requiring puff pastry.
- This recipe makes about 1 lb. of puff pastry dough.
Storage
- The dough can be kept for up to 3 days in the fridge. You can also place it in a ziplock bag and keep it in the freezer for up to 2 months.
I would love to try making this. My question is in Step 6 it says “Just keep doing this until the dough comes together, about 5 times.”
Not sure what this means – exactly what am I doing 5 times.
Patting the dough down, cutting in half, placing one half on top of the other, patting it down again, repeating this 5 times. It’s a method for incorporating the ingredients for a delicate dough such as puff pastry in a way that doesn’t overmix it, and also creates the layers in the pastry. It’s called the “pat and fold method”
Amazing, Iade this and I loved this recipe, I have a quick question, Im Actually gonna do 4 time more of the amount required, for the step of the rolling pin it requires that is goes 10″ inches but since Im dong more, how long should I roll the dough,
you recommend I should do
Instead of going by the measurement then, go by the thickness of the dough, should be about 3/8 of an inch. You can also make two double batches to make it easier to work with.
I am so glad you love the recipe 🙂
Should i bake it fresh from chiller? Should it be baked cold?
Baked cold always 🙂
Can I replace the iced water with iced coconut water?
Good question. I dont see why not.