Chocolate Mousse Cake
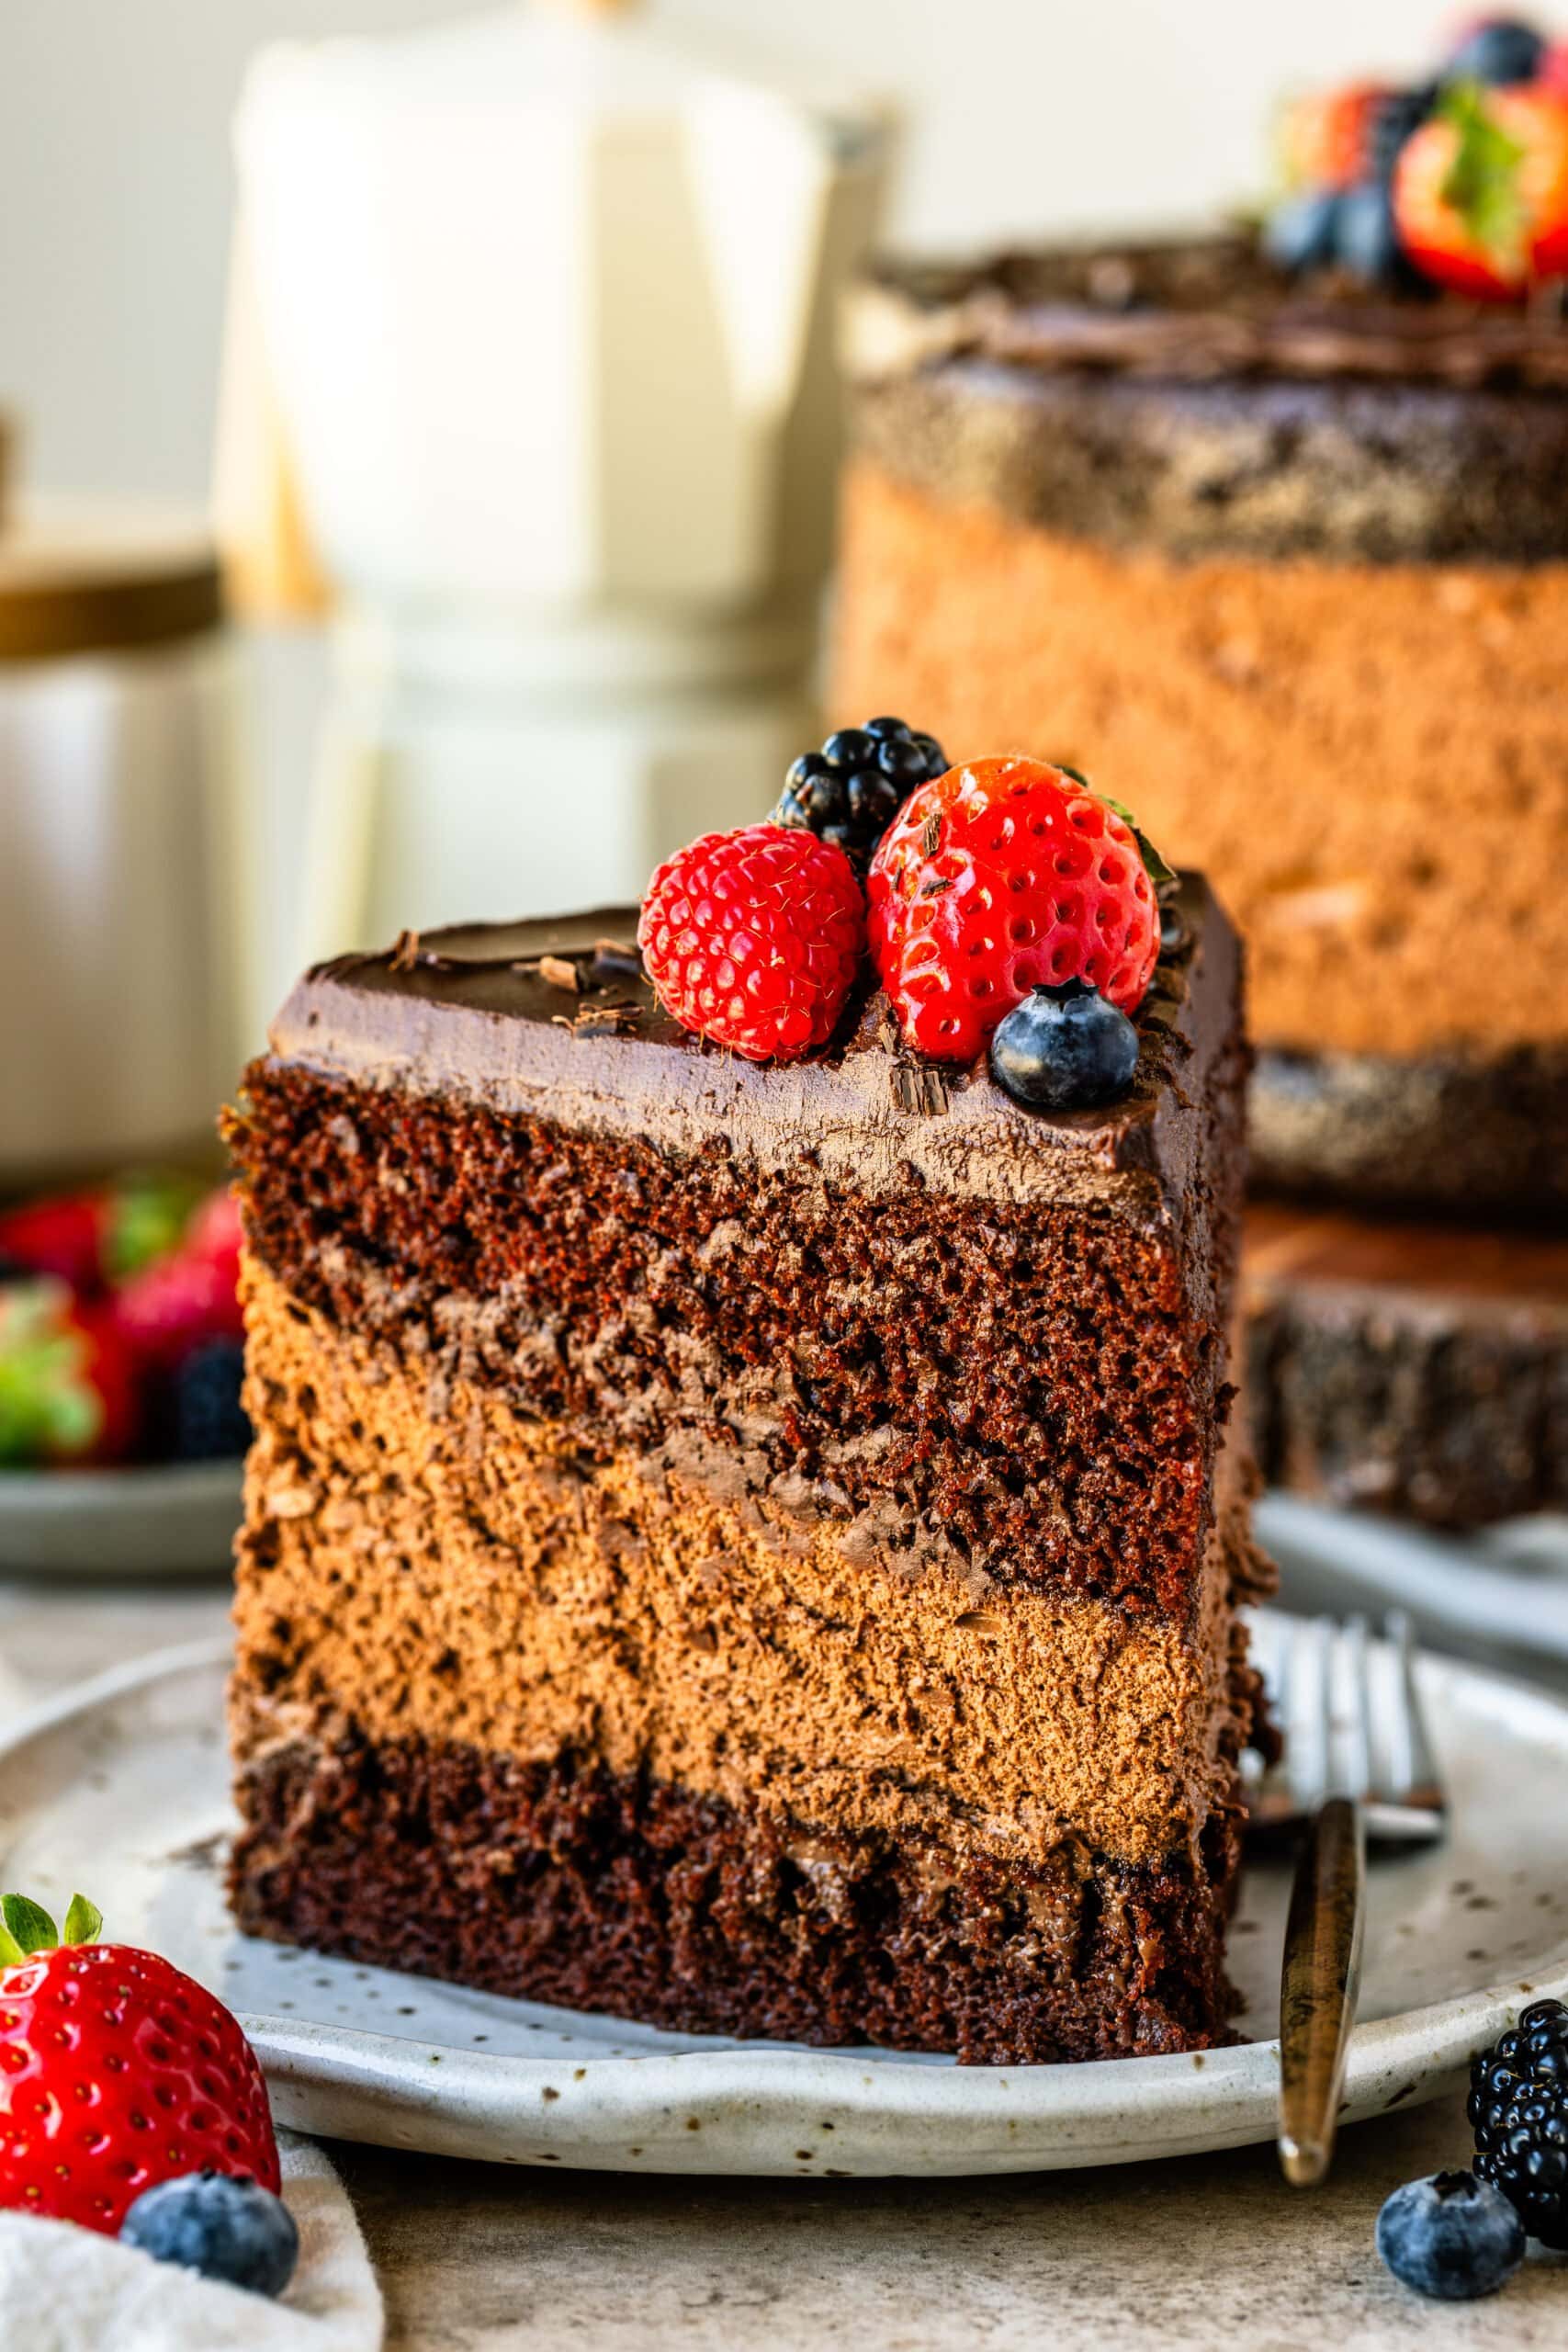
Hello friends! This Chocolate Mousse Cake is what I make when I want something that feels truly celebratory. It has structure from the chocolate cake layers, lightness from the mousse, and that glossy finish from ganache that makes it look polished without being fussy. It’s rich, yes — but balanced. Every layer has a purpose.
I’ve made a lot of chocolate desserts over the years — from Chocolate Cheesecake to my classic Chocolate Birthday Cake — but this one sits in its own category. It’s softer than a layer cake, lighter than a cheesecake, and somehow still deeply chocolatey without feeling heavy. If you’re looking for a chocolate dessert that feels special but is still grounded in good technique, this is it.
Why This Cake Works
This isn’t just cake stacked with mousse. It’s built intentionally.
This post may contain affiliate links. I earn a commission from qualified purchases. Please read our Privacy policy here.
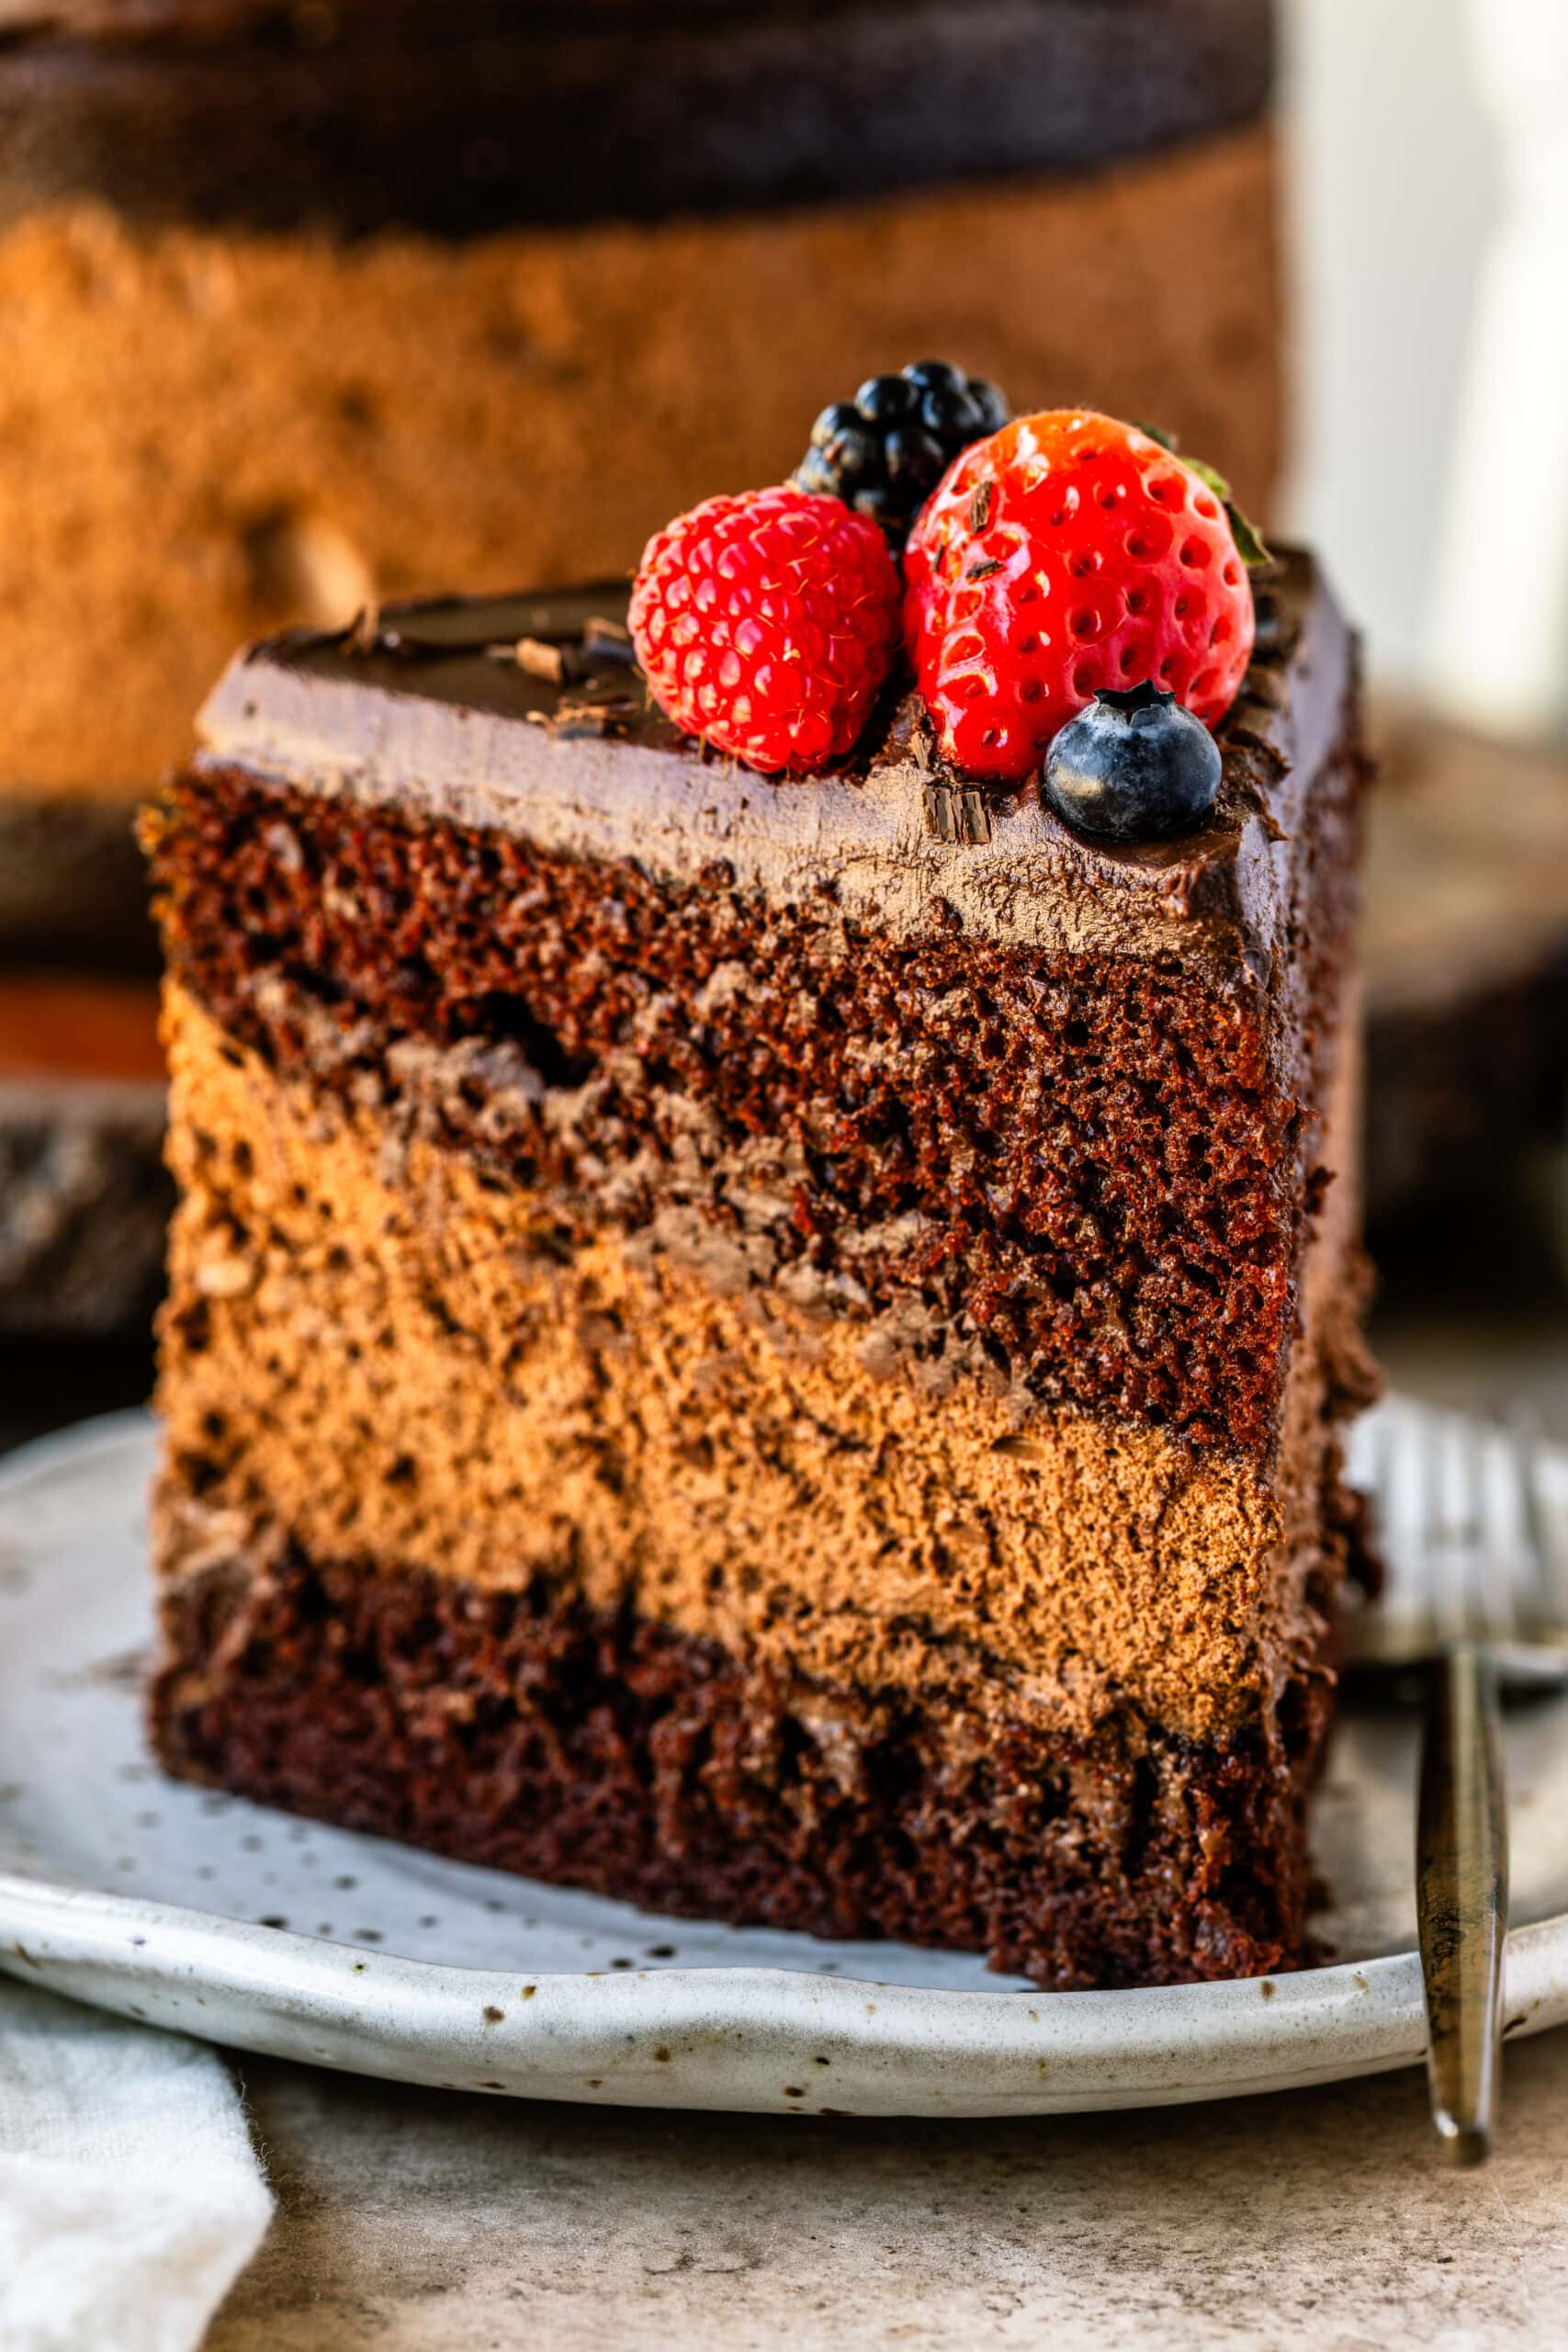
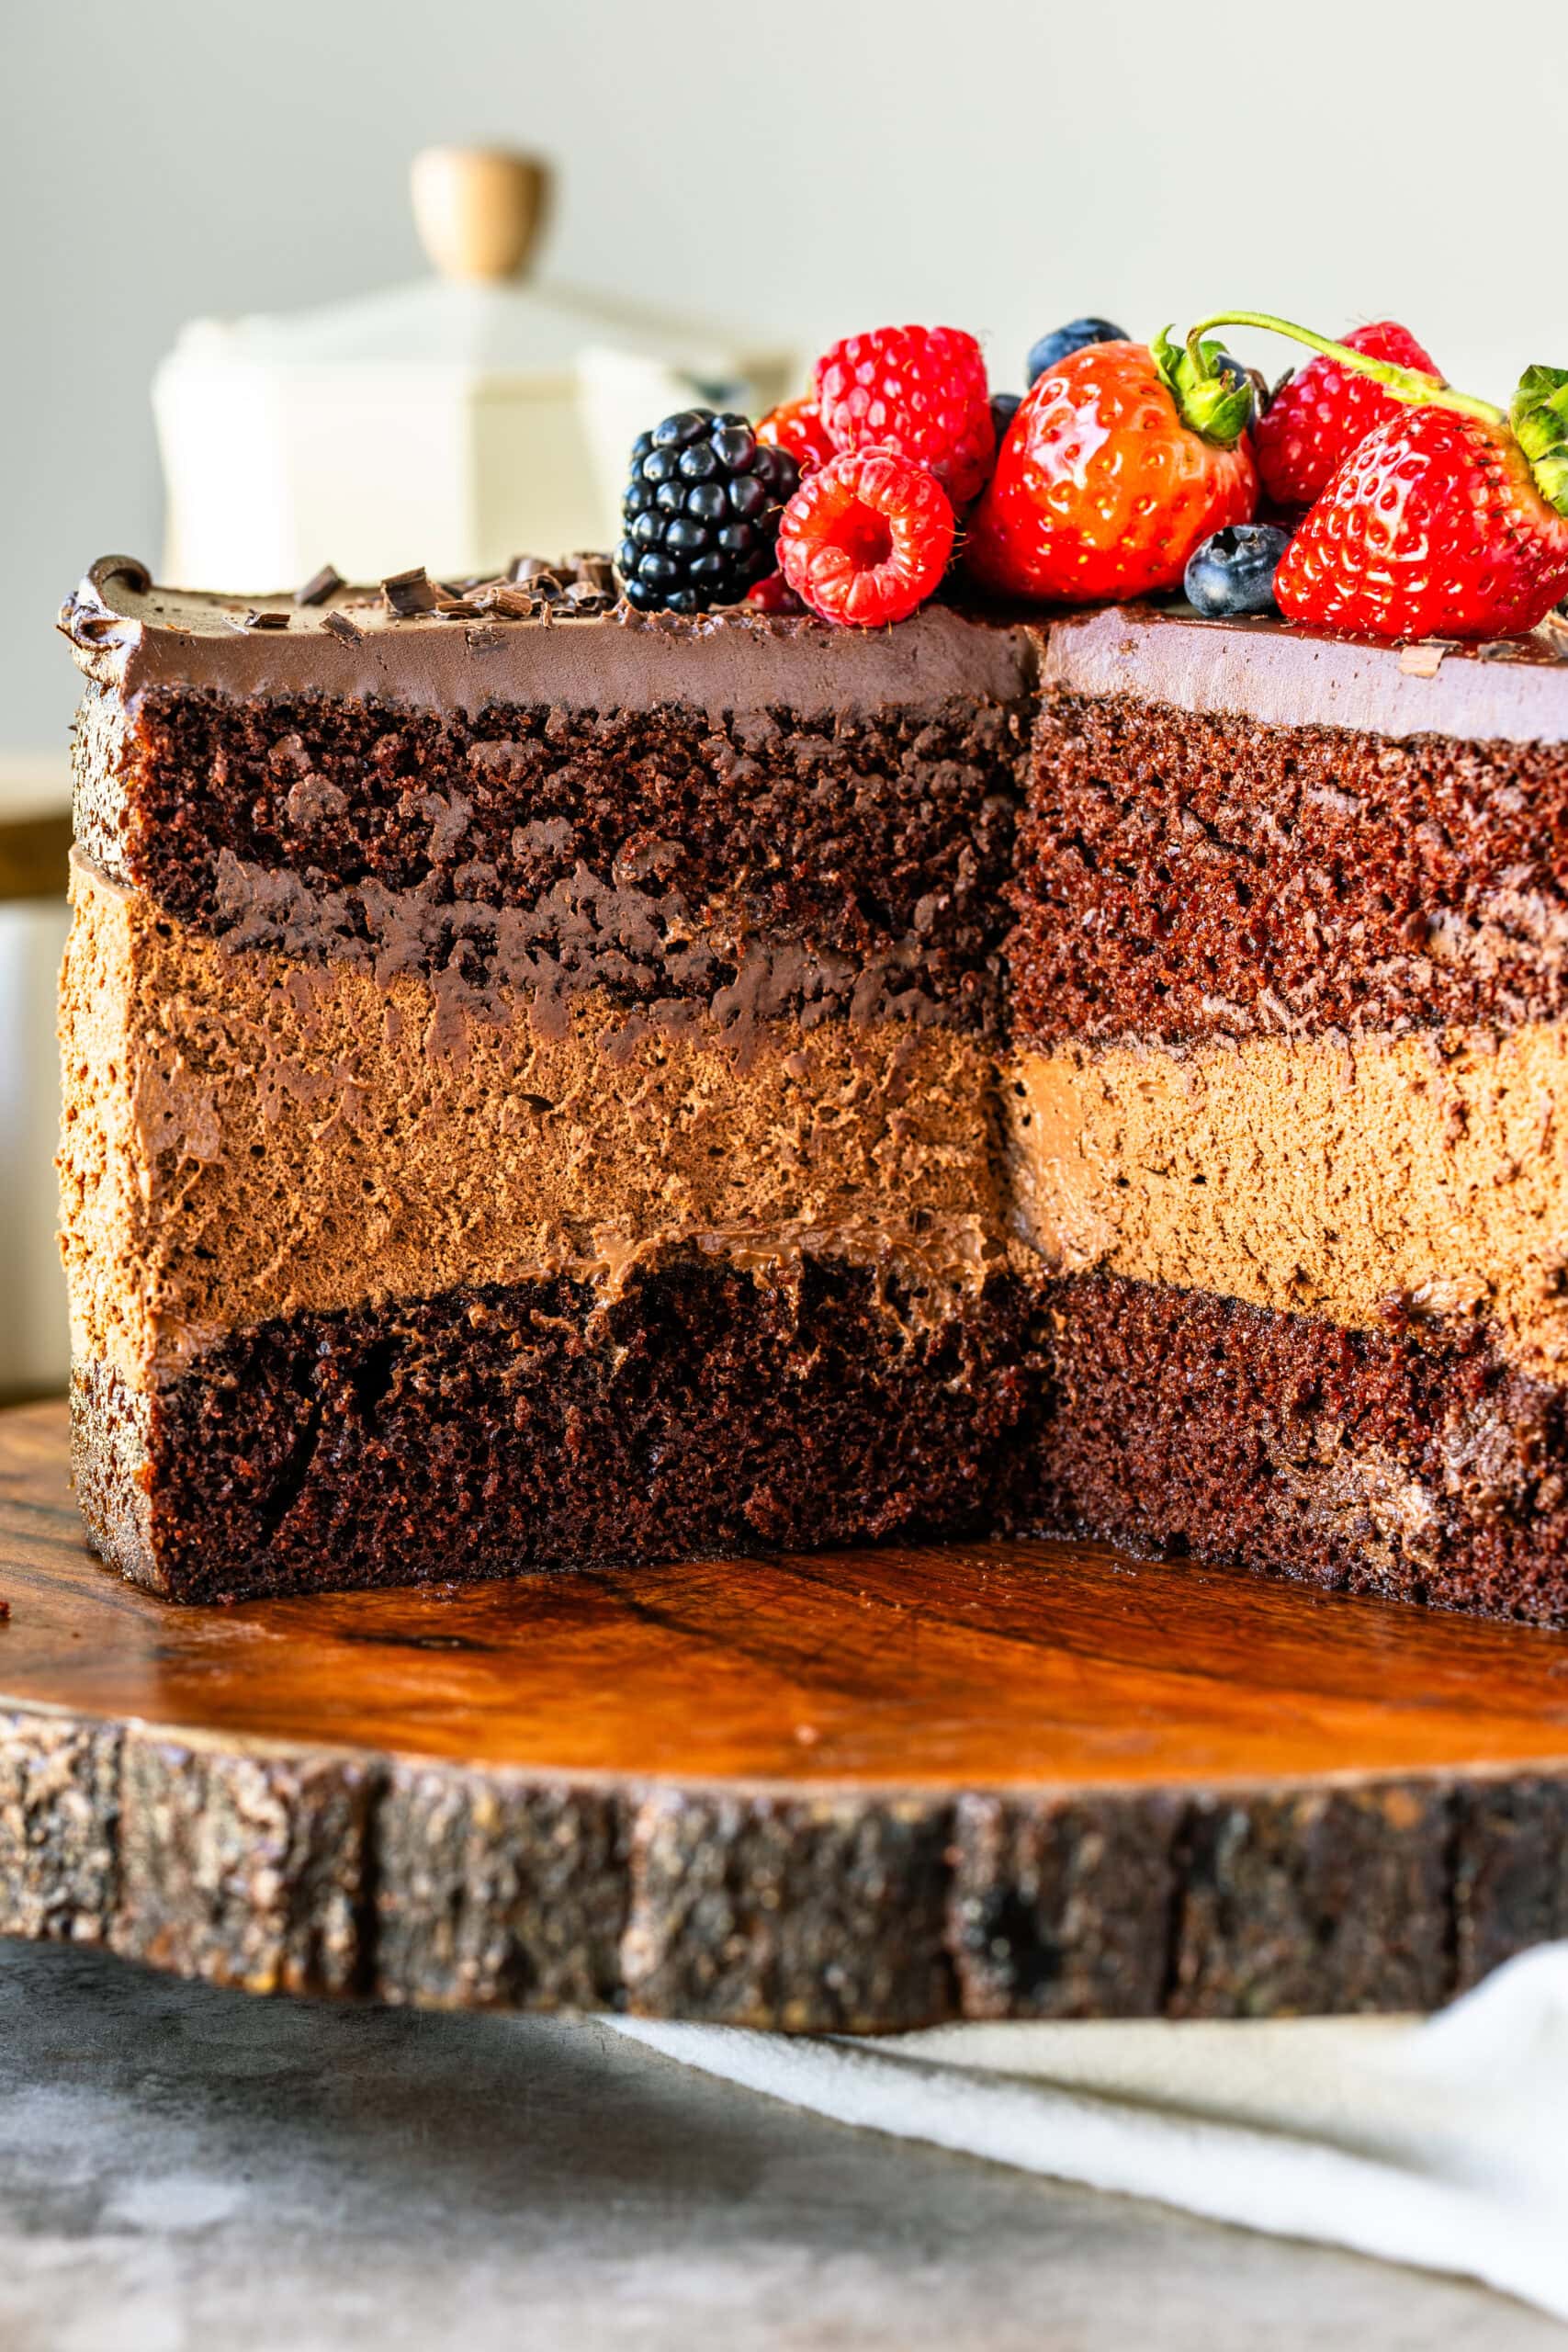
- Moist, deeply chocolate cake base
- Silky mousse that sets cleanly
- Glossy ganache that finishes the texture
- Balanced sweetness from milk + dark chocolate
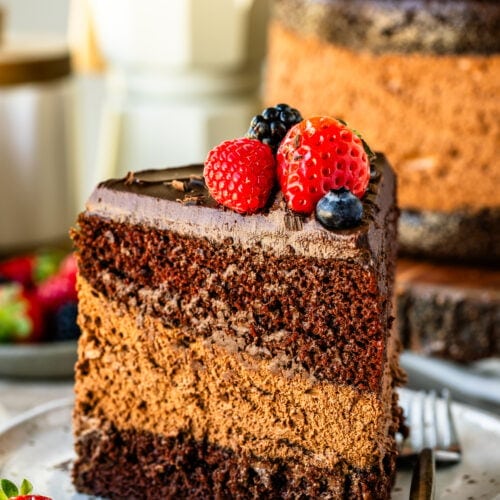
- Makes clean slices when properly chilled
It’s the kind of dessert that feels bakery-level but is absolutely doable at home.
Key Ingredients & Why I Use Them
Hot coffee; I always use hot coffee in chocolate cake. It doesn’t make the cake taste like coffee — it deepens the chocolate flavor and keeps the crumb moist.
Buttermilk + sour cream: This combination keeps the cake tender and soft. I prefer using both for texture.
Espresso powder (optional): just a little intensifies the cocoa without being noticeable.
Milk + dark chocolate: I like using a blend. Milk chocolate softens the bitterness, dark chocolate keeps it balanced.
Gelatin: This gives the mousse enough structure to slice cleanly while still staying airy.
Whipped cream + whipped egg whites: This is where the lightness comes from. Folding gently matters here.
How I Make This Chocolate Mousse Cake
The full ingredient list is below, but here’s how I approach it step by step.
Step 1: Prepare the cake layers
Preheat the oven to 350°F (175°C). Grease and line two 9-inch pans with parchment.
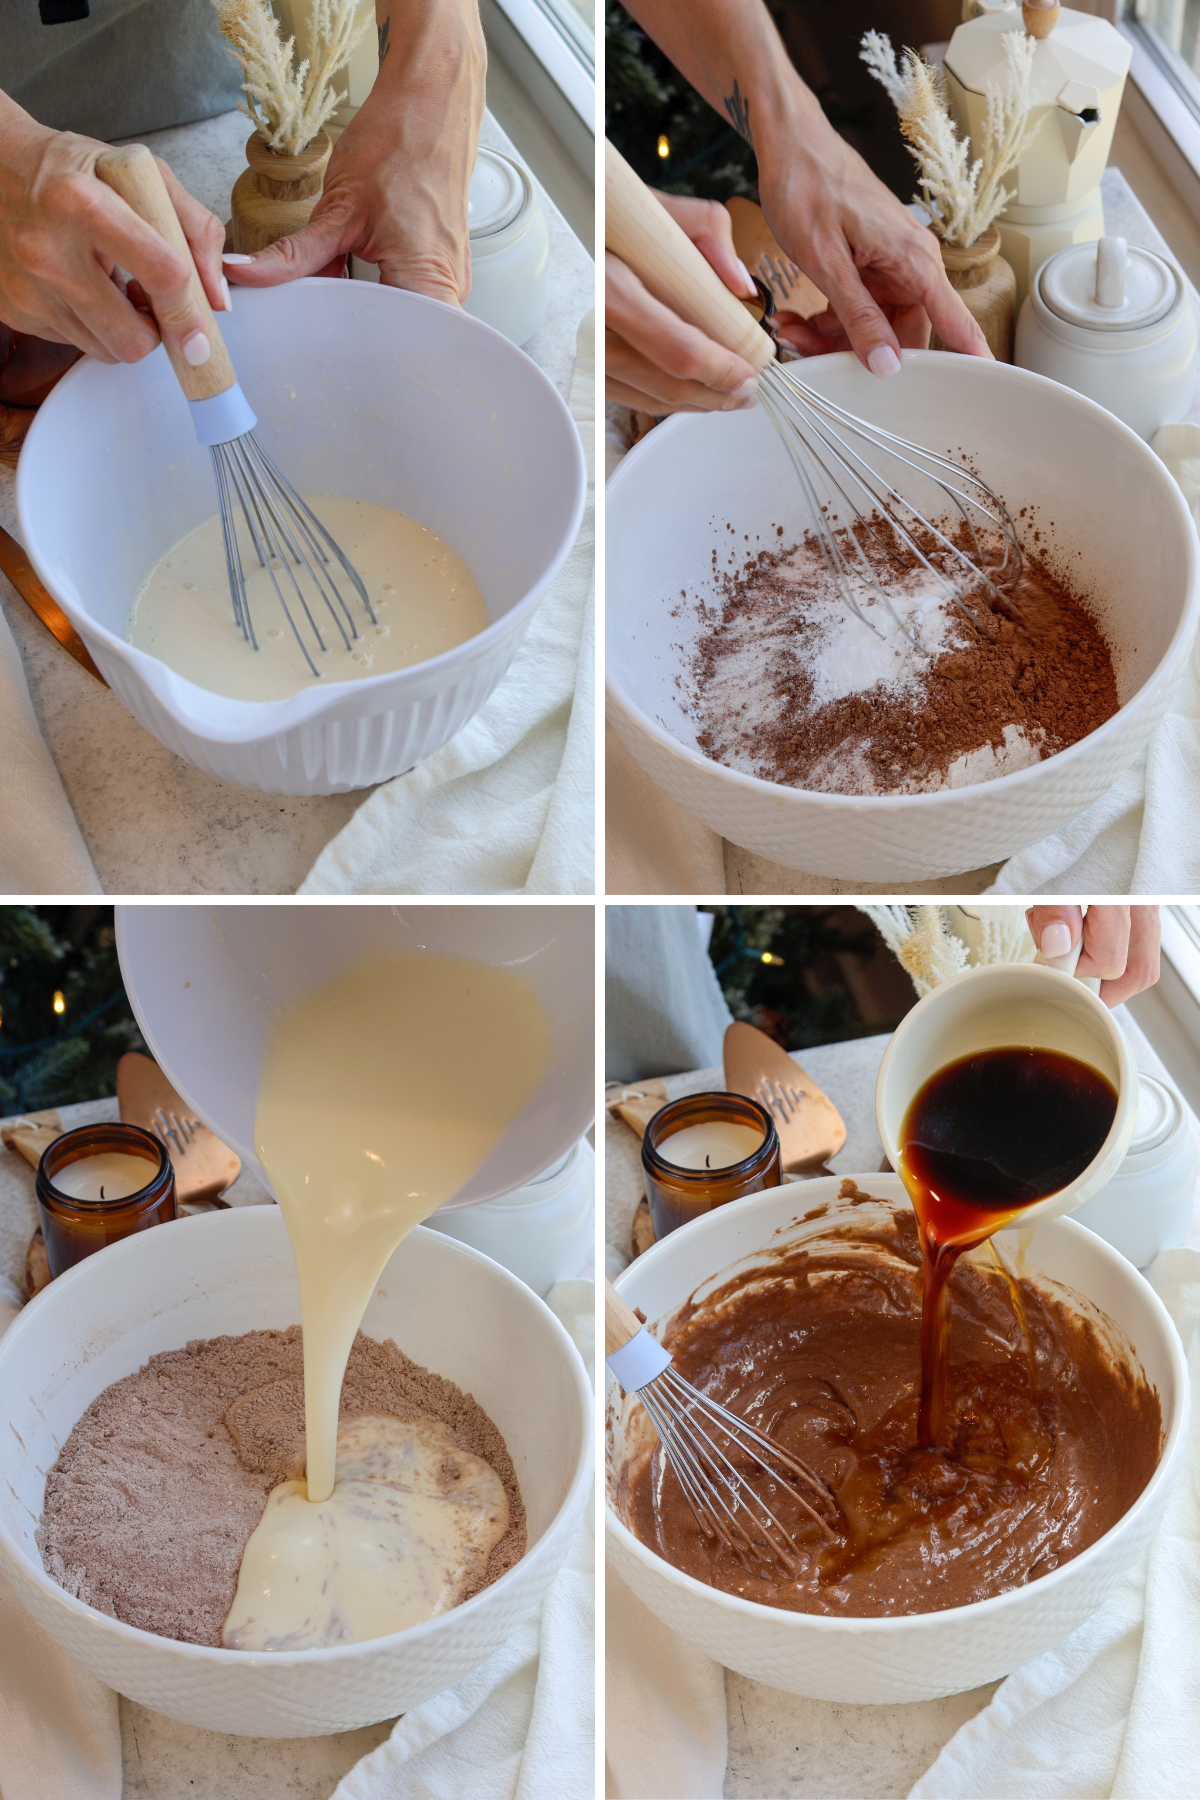
Whisk together the dry ingredients in one bowl. In another bowl, combine the eggs, oil, buttermilk, sour cream, and vanilla. Mix wet into dry, then whisk in the hot brewed coffee. The batter will be thin — that’s exactly what you want.
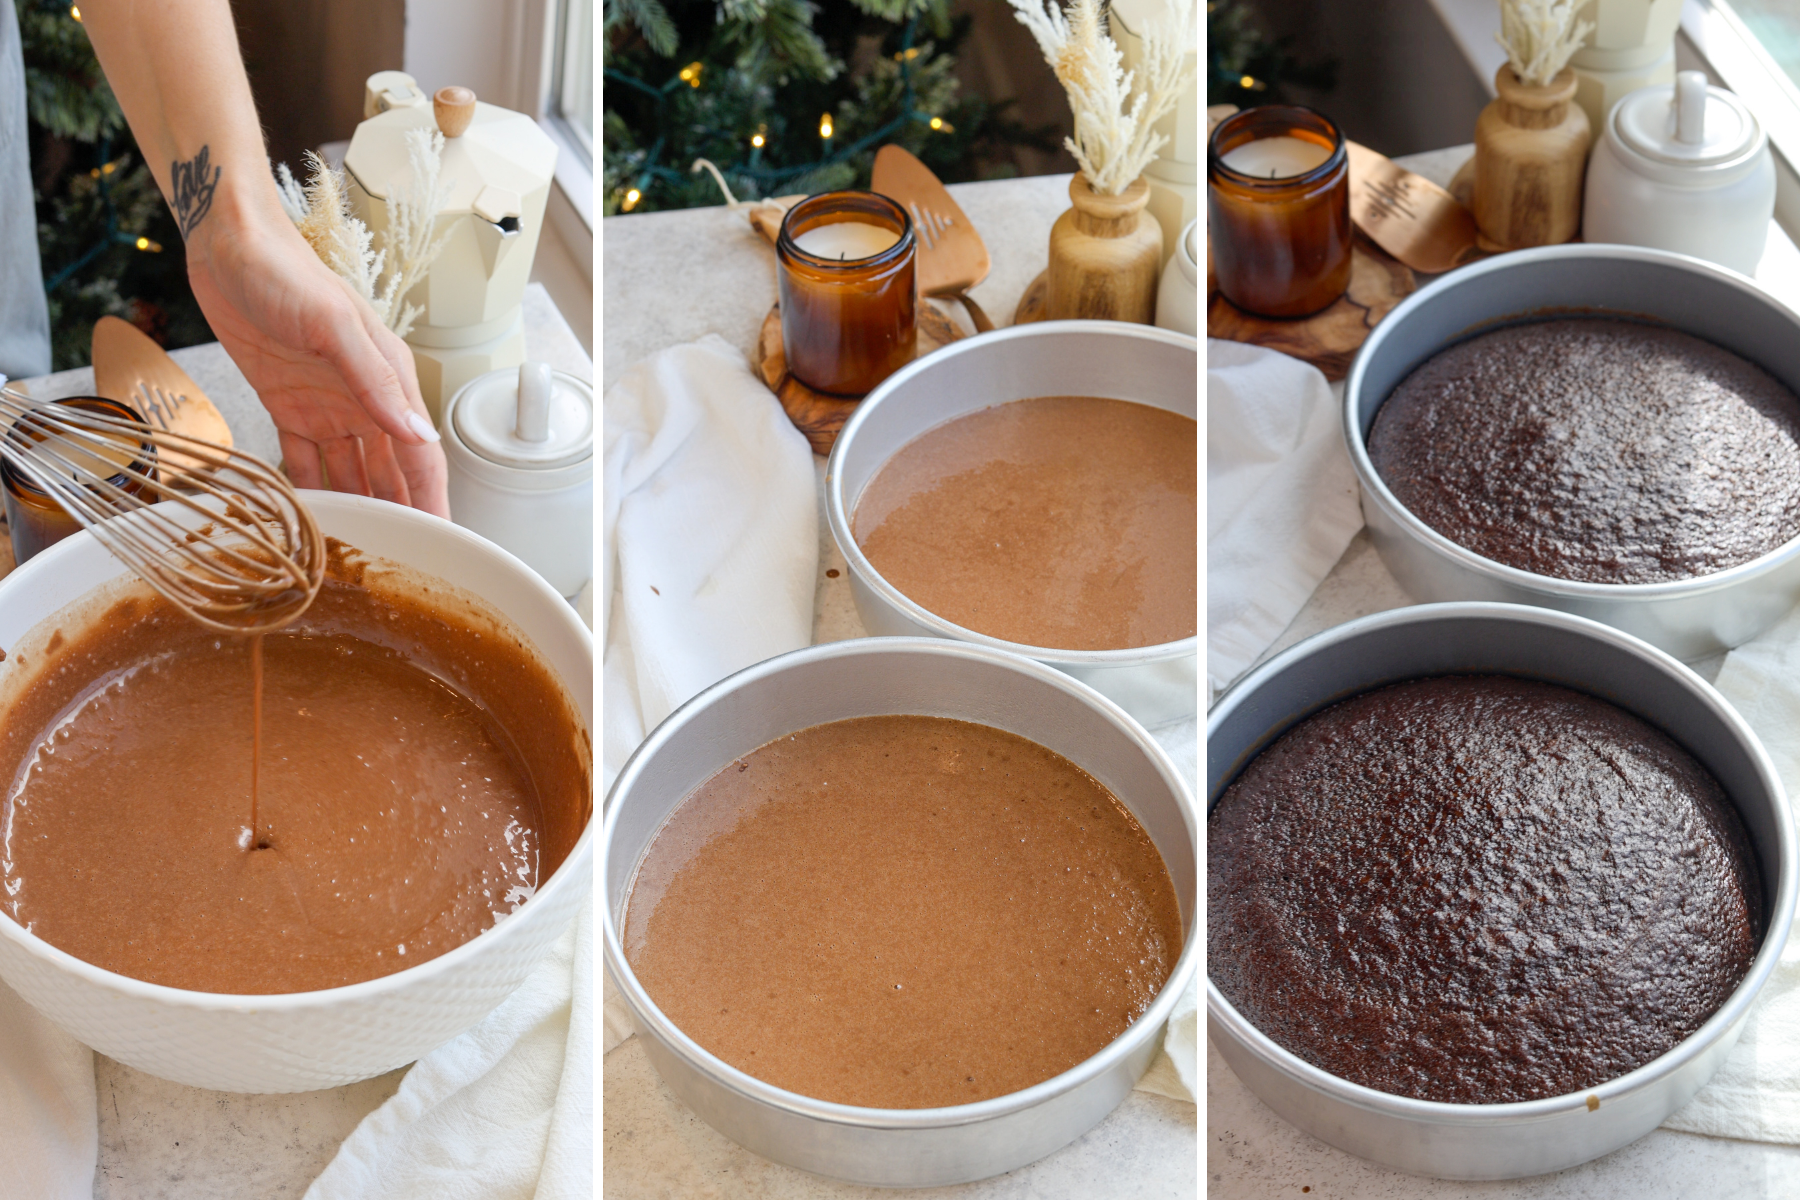
Step 2: Pour into pans and bake
Divide between the pans and bake for 30–35 minutes, until a toothpick comes out clean.
Cool in the pans for 15 minutes, then transfer to a rack to cool completely. If I’m assembling later, I wrap and freeze the layers. Cold cake is easier to work with.
Step 3: Make the chocolate mousse
Before starting, prepare your workspace by measuring and separating all ingredients. Keep the heavy cream chilled until needed.
Chocolate Mixture: Melt the milk and dark chocolate in a large bowl, stirring until smooth. Let cool slightly, then whisk in the egg yolks one at a time, followed by the salt and vanilla.
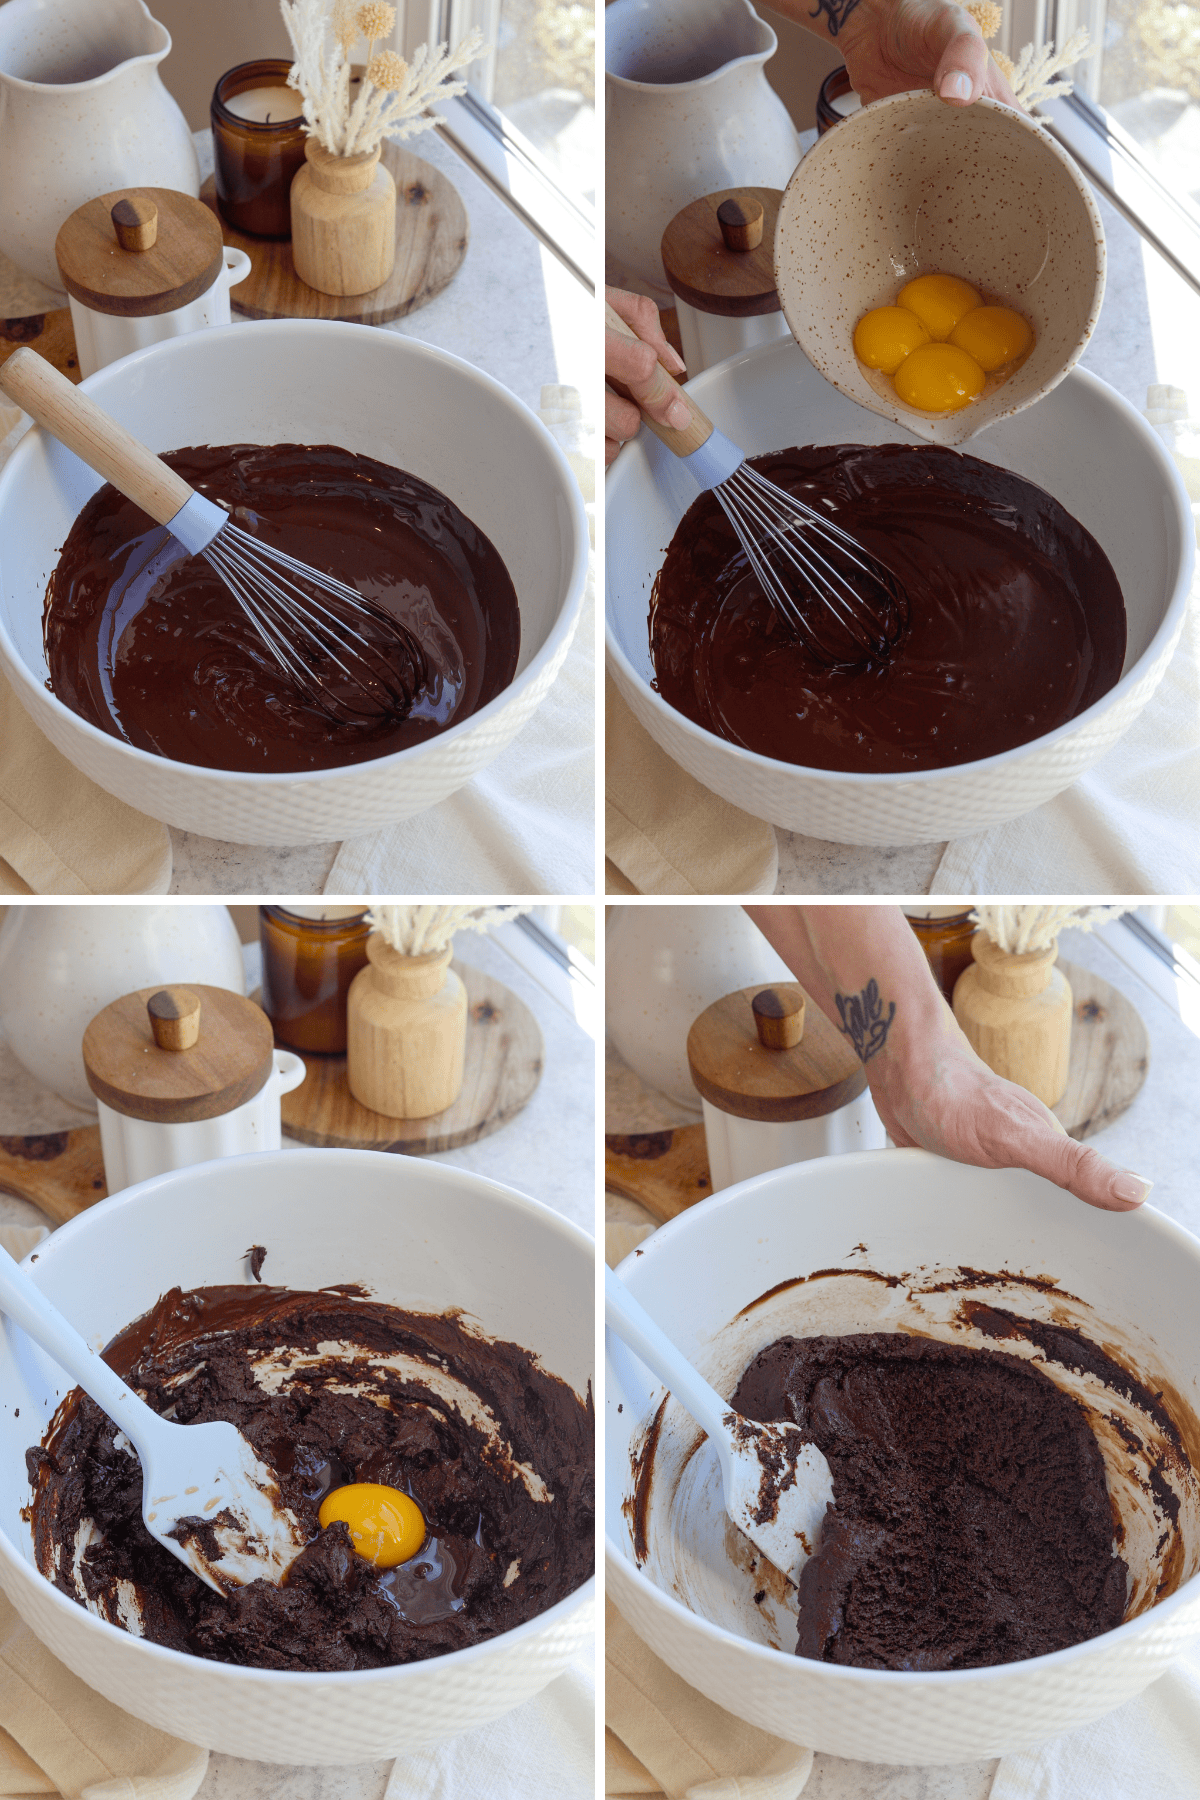
Step 4: Bloom the gelatin
Sprinkle gelatin over cold water and let it bloom.
Heat ½ cup of cream until steaming, then dissolve the bloomed gelatin into it. Gradually whisk this into the chocolate mixture.
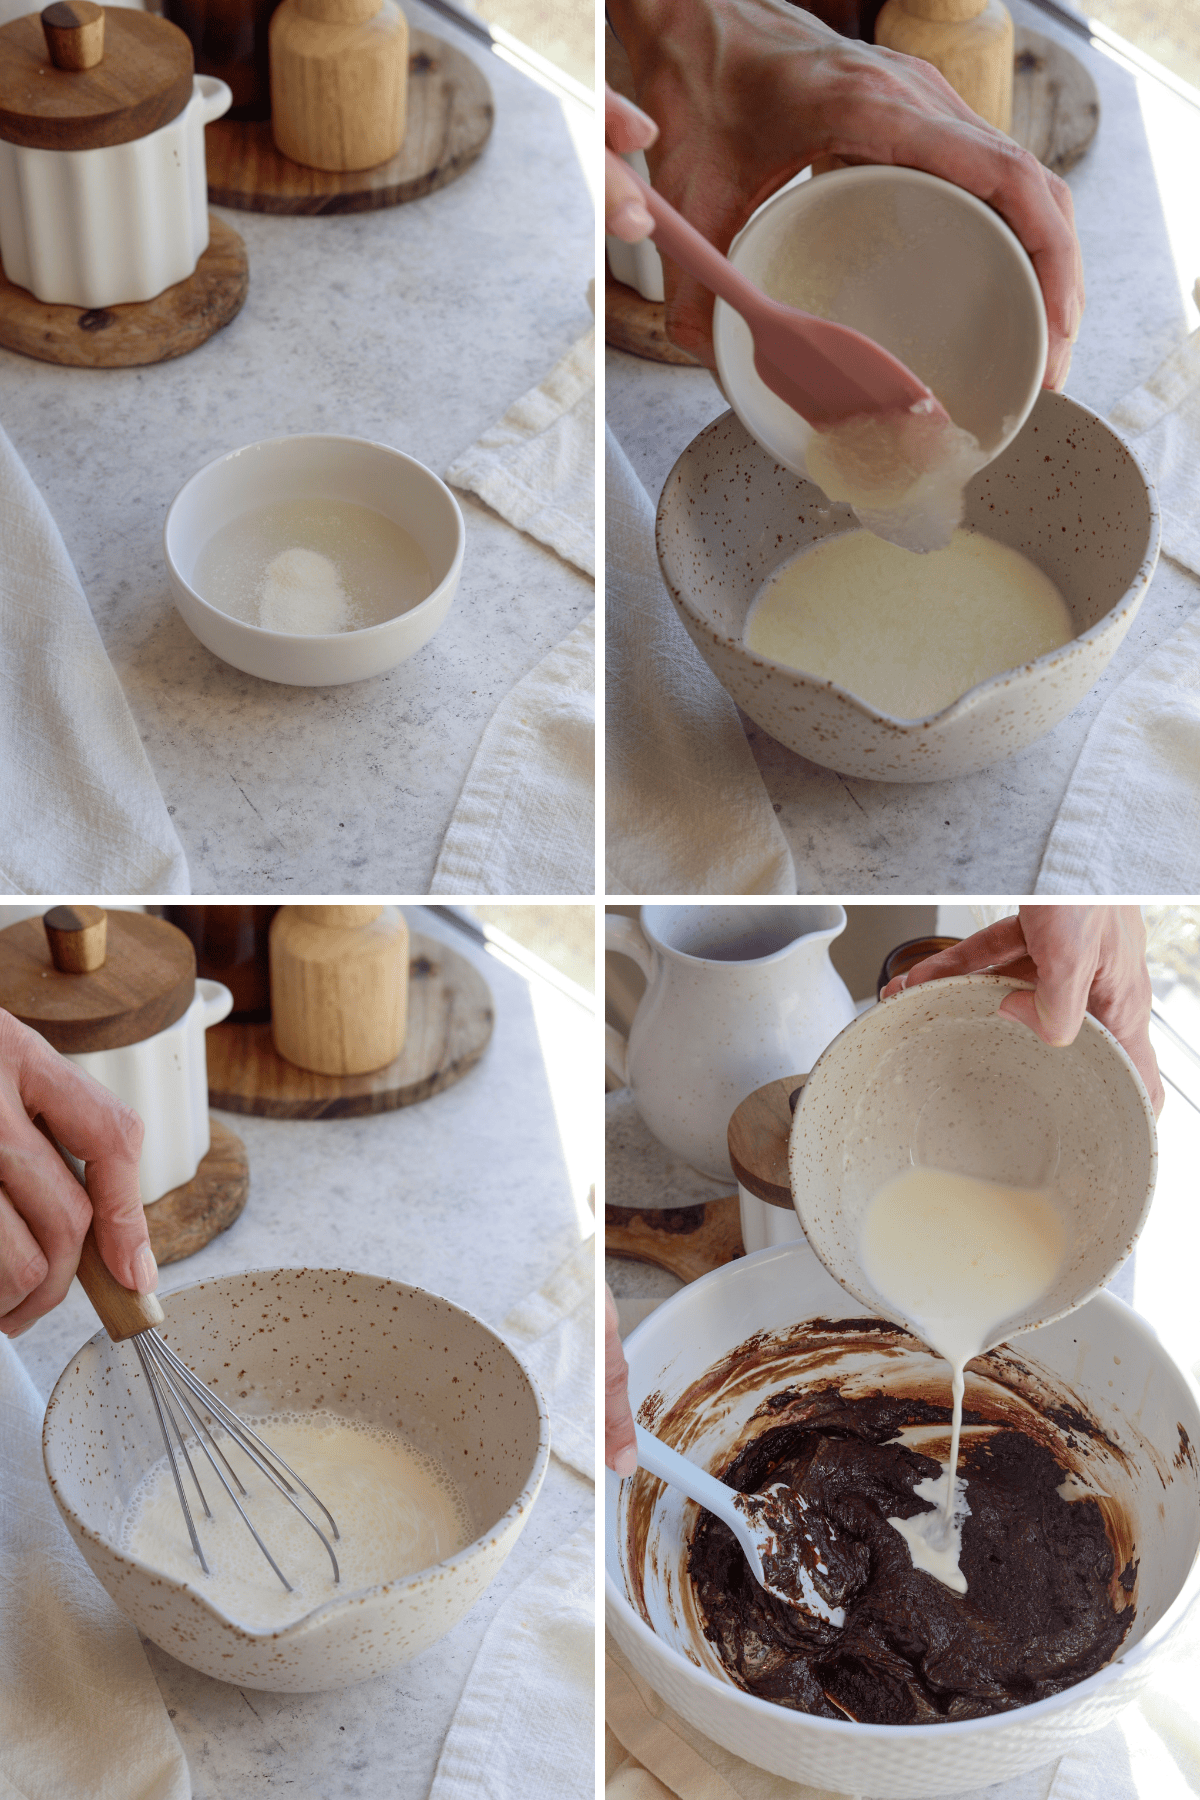
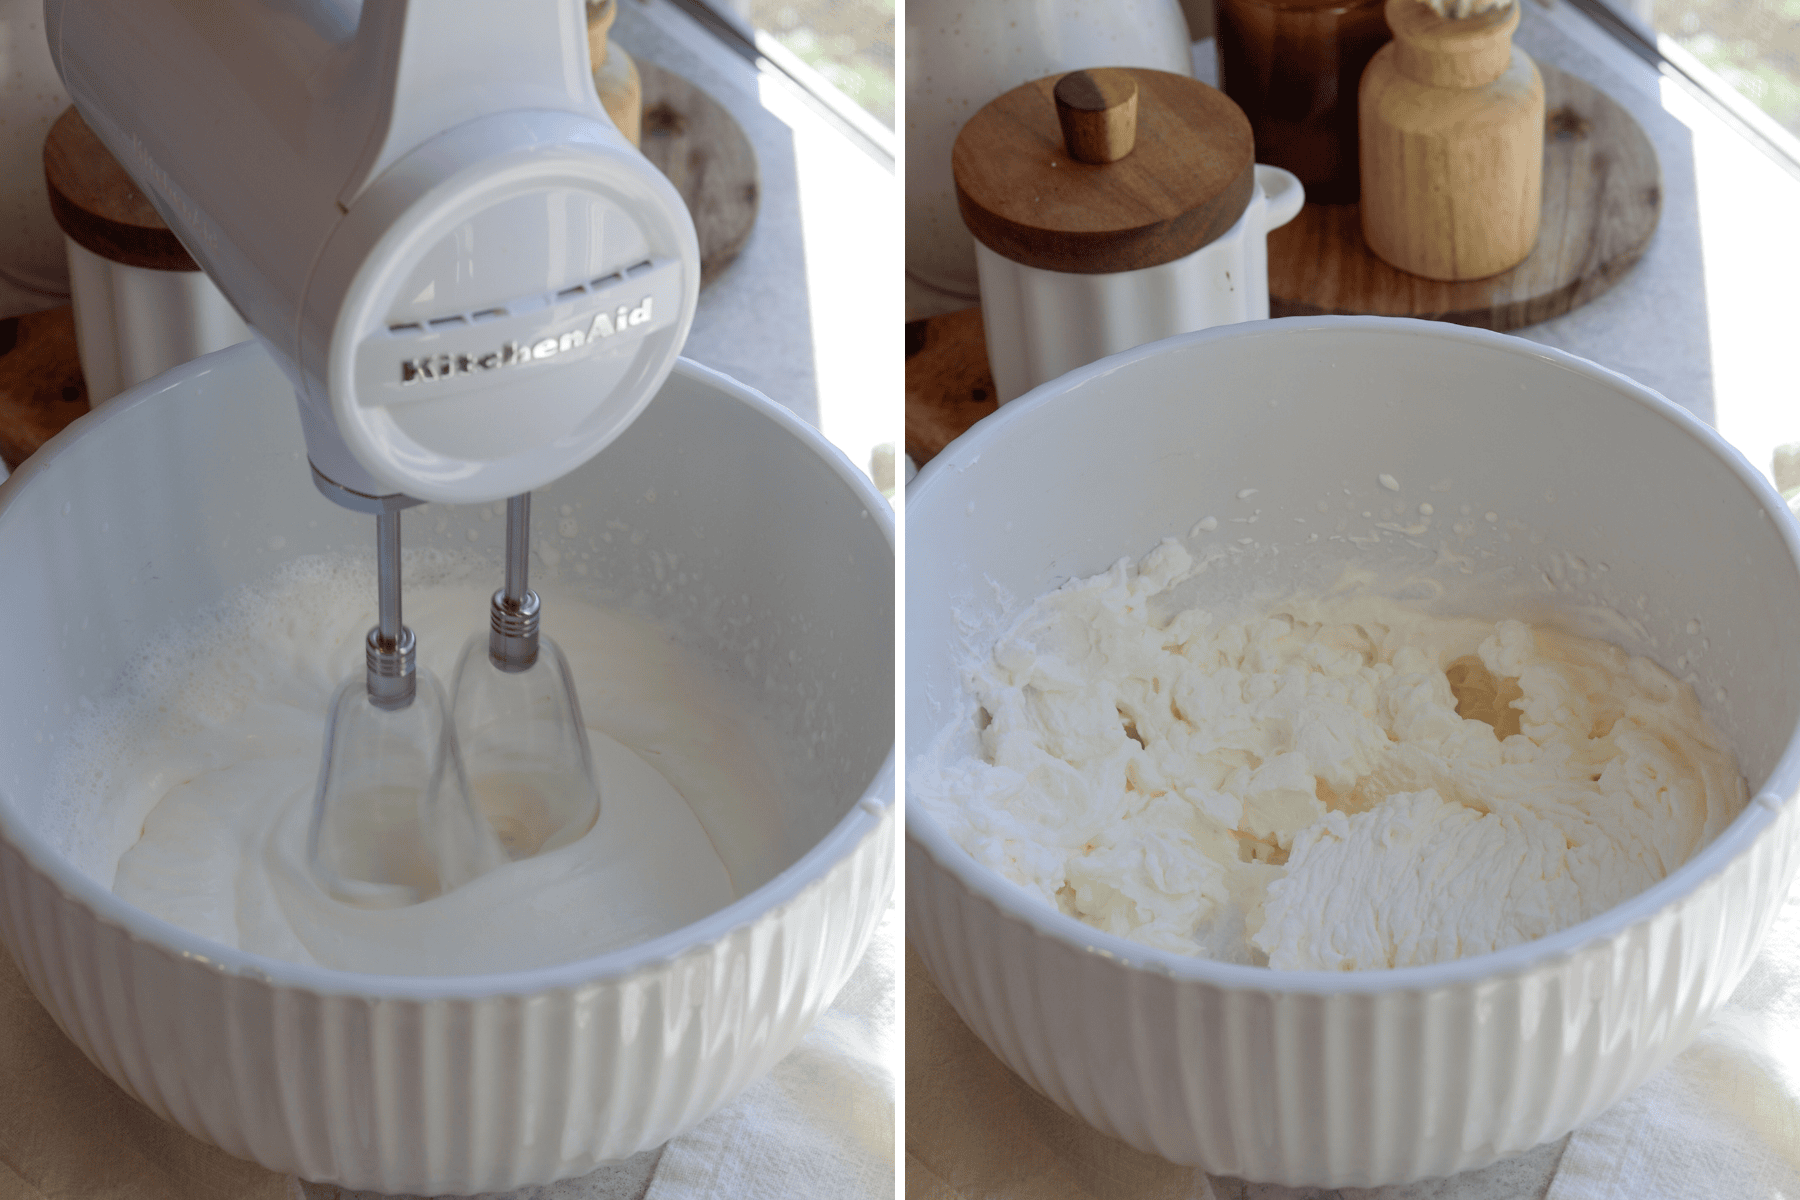
Step 5: Whip the cream
Whip the remaining cream to stiff peaks. Set aside.
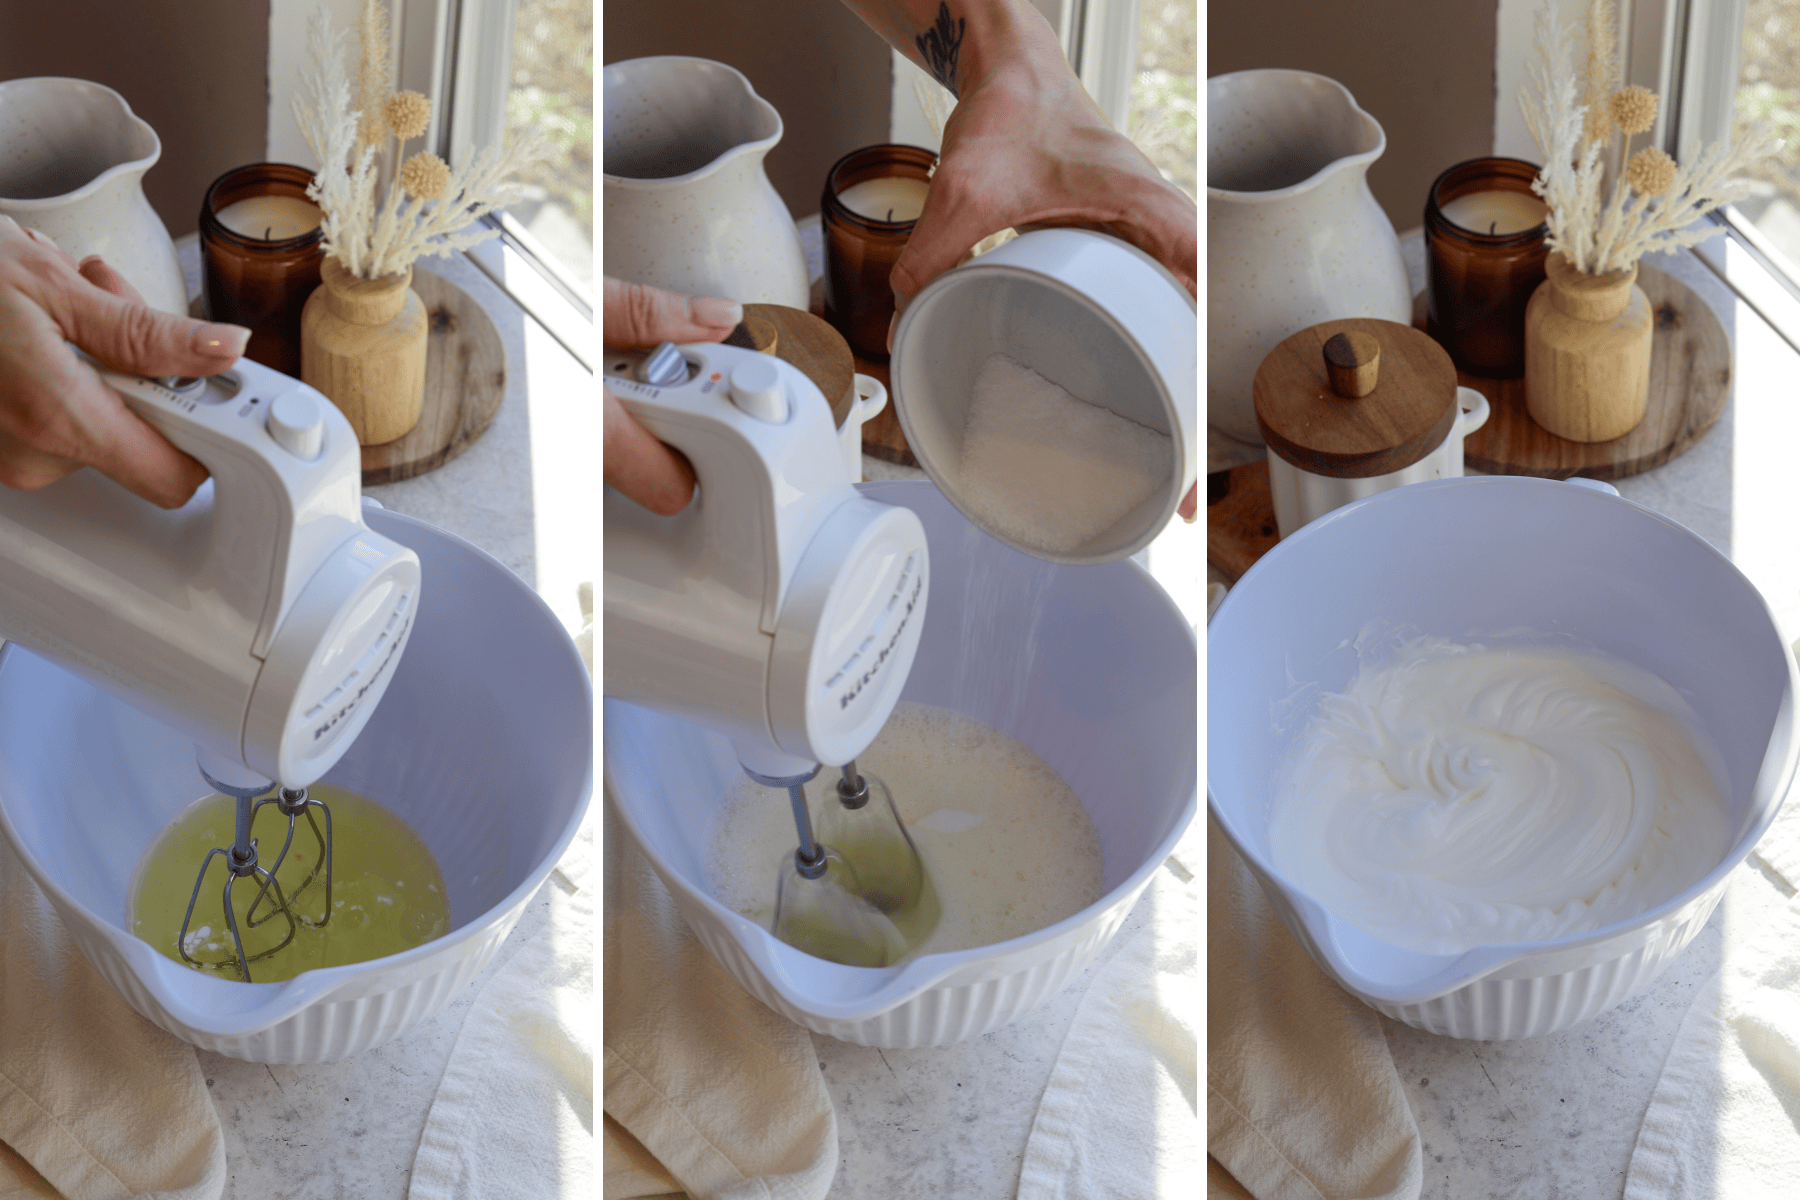
Step 6: Whip the egg whites
Beat egg whites with cream of tartar until foamy. Slowly add sugar and beat to stiff peaks.
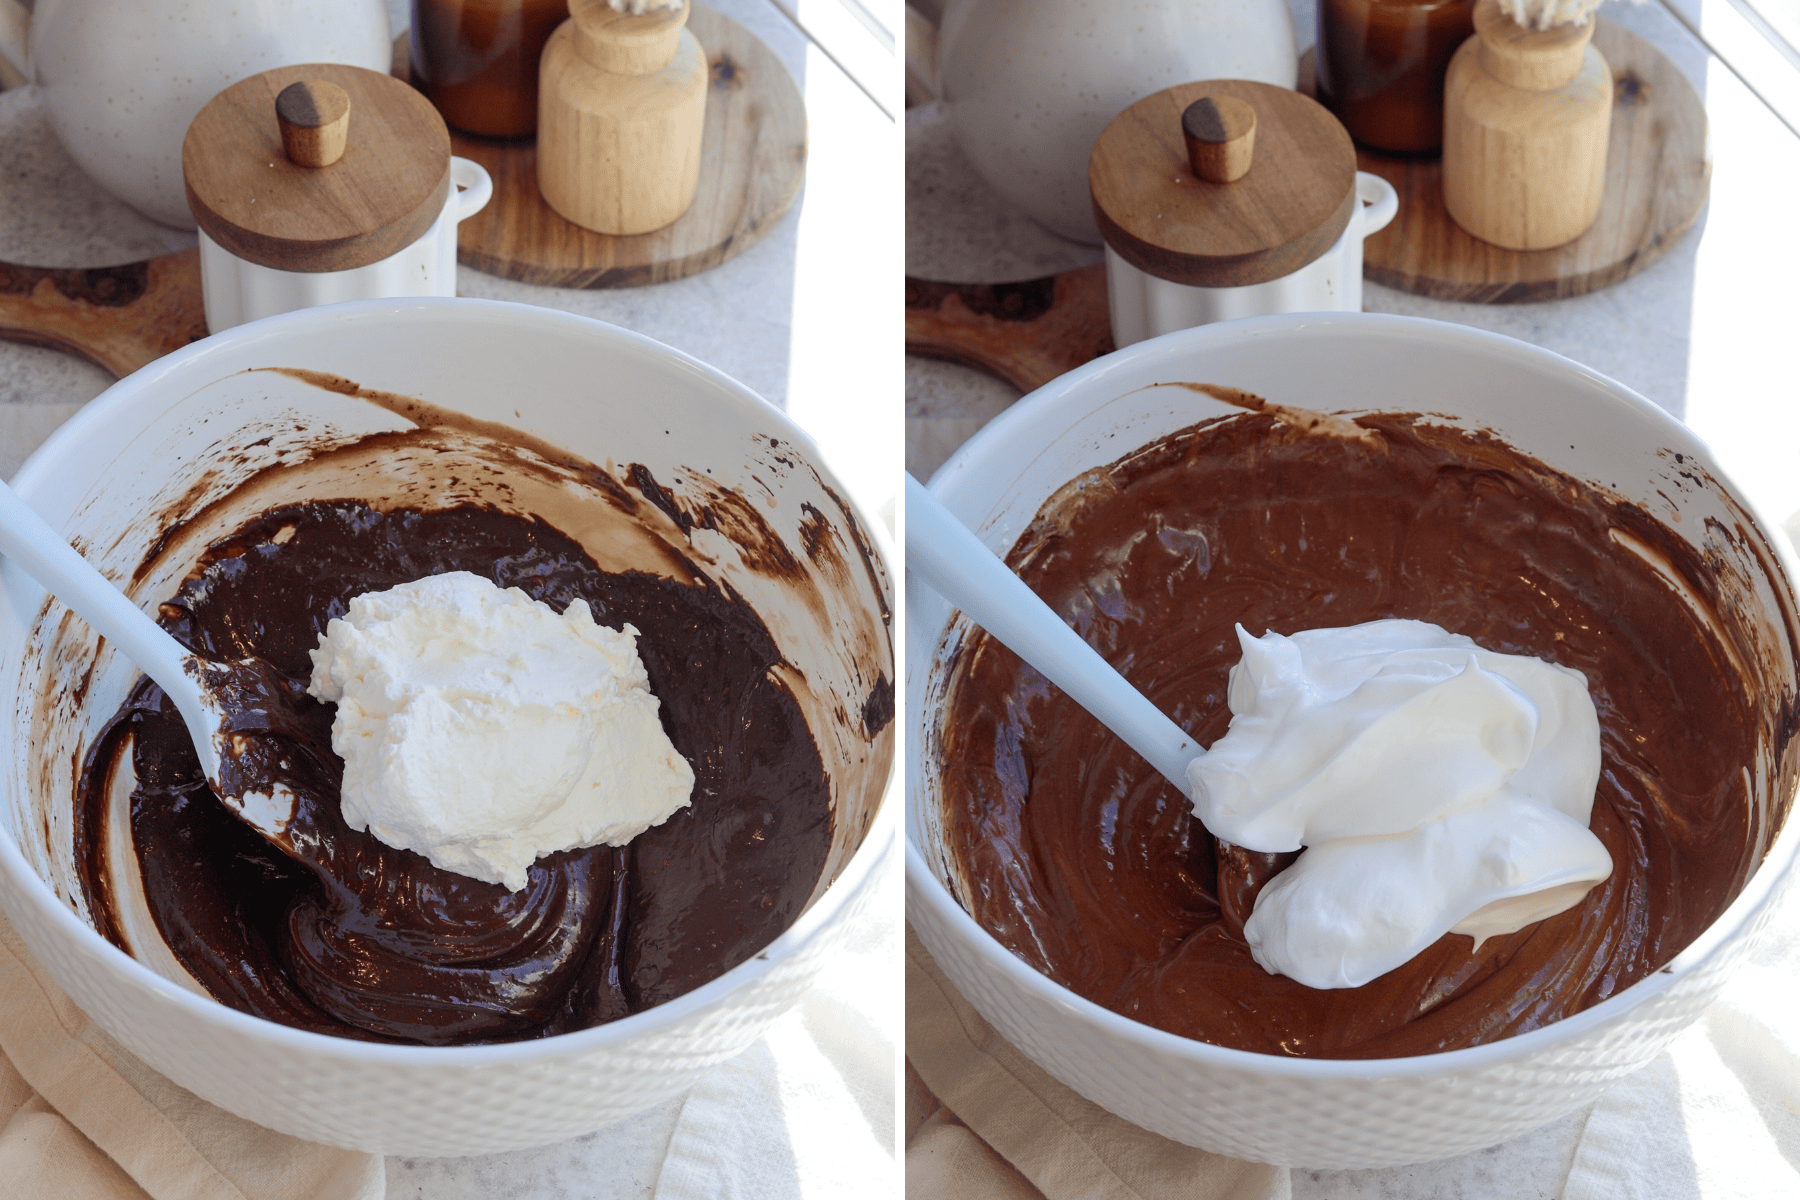
Step 7: Fold into the chocolate mixture
Fold whipped cream into the chocolate mixture in two additions. Then fold in the egg whites in two additions. Be gentle. This is where the mousse keeps its air. It will look slightly loose — that’s normal. It firms up fully after chilling.
Step 8: Assemble the Cake
You’ll need a 9-inch pastry ring or springform pan with acetate for assembly.
If using a springform pan, you probably won’t be able to fit all the mousse in the pan, so you can either halve the mousse recipe in that case or divide the leftover mousse that didn’t fit between ramekins.
Place one cake layer in the base of the ring or pan, ensuring the acetate is secured around the edges.
Pour the mousse over the cake layer. Gently place the second cake layer on top. Refrigerate overnight or for at least 8 hours to set.
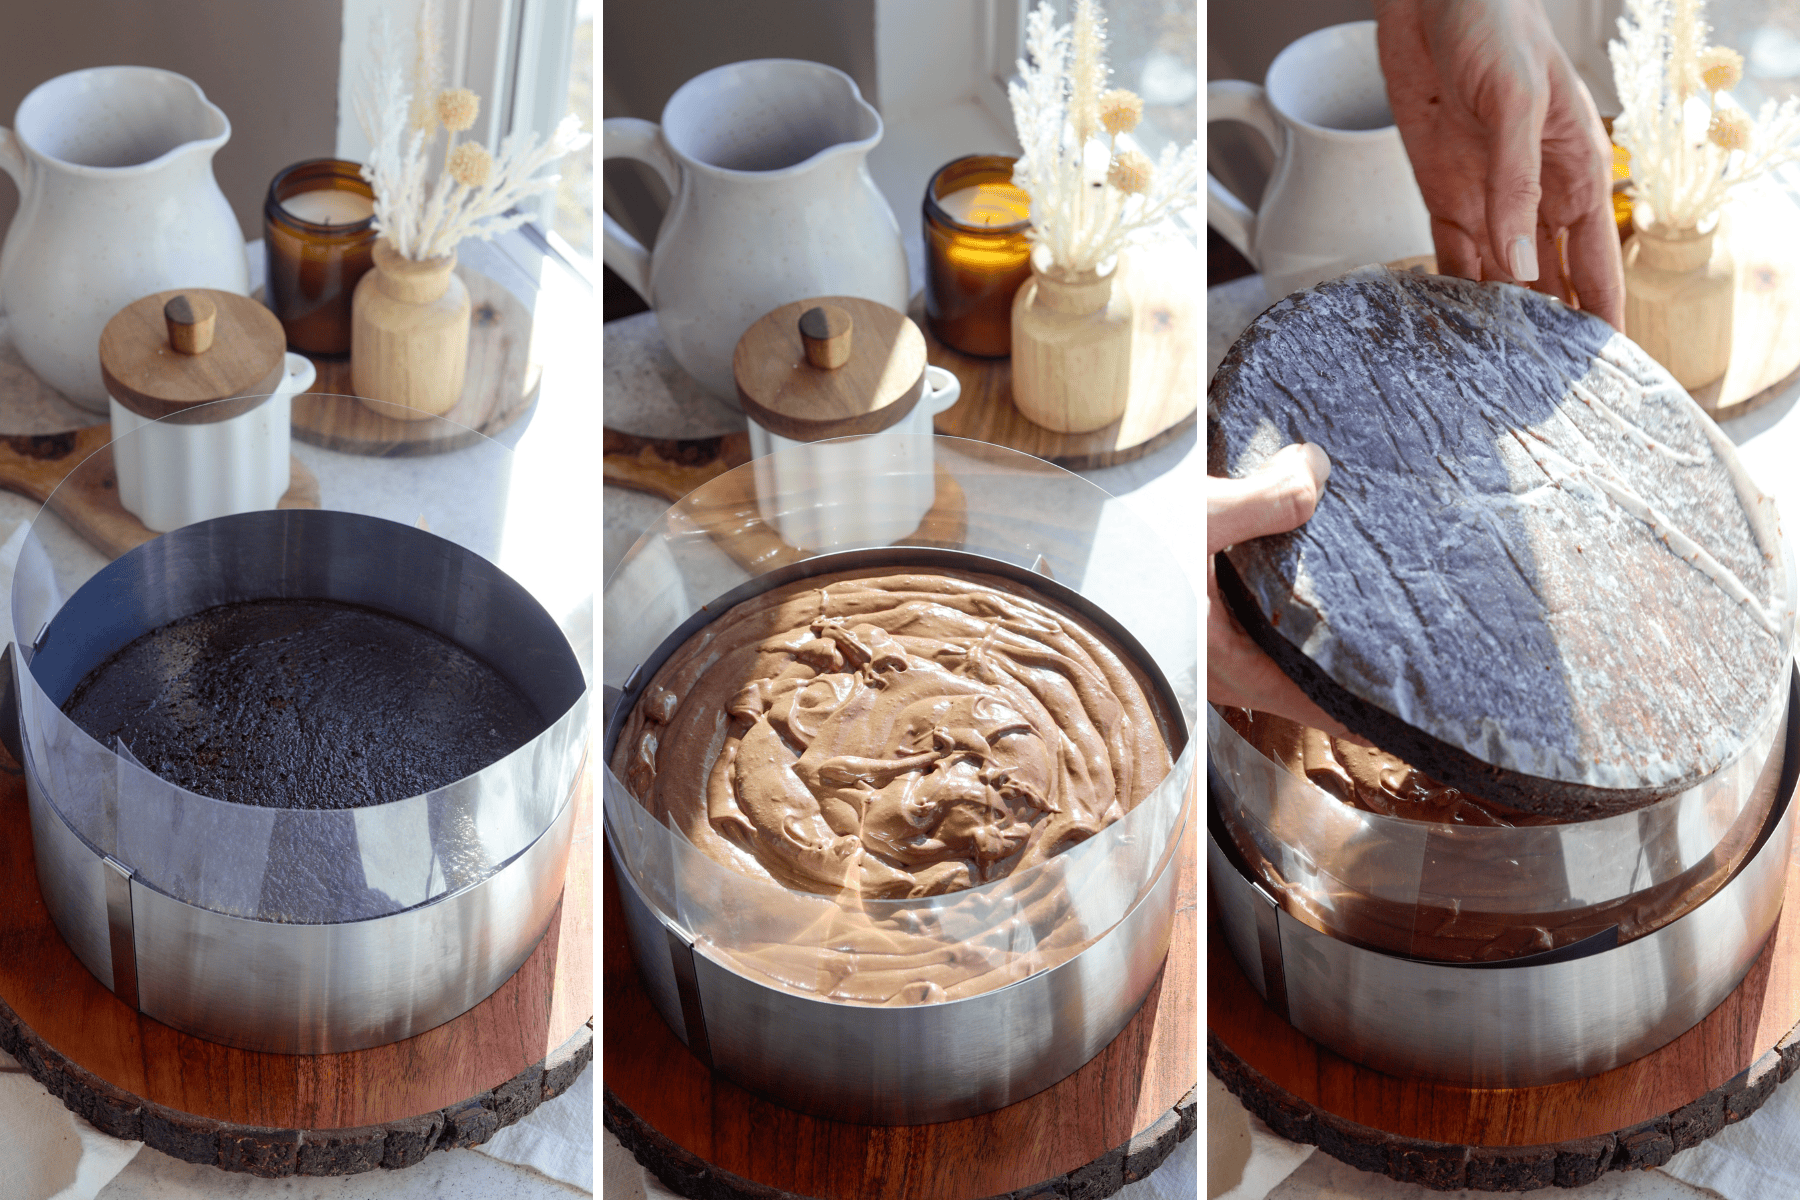
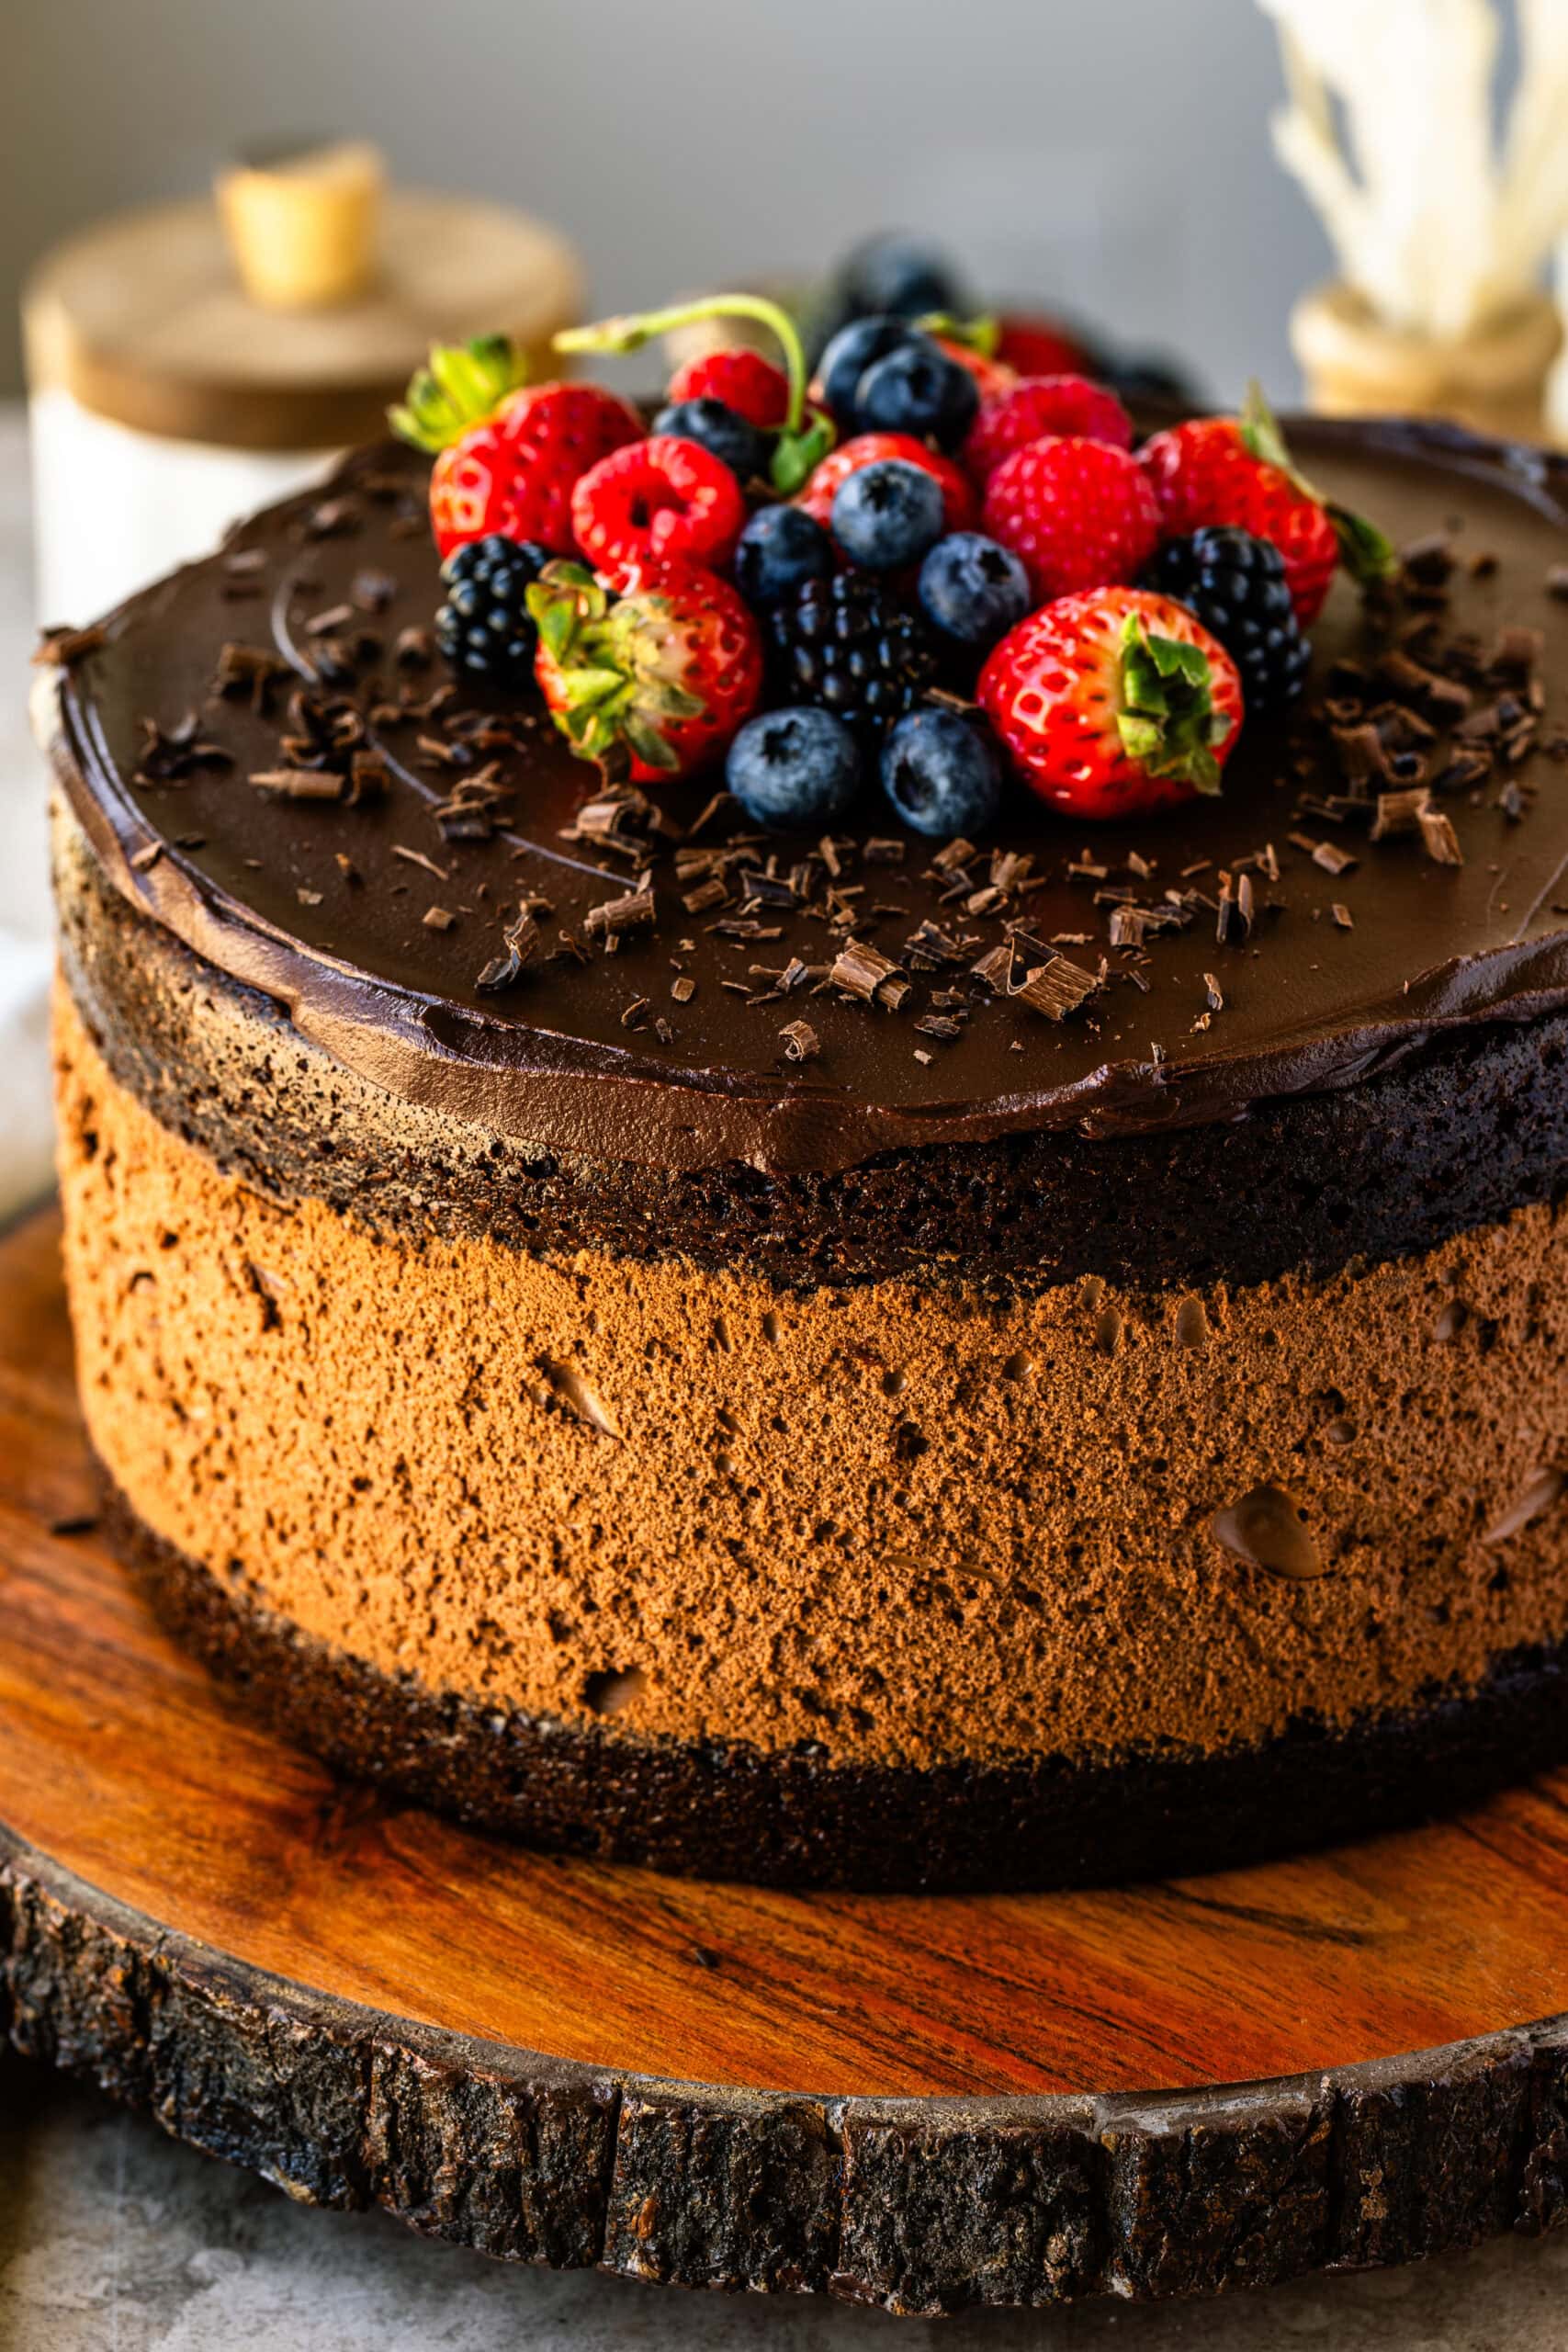
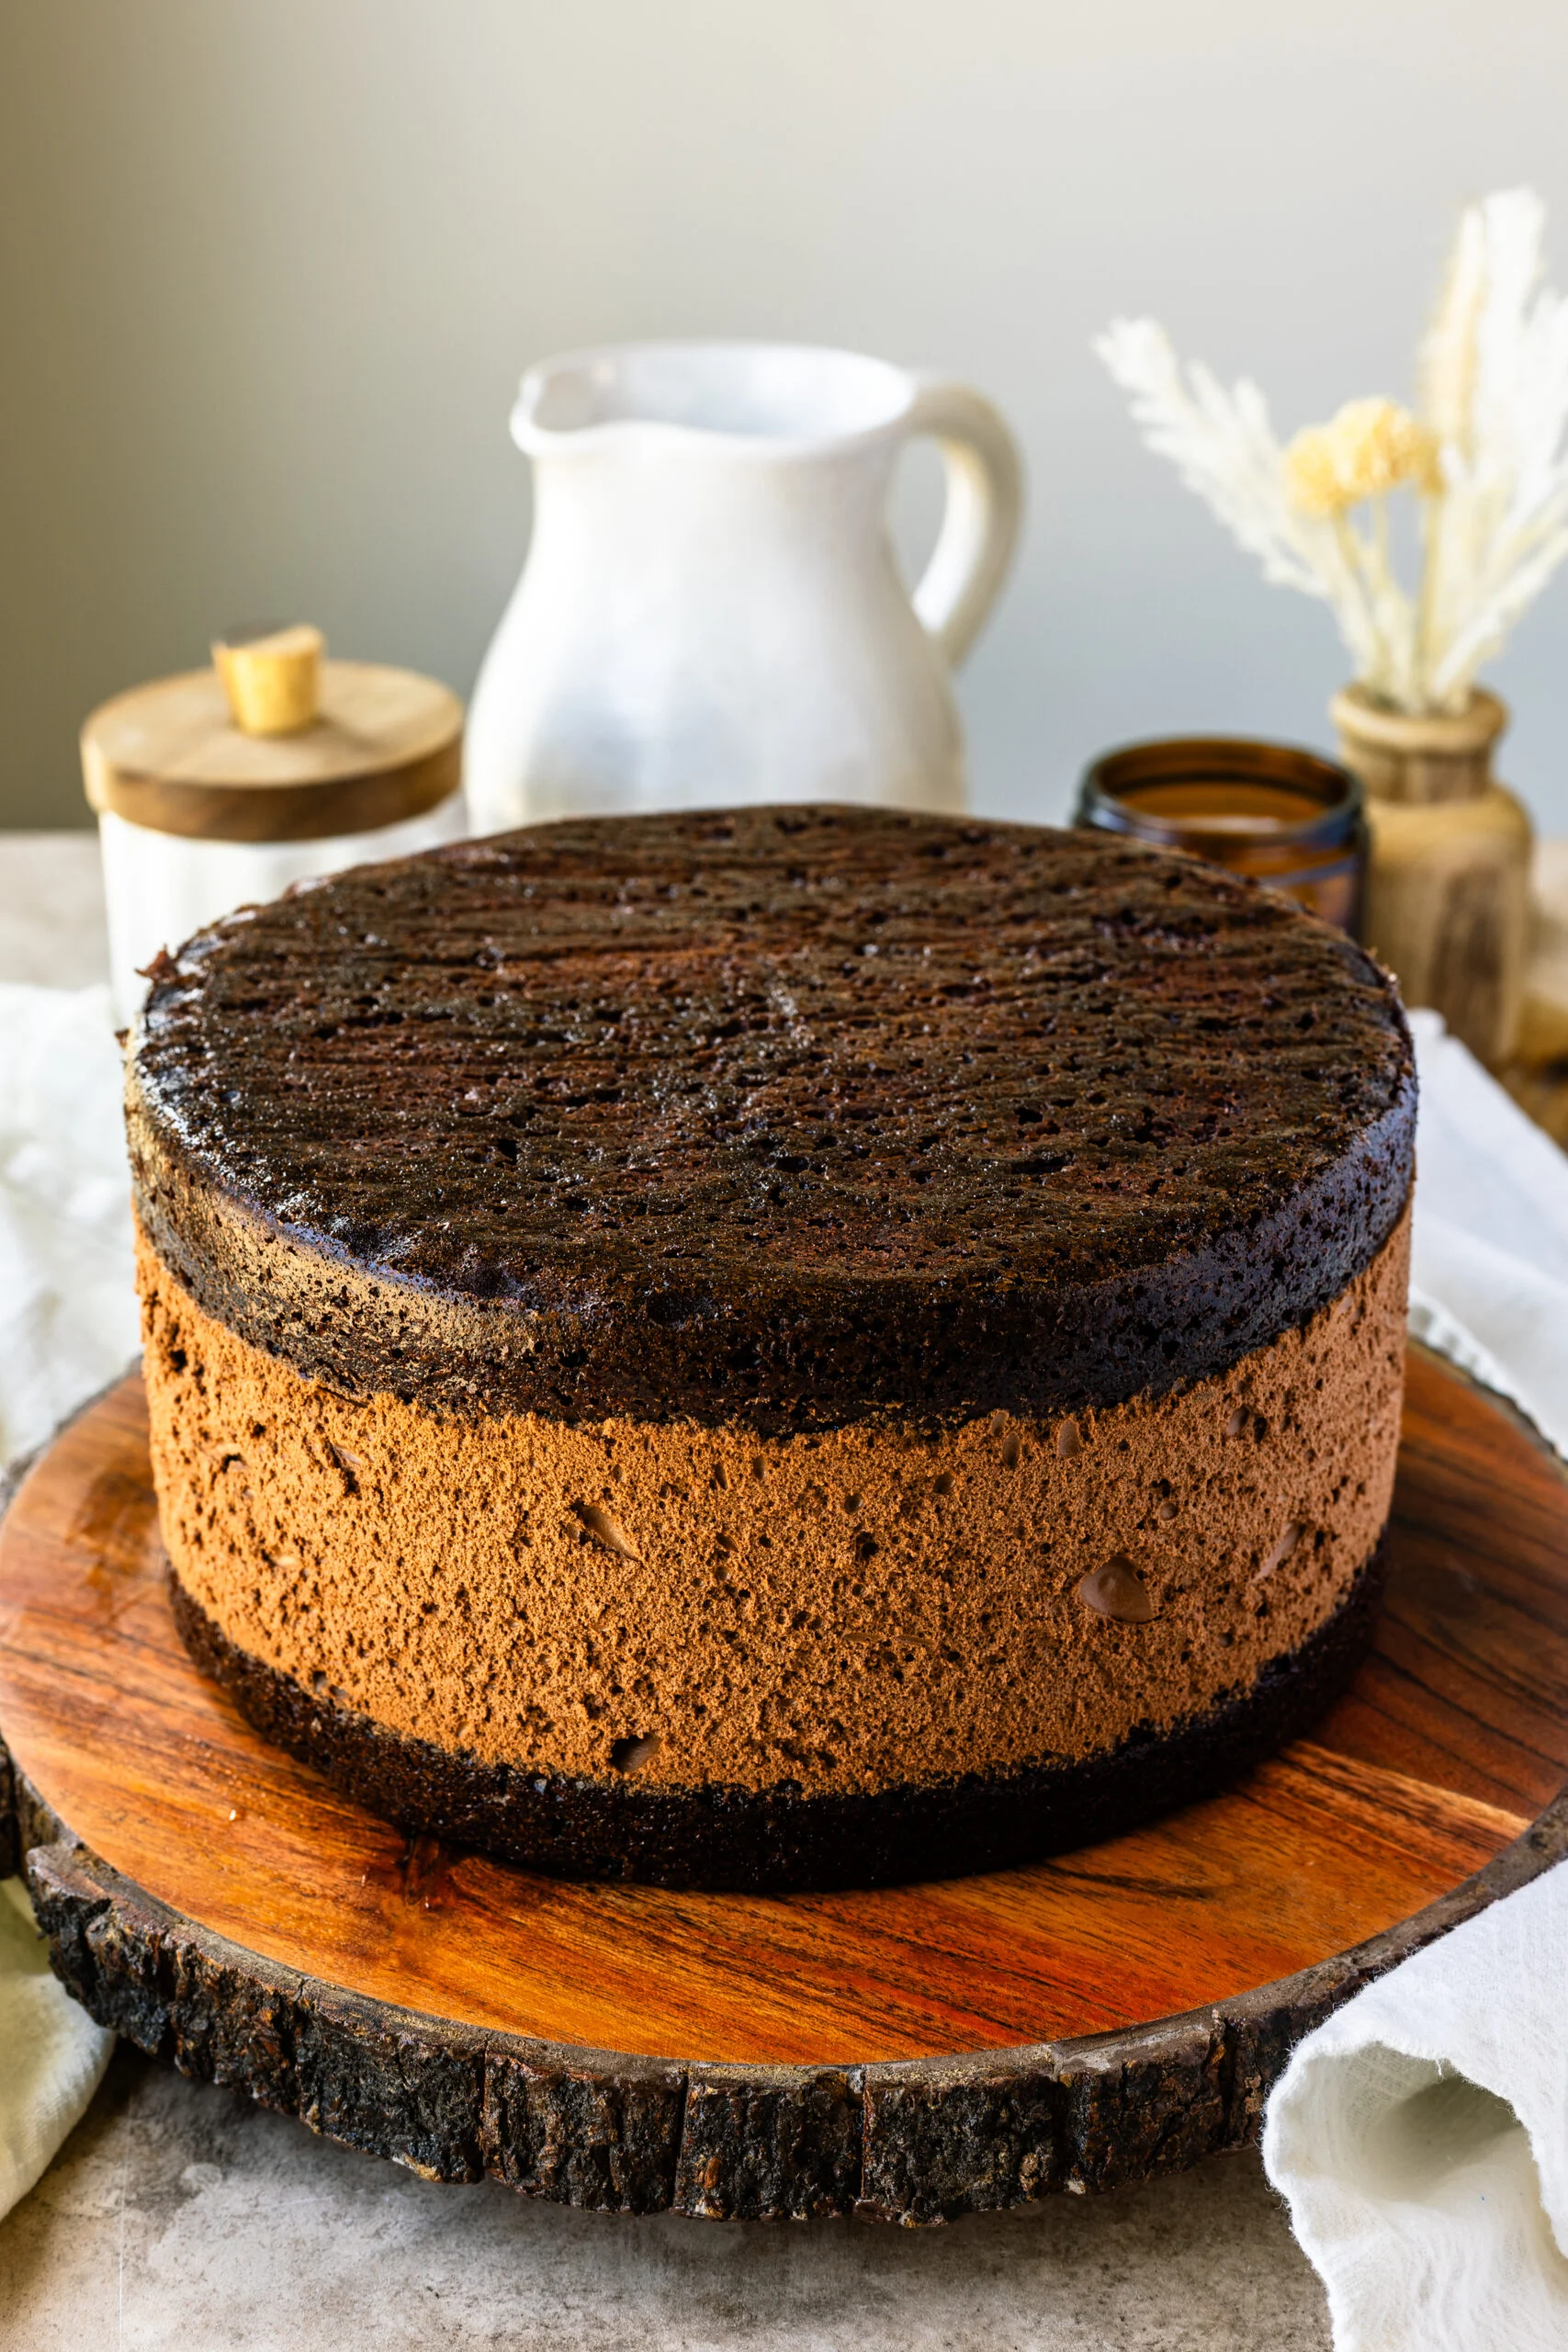
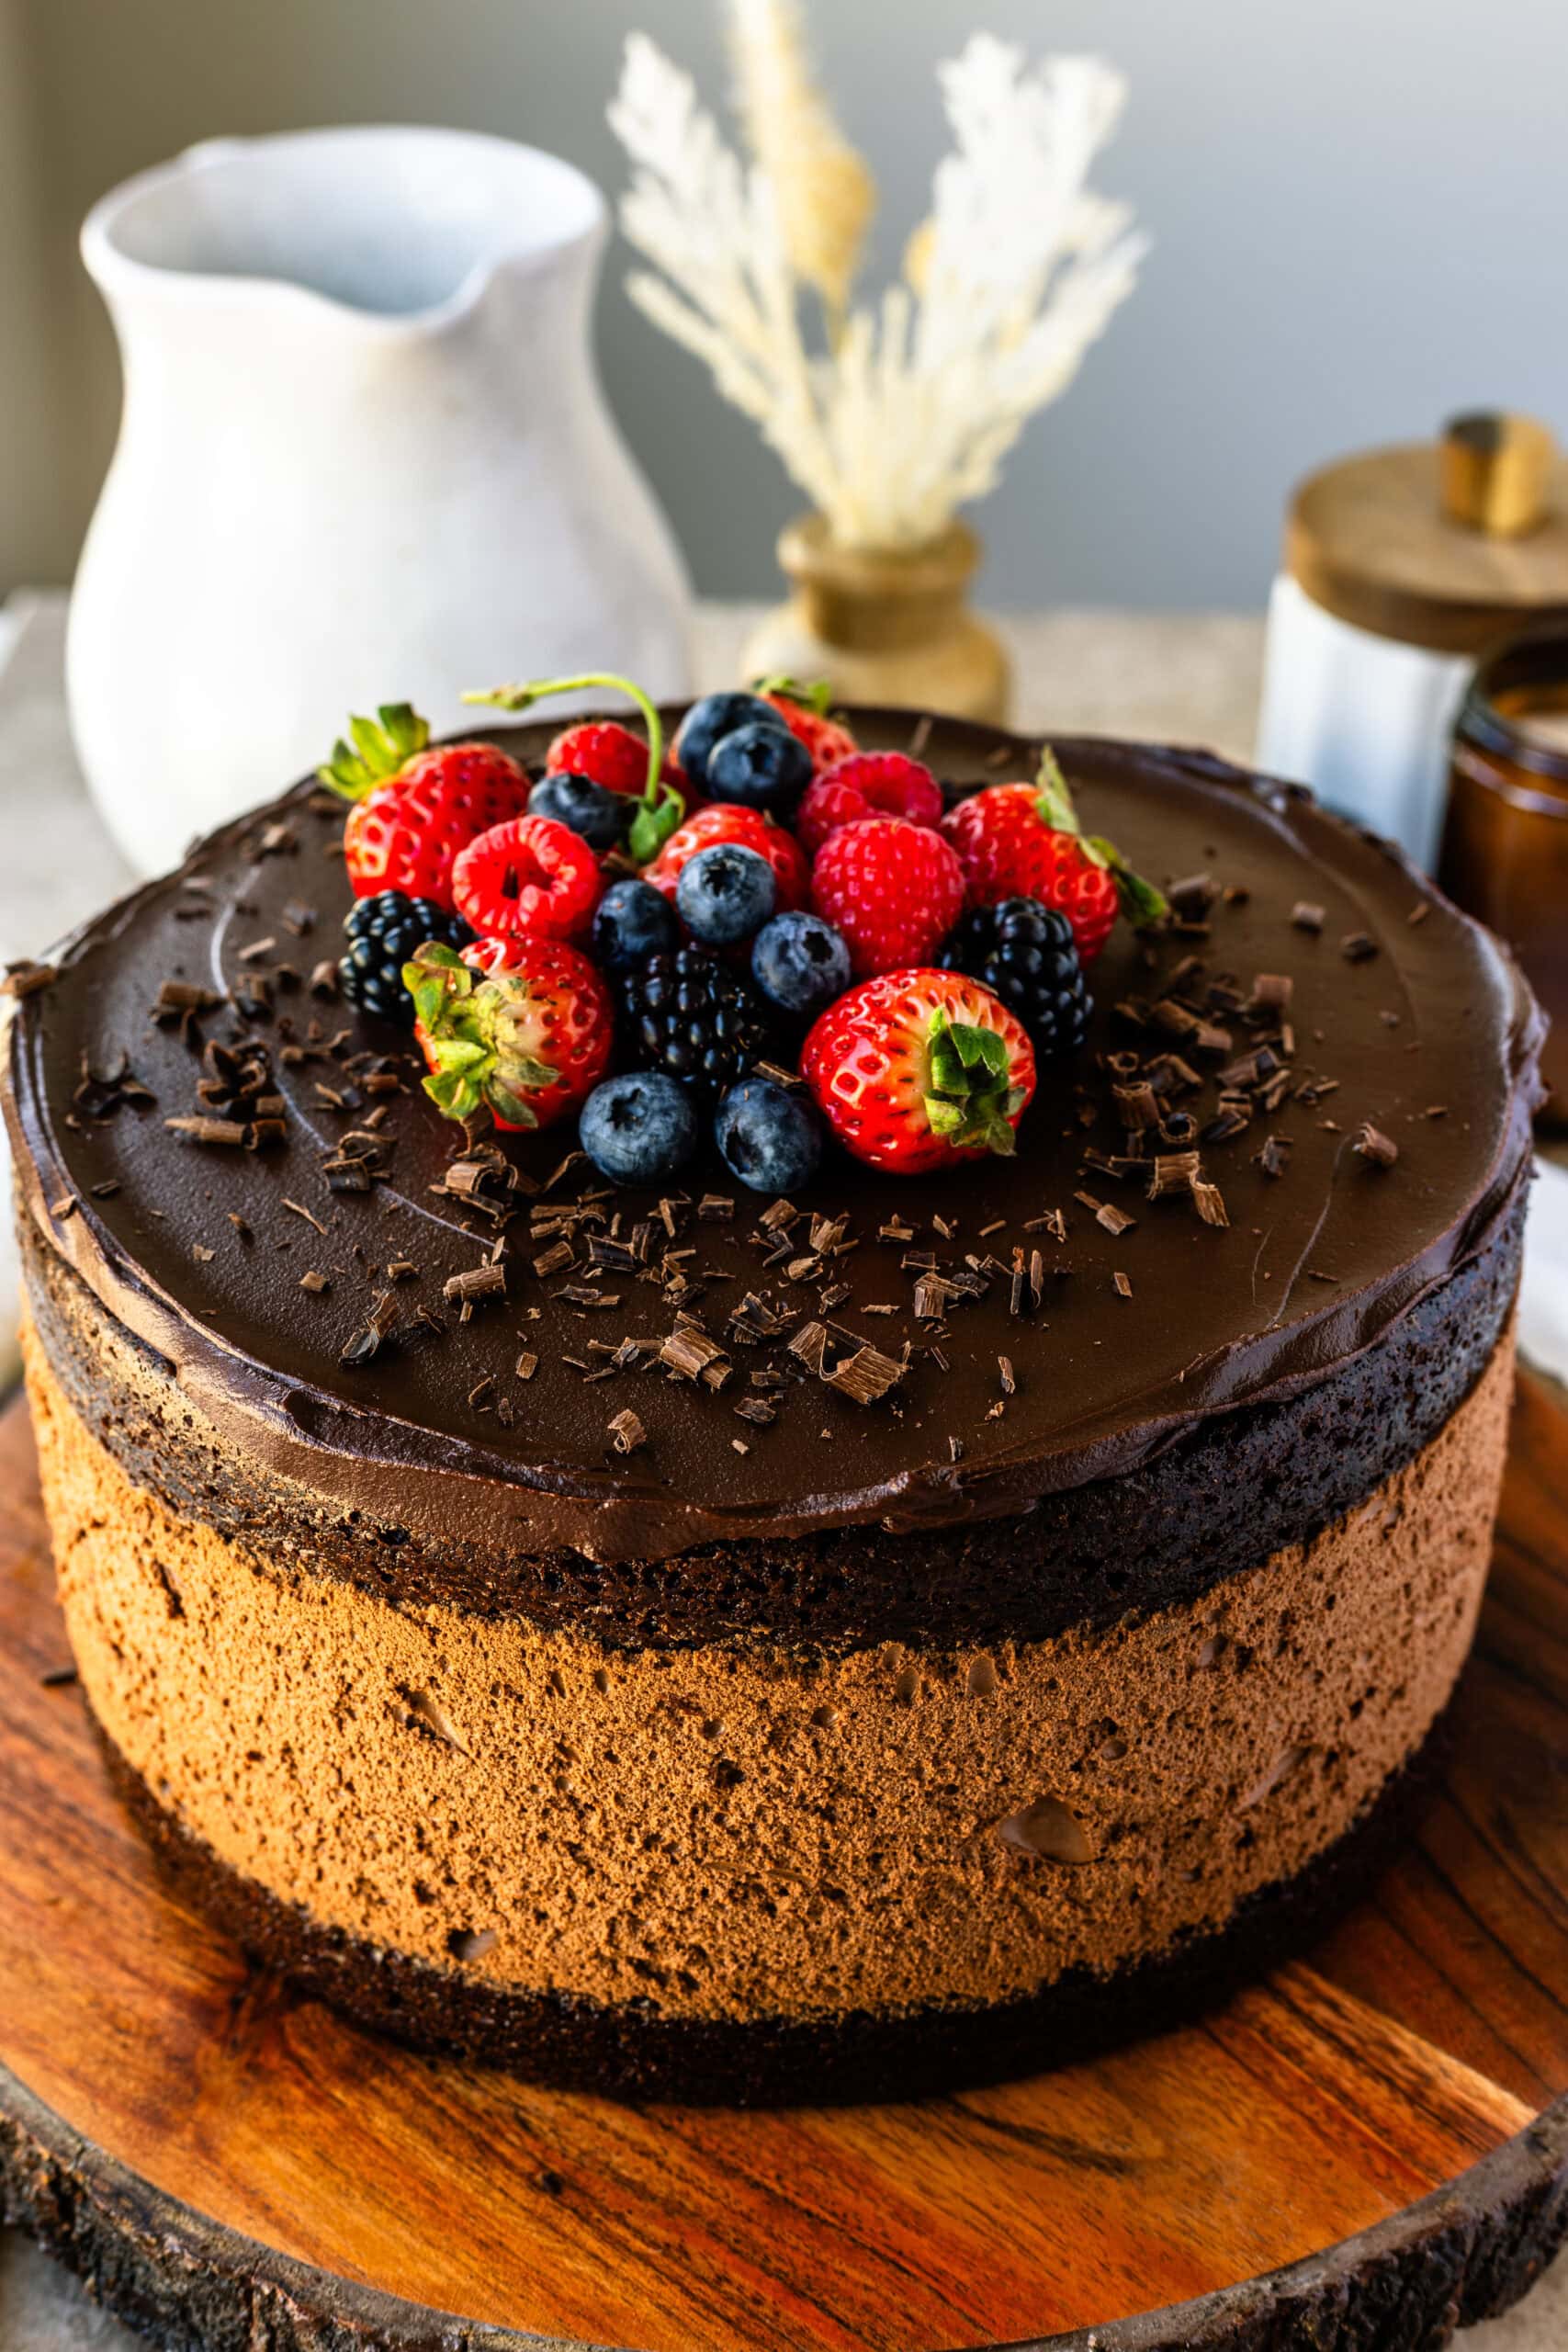
Once finished, it should look something like this!
Step 9: Make the ganache
Combine the chopped dark and milk chocolate in a bowl. Heat the cream and corn syrup until steaming, then pour over the chocolate. Let sit for a minute, then whisk until smooth. Allow the ganache to thicken at room temperature for about an hour.
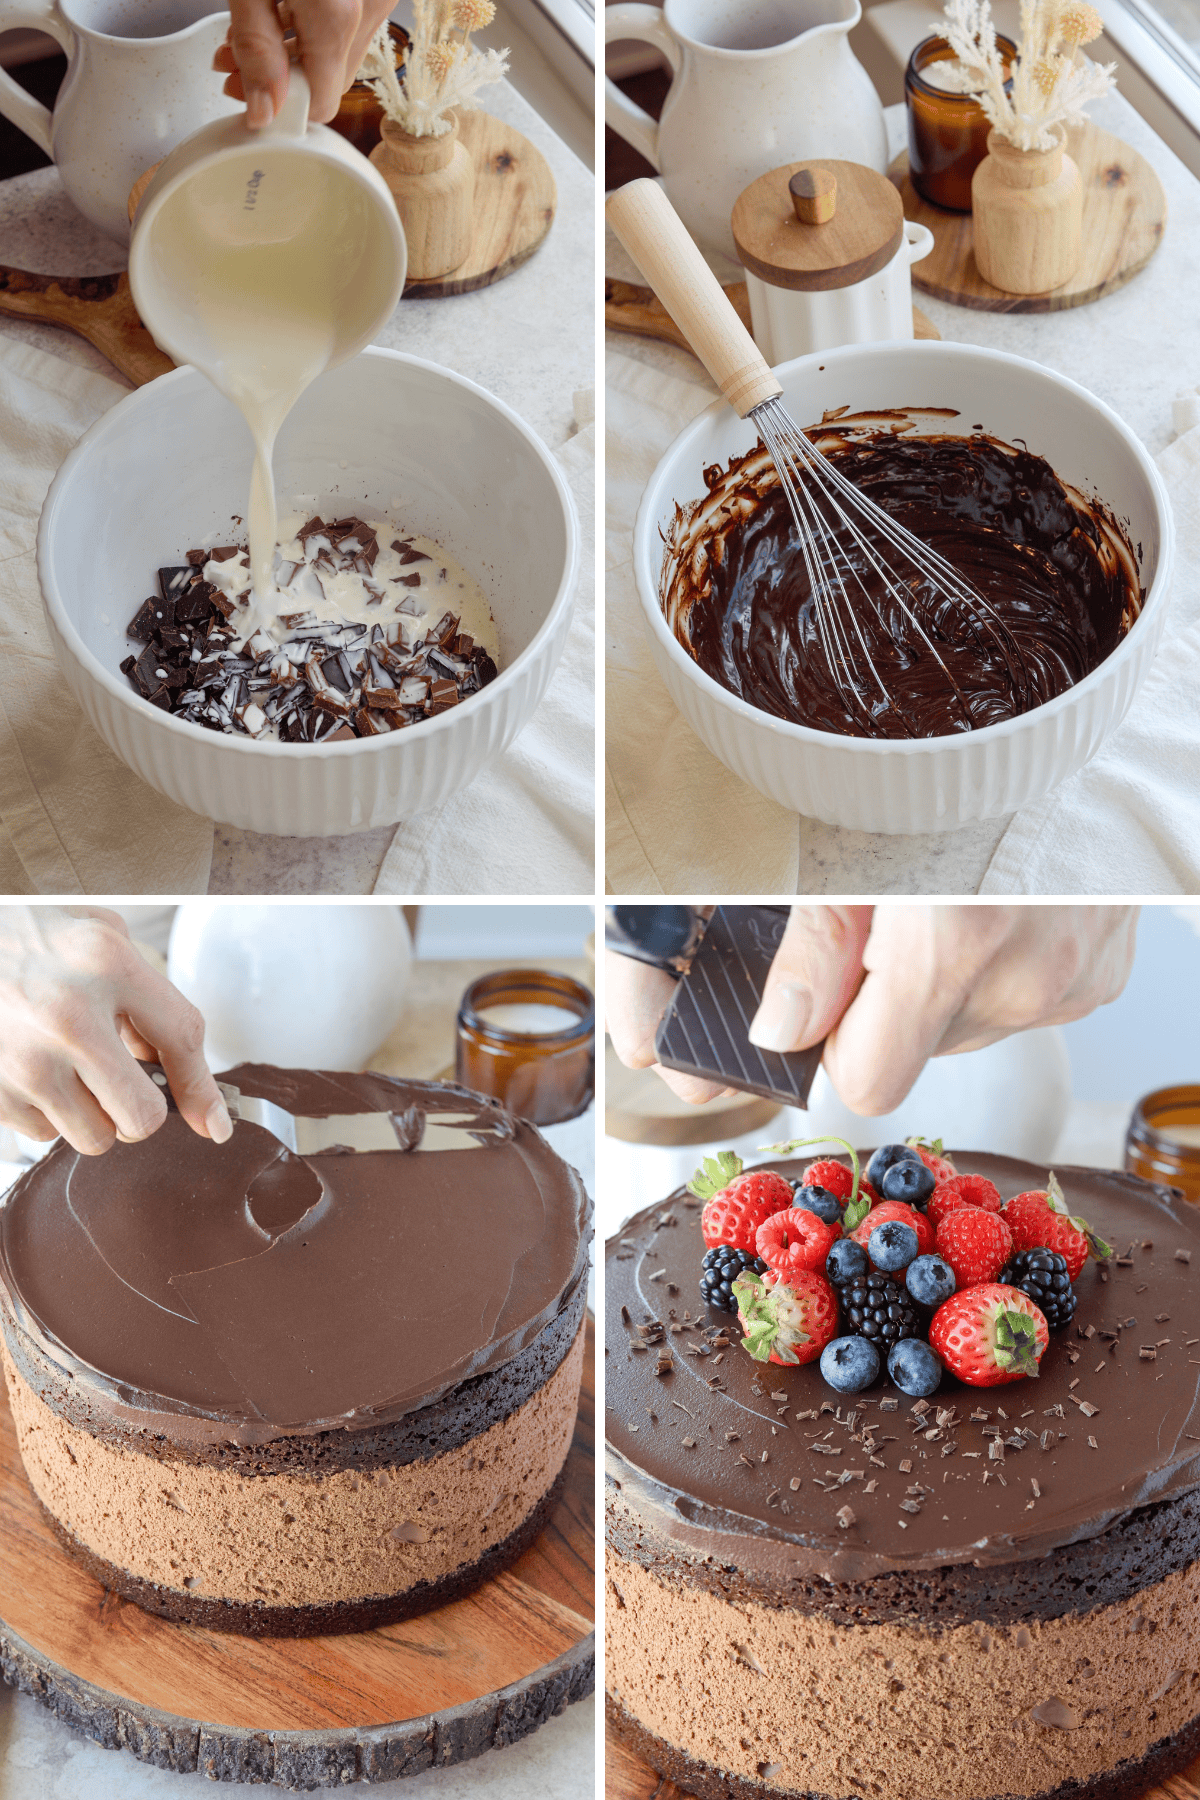
Step 10: Decorate
When the ganache is ready, decorate with care as depicted above! It should look like the below when finished!
Storage & Make Ahead
Store the cake in the refrigerator for up to 3 days. Freeze slices tightly wrapped for up to 1 month.
I like to remove it from the fridge about 10–15 minutes before serving so the ganache softens slightly.
Baking Tips
This cake isn’t difficult, but it does reward preparation and precision.
- Read the entire recipe before starting: There are multiple components here. I always measure everything out first (mise en place) so I’m not scrambling once the mousse stage begins.
- Use a kitchen scale: For layered cakes and mousse, accuracy matters. Especially with chocolate and gelatin. Small measurement differences change texture.
- Bring dairy and eggs to room temperature: Room-temperature eggs, buttermilk, and sour cream incorporate more smoothly into the batter and prevent curdling.
- Don’t skip the hot coffee: It deepens the chocolate flavor and keeps the cake incredibly moist. If you don’t drink coffee, use hot water with a pinch of espresso powder. The cake won’t taste like coffee — it just tastes more chocolatey.
- The cake batter will be thin: That’s intentional. I pour it into a large measuring cup with a spout to divide it evenly between pans without making a mess.
- Chocolate quality matters — especially for the mousse: I prefer a blend of milk and dark chocolate. Milk chocolate softens the flavor, dark chocolate adds depth. Cheap chocolate will make the mousse overly sweet or flat.
- Be gentle when folding: When folding whipped cream and egg whites into the chocolate base, I use a large spatula and slow, deliberate motions. Overmixing deflates the mousse and makes it dense If the mousse looks slightly runny at this stage, don’t panic. It sets completely once chilled.
- Use acetate for clean edges: If you want those smooth bakery-style sides, acetate makes a huge difference. It also prevents mousse from leaking. If you don’t have a pastry ring, use a springform pan lined with acetate. Just note that you may need to slightly reduce the mousse if your pan is shallow.
- For silky ganache: Chop the chocolate finely so it melts evenly. Let the ganache cool to room temperature before spreading — too warm and it will run, too cool and it won’t glide smoothly. If the ganache ever looks grainy or split, whisk in a tablespoon of warm cream or milk until smooth again.
- Serve slightly chilled: This cake is best served cold, but I remove it from the fridge about 10–15 minutes before slicing so the ganache softens slightly and the mousse feels creamy rather than firm.
Variations
This cake is amazing on its own, but here’s what I would do if I were to make a few tweaks!
- Chocolate Raspberry Delight: Add a layer of raspberry preserves between the cake and mousse.
- Coffee Lover’s Twist: Add 1–2 tsp of instant espresso powder to the mousse for a mocha flavor.
- Nutty Crunch: Fold chopped hazelnuts or almonds into the mousse for added texture.
FAQ
Yes. It’s actually better made the day before.
It gives the cleanest edges. If you skip it, the sides may not be as smooth.
It was likely overmixed during folding.
I don’t recommend it for a layered cake like this. The structure depends on it.
If you make this cake…
If you try this Chocolate Mousse Cake, leave a comment below and let me know how it turned out. And if you share it on Instagram, tag me so I can see it — I love seeing your layers come together.
Chocolate Mousse Cake
Ingredients
Chocolate Cake Batter
- 2 cups all-purpose flour 255 grams
- 1¾ cup granulated sugar 350 grams
- ⅓ cup cocoa powder 34 grams
- 1 tsp baking powder
- 2 tsp baking soda
- ½ tsp salt
- ½ tsp espresso powder optional
- 2 large eggs
- ½ cup vegetable oil 120 ml
- ⅔ cup buttermilk 158 ml
- ⅓ cup sour cream 75 grams
- 2 tsp vanilla extract
- 1 cup brewed coffee 200 ml
Chocolate Mousse
- 1¼ cup chopped milk chocolate 212 grams
- 1¼ cup chopped dark chocolate 212 grams
- 4 large yolks
- ½ tsp salt
- ½ tbsp vanilla extract
- 2 tbsp cold water
- 1½ tsp unflavored gelatin powder
- 1½ cup heavy cream divided, (360 ml)
- 4 large egg whites
- ¼ tsp cream of tartar
- ¼ cup granulated sugar 50 grams
Ganache
- 1 cup chopped dark chocolate 170 grams
- ½ cup chopped milk chocolate 85 grams
- 1 cup heavy cream 240 ml
- 1 tbsp corn syrup
Instructions
Chocolate Cake Batter
- This recipe utilizes my Chocolate Birthday Cake batter! Start by pre-heating the oven to 350ºF. Grease and line with parchment two 9-inch cake pans. Grease the parchment and the sides of the pan as well.
- In a large mixing bowl, mix the flour, sugar, cocoa powder, baking powder, baking soda, salt, and espresso powder (if using). Whisk to combine.
- In another bowl, combine the eggs, vegetable oil, buttermilk, sour cream, and the vanilla extract. Whisk until completely incorporated.
- Pour the wet ingredients over the dry ingredients and whisk until combined. When the batter is incorporated, add the hot coffee and mix to combine.
- Whisk until the batter is smooth. The chocolate cake batter will be very thin and liquidy.
- I like to transfer it to a bowl with a spout to help distribute the cake batter between the cake pans, which helps with such a runny batter.
- Divide the batter evenly between the cake pans. Tap them gently against the counter to release any bubbles.
- Bake the cakes in the oven for about 30 to 35 minutes, until a toothpick inserted into the cake comes off clean.
- Let the cakes cool down for 15 minutes in the pan.
- Then remove the cakes from the pan. Let them cool down completely before the next step. If you aren’t assembling the cake on the same day, I recommend you wrap each layer individually in plastic wrap and then freeze until you are ready to use the cake layers. When you are ready to assemble the cake, you can simply use the frozen cake layers, or let them sit on the counter for 20 minutes before beginning.
Preparing the Chocolate Mousse (Mise en place)
- Get all the ingredients separated and measured out, but keep the cream in the fridge so it remains cold.
- You will need a large bowl for the chocolate/egg yolk mixture. You will need a small bowl for heating up the cream with the gelatin. Another large bowl to whip the cream, and one more bowl to whip the egg whites.
Chocolate & Egg Yolks
- Place the chocolate in a large bowl. Microwave for 15 to 30 second intervals, stirring in between, until the chocolate melts completely.
- Allow for the chocolate to cool down for about 5 minutes.
- Add the yolks to the chocolate one at a time, whisking until incorporated. The mixture will get very thick and might get hard to whisk so you may have to use a spatula instead.
- Add the salt and vanilla, mix to combine. Set aside.
Gelatin
- Place the water in a small bowl. Sprinkle the gelatin powder over the water and let it sit for a couple of minutes.
- Meanwhile heat up 1/2 cup of the heavy cream in the microwave until hot and steaming.
- Pour the bloomed gelatin in the hot cream and stir to combine until the gelatin has dissolved with the hot cream.
- Pour the hot cream mixture over the chocolate/yolk mixture just a little at a time, stirring with a spatula until incorporated before adding the next little bit.
- Set the chocolate/yolk/gelatin mixture aside.
Whipped Cream
- Place the remaining 1 cup of cold heavy cream in a large bowl or in the bowl of a stand mixer. Whip on medium-high speed for a few minutes with the whisk attachment or with a hand mixer until stiff peaks form. Set it aside.
Egg Whites
- Place the egg whites and cream of tartar in a bowl, or in the bowl of a stand mixer. With the whisk attachment, whip until it becomes whitened in color and foamy. Then start adding the sugar while whisking on medium speed. Gradually add the sugar in until it’s all been added and continue to whip until stiff peaks form.
Assembling the Mousse
- Add half of the whipped cream to the chocolate/gelatin mixture and fold to combine.
- Add the remaining half and fold again.
- Add half of the whipped whites and fold gently.
- Add the remaining whipped whites and fold until incorporated.
- The mousse will be very runny, it’s ok, it will firm up in the fridge once you assemble the cake.
To Assemble the Cake
- You will need a large (9-inch, or adjustable) pastry ring and acetate to assemble the cake. If you don’t have a pastry ring, you can use a springform pan, but then I recommend halving the mousse recipe because you will have too much mousse and won’t be possible to form such a tall cake in the springform pan. Alternatively, you can make the full mousse recipe and divide whatever mousse doesn’t fit in the pan between ramekins and serve them like that.
- The acetate is needed for the recipe to work otherwise the mousse will leak out.
- Place a cake layer on the bottom of the pastry ring, or in the bottom of the springform pan with the acetate around it. You will want to leave a bit more loose at the top part so the top cake layer can slide in easily.
- Pour the mousse in, on top of the cake. Top with another cake layer.
- Place it in the fridge overnight, or at least 8 hours.
Chocolate Ganache
- To make the ganache place the chopped chocolate in a large bowl.
- Heat up the heavy cream and corn syrup until steaming.
- Pour the heavy cream and corn syrup over the chopped chocolate.
- Let it sit for one minute. Whisk until the chocolate has melted entirely.
- If the chocolate hasn’t melted, microwave for 10 to 15 second intervals, stirring in between until it melts, be careful not to overheat, or it can cause the ganache to split.
- Let the ganache sit at room temperature for about 1 hour until it thickens.
To Decorate
- Remove the pastry ring from around the cake. Carefully peel off the acetate.
- Spread the ganache over the cake. Decorate with berries and chocolate shavings if desired.
It looks amazing! Could you make the mousse with peanut butter instead of chocolate? Would you leave the egg yolks out to even out the fat?
Here’s what I would do. I definitely wouldn’t remove the yolks because they help the mousse set. What I would do is add about 1 1/2 cups of peanut butter, maybe 1/4 cup sugar to make up for the sweetness. You can taste during the process and addd a bit more powdered sugar. I think I’d also add a bit more gelatin to ensure it will firm up. Because the chocolate sets more solid than peanut butter. so maybe use 2 tsp gelatin instead. This is what I’d do if I wanted to make this a peanut butter mousse instead.
Thank you! I appreciate the advice!
I haven’t made it yet, a couple of things I need to clarify first:) This looks AMAZING 🤤 and I’m making for my son’s birthday!
What gelatin do you recommend/use? With all the baking I’ve done in my life I’ve not used gelatin as a thickening agent, but excited to try it! The way you lay out directions is perfect, and easy to visualize! You make a great teacher!! Thanks:)
Dee
Thank you so much, the gelatin I use is Knox.
I’m glad you found the instructions helpful!
Let me know how it goes!
Ah-mah-zing 🙂 my daughter is a chocolate mousse fiend and wanted it for her birthday cake. I made sure to read the instructions and understood the steps before starting with the baking. I made the cake layer 2 weeks prior and still defrosted beautifully retaining the moistness of the cake. Many compliments were received. The best tasting chocolate cake I’ve ever had the opportunity to undertake. I didn’t have 9 inch tins so used 8 inch instead which resulted in a taller cake and came out fine 🙂 thank you !
That’s wonderful, Belinda! I love to hear that! Thank you so much!!
If you are a chocolate lover, this is your cake. It is lip smacking delicious and I can’t get enough of that mousse. I made this in an 8” springform pan,8” cake pans. 17 oz of cake batter is perfect. Make cupcakes with the left overs. I would cut the ganche ingredients in half. I had lots extra and glad I did not put all of it on the cake. I used half and it was perfect. Make sure you read the notes as the mousse recipe card would be for two cakes. Cut it in half if you don’t want extra. But extra mousse is good. Lol. I do wish the recipe card for the mousse is what you need for the cake. I had a lot left over. So decide before you make it.
Use dark chocolate in the cake recipe
A lot of steps but so worth it in the end. I will make again
I want to update my review. This cake is so heavenly, I had to make it again. The first time around, i made a little mistake on the mousse. I had mention to make half of the recipe, but I want to update this. This amount is perfect, to get the rich flavorful of the mousse with the cake. You will want the acetate sheet to be at least 5-1/2-6″ tall. Just a small amount of mousse left over which i loved as to eat, lol This cake is not overly sweet, and so smooth tasting if you are a chocolate lover.
This cake is absolutely delicious! By far one of the best cakes I’ve ever tried and baked. I’ve baked many of your recipes now and they always come out perfect! Thank you so much for sharing your recipes.
I look at acetate on Amazon. It comes in sizes. What size do I need? It looks delicious. C
You want to get at least 5.5 inch tall acetate.
Can I use a regular cake mold to assemble the cake instead of using acetate; so then I can freeze, unmold, and decorate it?
You could but you might have to think about how to remove it from the pan. Also have to make sure the pan is tall enough because it’s going to be quite a tall cake.
Hi, it looks delicious! I want to make sure I understand correctly – for the mousse, do I fold the beaten egg whites into the warm chocolate mixture?
Will that stabilize the eggs?
This cake looks wonderful! I have a friend who adoes chocolate and this will be perfect.
Could I use this mousse as a filling for profiteroles as well?
Hm, it might. It does get very thick.