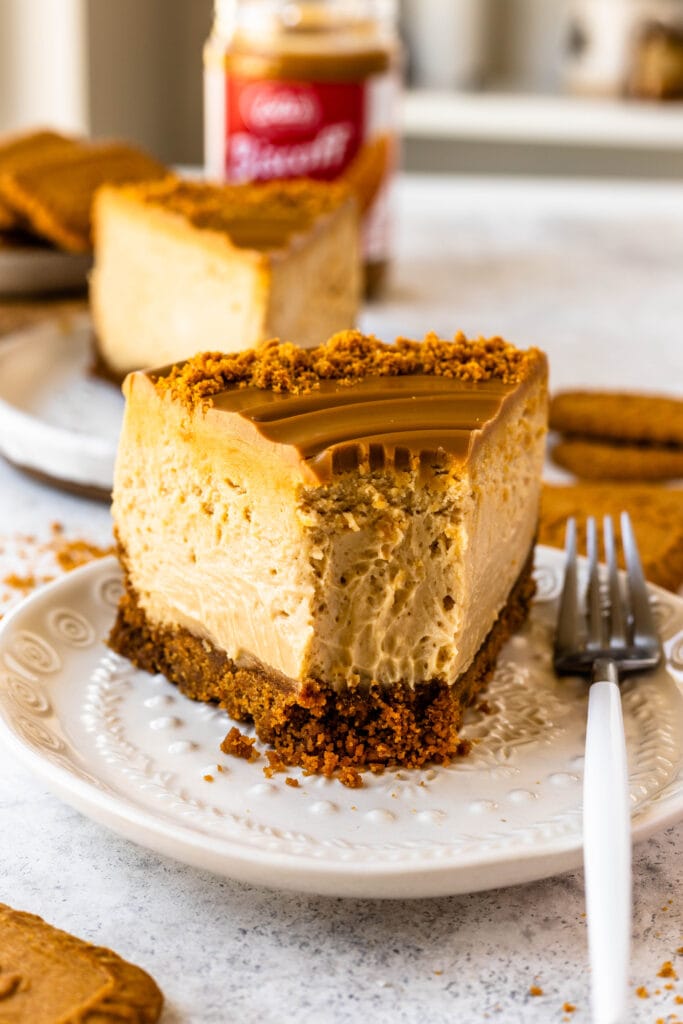
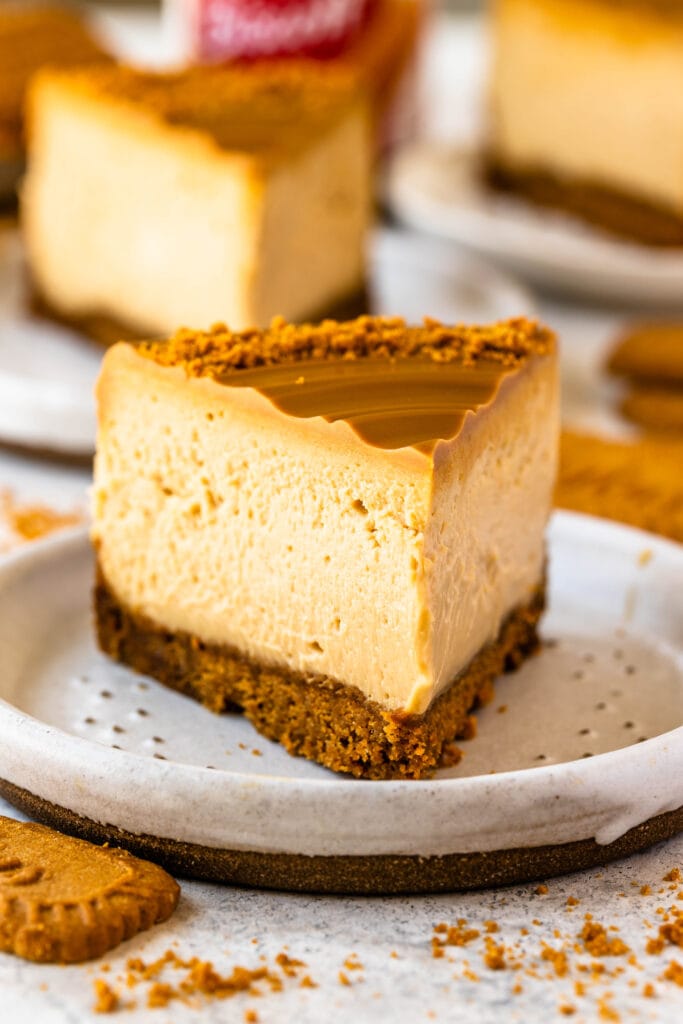
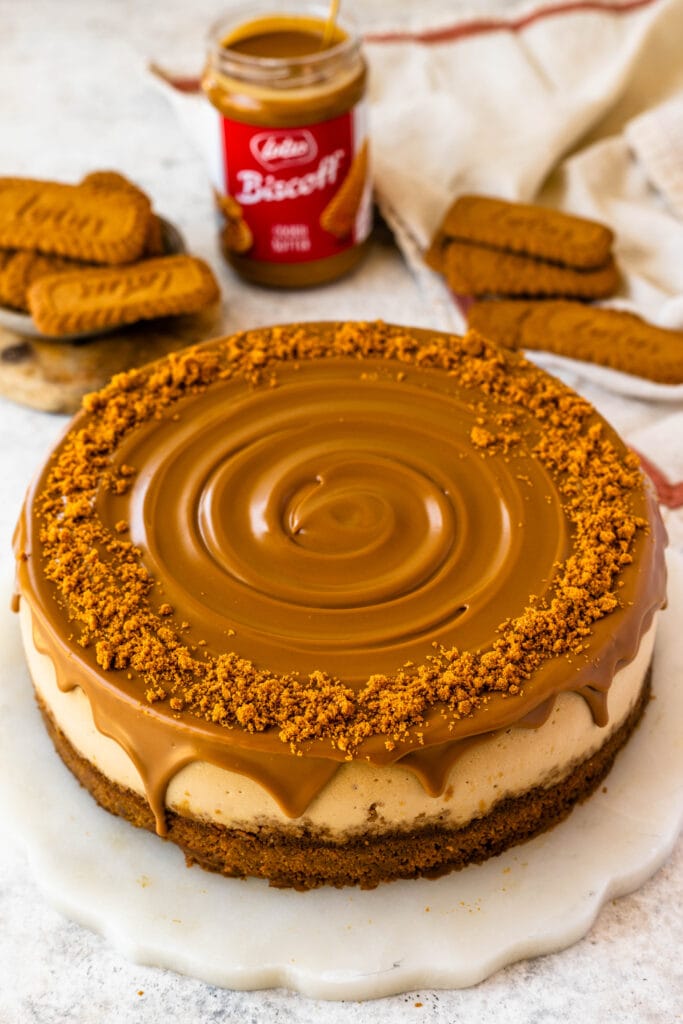
Biscoff Cheesecake
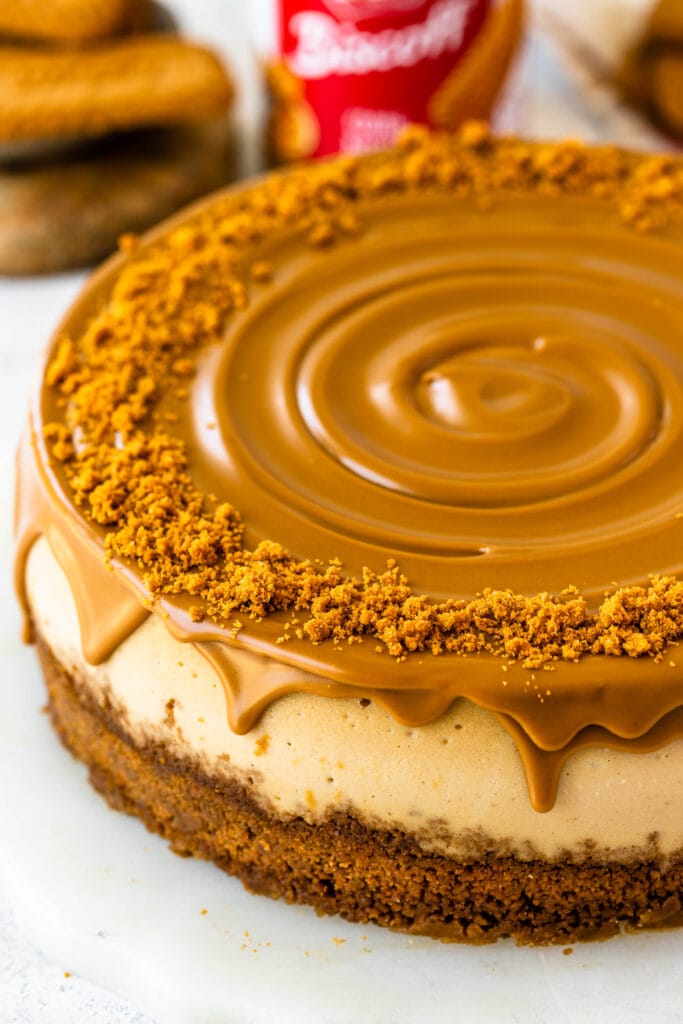
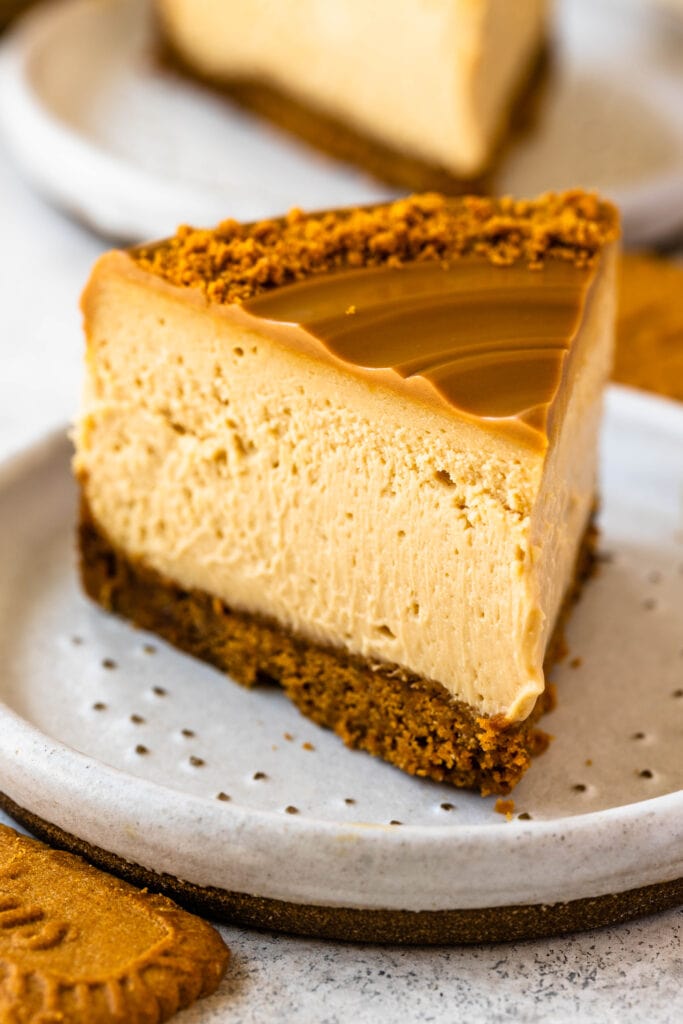
This Biscoff Cheesecake is creamy, rich, and packed with warm speculoos flavor. It starts with a buttery Biscoff cookie crust, then gets filled with a silky batter that bakes up perfectly smooth. A glossy layer of melted Biscoff cookie butter takes it from delicious to unforgettable.
I’ve tested hundreds of cheesecake recipes over the years, and I’m currently writing an entire book dedicated to cheesecake. And truly, this one ranks among my top recipes. It’s reliable, impressive, and the kind of dessert people remember long after the last bite. Check the reviews below this post and see for yourself!
What Is Biscoff?
Biscoff is a spiced shortcrust cookie made by Lotus Bakeries. The flavor is similar to a caramelized, lightly spiced shortbread with cinnamon, brown sugar, and warm buttery notes. When blended into cheesecake batter, it creates a flavor that tastes like speculoos + cheesecake + caramel butter all in one.
This post may contain affiliate links. I earn a commission from qualified purchases. Please read our Privacy policy here.
If you already love Biscoff cookies or Biscoff spread, this dessert is the ultimate way to enjoy them.
Why you will love this recipe
- Thick, crunchy Biscoff crust
- Creamy, luxurious filling with no graininess
- No complicated steps — perfect for beginners
- Water bath for a crack-free cheesecake
- Stunning presentation with melted Biscoff topping
- Perfect make-ahead dessert
- Amazing reviews, read them for yourself!
The ingredients
- Lotus Biscoff biscuits – finely crushed; I don’t recommend substitutes here because the caramelized spice is essential to the flavor balance. However, you can use a graham cracker crust instead, if you can’t find Biscoff cookies.
- butter
- cream cheese – full-fat, brick-style, fully softened; avoid spreadable tubs, which can make the filling loose. Also, make sure it’s at room temperature, to prevent lumps in the cheesecake.
- brown and granulated sugar – brown sugar deepens the caramel notes, while white sugar keeps the filling from tasting heavy
- sour cream – it adds tang and keeps the cheesecake from being dense. You can substitute for yogurt if you don’t have sour cream.
- Biscoff cookie butter – the star of the show! I prefer using creamy Biscoff cookie butter for a smooth filling.
- vanilla extract – essential to the recipe. It rounds out the flavors.
- salt – essential for balance.
- eggs – use room temperature eggs. You should not try to substitute the eggs in this recipe. If you want to make an eggless version, you can check out this No-Bake Biscoff Cheesecake recipe.
The tools
- Large roasting pan for the water bath – I prefer using a disposable roasting pan, which I reuse multiple times since it only ever holds water.
- Food processor (or a rolling pin to crush the cookies) – A food processor works best because it creates very fine crumbs, but a rolling pin will work well if you don’t have one.
- Electric mixer – A hand mixer or stand mixer both work; you’ll need one to properly beat the filling.
- 9-inch or 8-inch springform pan – I use an 8-inch Fat Daddio’s pan that’s 3 inches tall. This recipe also works well in a 9-inch pan. You can bake the batter in cupcake pans too; you’ll get about 32 mini cheesecakes, and they’ll need roughly 20–25 minutes in the oven.
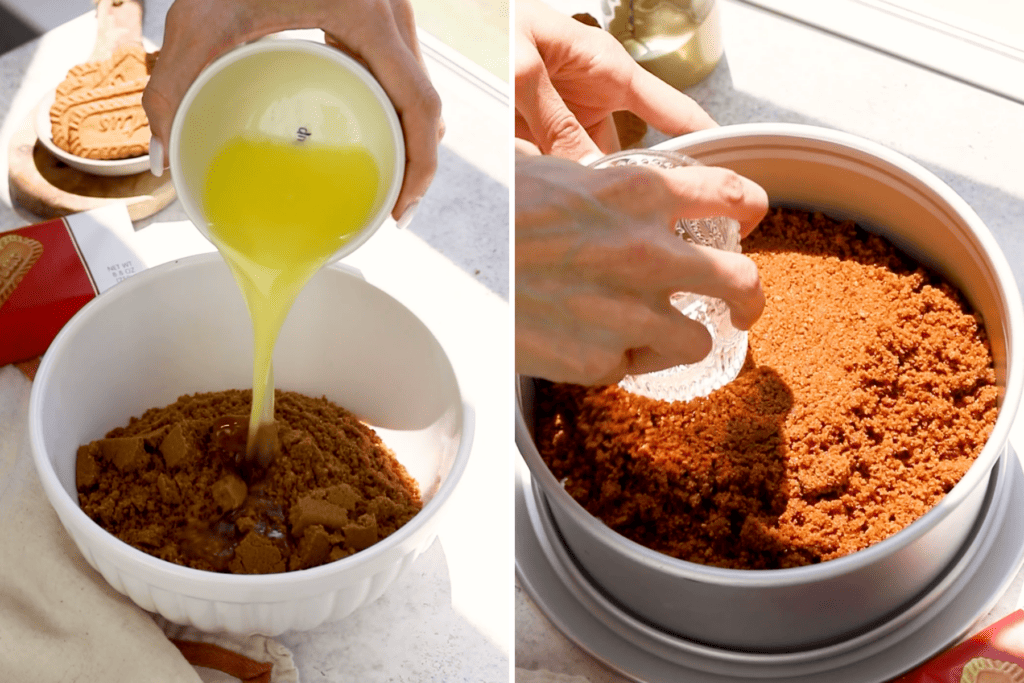
Biscoff Cookie Crust
Let’s begin with the Biscoff cookie crust. Crush the Biscoff cookies into crumbs. Mix with melted butter, and press the crumbs onto the bottom of your springform pan.
Bake in the oven for about 10 minutes – your crust should come out slightly golden. While the crust is baking and cooling, it’s time to prepare the cheesecake filling.
How to make the cheesecake
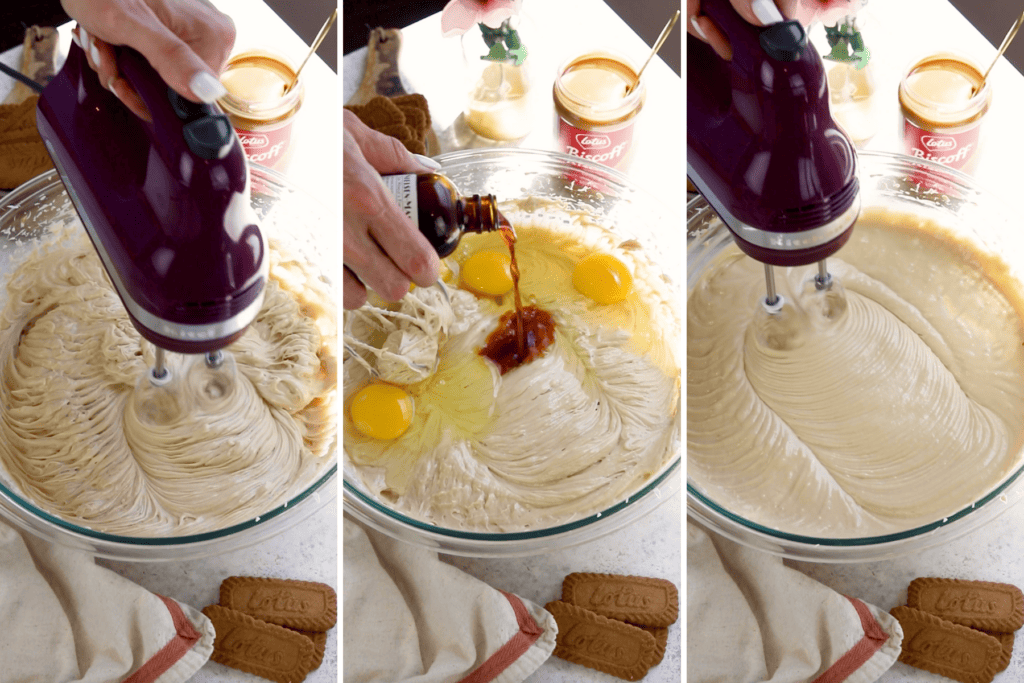
To make the cookie butter cheesecake batter, start by beating the full-fat cream cheese with an electric mixer. If using a stand mixer, use the paddle attachment. I just used a hand mixer.
Add the brown sugar and granulated sugar to the bowl and beat.
Then, add the cookie butter spread along with the sour cream and mix to combine.

Finally, add the eggs, the vanilla, and salt.
I added the eggs all at once, but often times when making cheesecake, it’s recommended that you add the eggs one at a time, waiting for one egg to be incorporated before adding the next one. That is because you want to avoid over mixing the batter once the eggs have been added. Beating the eggs too much can cause the cheesecake to crack.
Since I was using my hand mixer, and it’s not very powerful, I know the batter wouldn’t be over mixed if I added all the eggs at once. However if I was using my KitchenAid stand mixer, I would add the eggs one at a time.
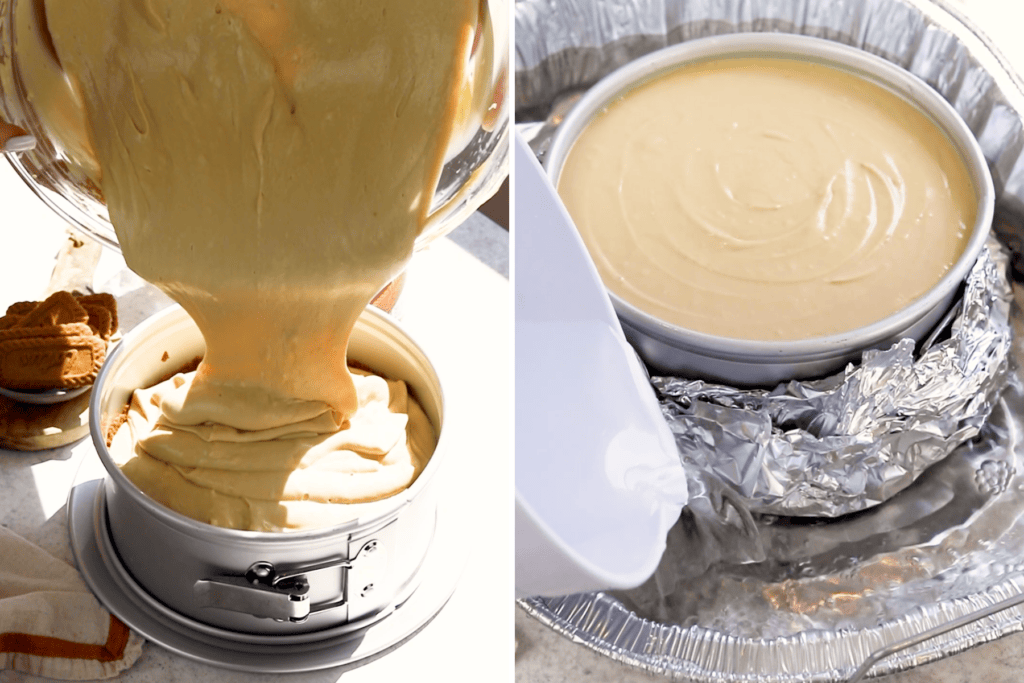
Spread the cheesecake mixture on top of the baked cookie crust. I used a deep 8-inch springform pan to make the cheesecake, you can also use a 9-inch springform pan. The brand I use is called Fat Daddio. I always get asked about this pan, and I can’t recommend it enough.
Wrap the bottom of the springform pan with a few layers of aluminum. Then, place it in a large roasting pan. Pour hot water in the roasting pan to form a water bath.
Baking
Bake the cheesecake for 60 to 70 minutes in the 325ºF oven.
To check if the cheesecake is done baking, wiggle the pan gently. The center should be slightly jiggly, while the edges of the cheesecake should look set. Some ovens might take longer, even as long as 90 minutes to fully bake the cheesecake.
Once the cheesecake is done baking, turn the oven off, and leave the cheesecake in there for one hour. If you remove the cheesecake from the oven immediately after baking, the sudden temperature change can cause the cheesecake to collapse and break.
Place the cheesecake in the fridge to chill for at least 6 hours before serving.
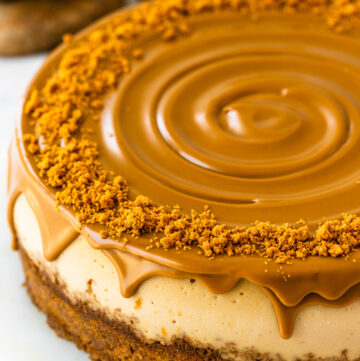
To decorate
To decorate, melt some biscoff lotus cookie butter in the microwave and drizzle on top of the chilled cheesecake. Use an offset spatula to spread it around. Sprinkle biscoff crumbs around the edges.

Tips for Cheesecake Success
- Use room temperature ingredients for a smooth batter.
- Do not over-mix after adding the eggs. It can add too much air into the batter and cause the cheesecake to expand too much and crack.
- Grease the sides of the pan, however, only do it after baking the crust. You can use oil spray or brush a bit of neutral oil. Avoid using butter due to the water content, it can make the crust soggy.
- Don’t open the oven during baking, only towards the end to check if the cheesecake is done baking.
- Make sure to leave the cheesecake in the oven for one hour after baking is completed, to prevent cracking.
- Chill completely for the creamiest texture.
- Only remove the ring from the pan after chilling the cake.
- Freeze slices individually for easy future desserts.
Frequently Asked Questions
Can I use another type of cookie for the crust?
Yes, graham crackers or digestive biscuits can be swapped in, but Biscoff cookies give this cheesecake its signature flavor and make it stand out from other cake recipes. You can also make a graham cracker crust instead.
Do I need a water bath?
I always recommend a water bath (or at least a pan of water on the rack below) to help prevent cracks and keep the texture extra creamy.
Can I make this cookie butter cheesecake ahead of time?
Yes! It tastes even better the next day.
How should I store leftovers?
Store the cheesecake covered in the refrigerator for up to 5 days. It also freezes beautifully — just wrap slices individually for an easy make-ahead dessert. You can freeze the whole cheesecake as well as long as you have a container that comports it.
Can I use crunchy Biscoff spread instead of smooth?
Yes! Either works well.
If this recipe wins you over, make sure to try the No-Bake Biscoff Cheesecake next—it’s just as flavorful but even creamier, and requires zero oven time. You might also enjoy my Tiramisu Cheesecake, Chocolate Cheesecake, and Oreo Cheesecake, all rich, crowd-pleasing desserts that showcase different flavors and textures.
If you try this recipe let me know in the comments below or tag me on Instagram, I love to see your creations!
Watch Video

Biscoff Cheesecake
Ingredients
Biscoff Crust
- 250 grams biscoff cookies 1 package of biscoff cookies
- 1/3 cup unsalted butter 75 grams
Biscoff Cheesecake Batter
- 907 grams cream cheese softened (4 packages of 8 oz.)
- 1 cup brown sugar 200 grams
- 1/4 cup granulated sugar 50 grams
- 1/2 cup sour cream 120 grams
- 1 cup biscoff cookie butter 240 grams
- 1 tbsp vanilla extract
- 1/4 tsp salt
- 4 large eggs room temp
To decorate
- 1/2 cup biscoff spread
- 1/4 cup biscoff cookies crumbled
Instructions
Biscoff Crust
- Pre-heat the oven to 325ºF.
- Place the biscoff cookies in a food processor and process to obtain fine crumbs.
- Melt the butter and mix with the biscoff crumbs.
- Press the mixture on the bottom of an 8” or 9” cheesecake pan. If using an 8” pan, it must be deep.
- Bake the crust in the oven for 10 minutes.
- Remove it from the oven and let it cool down.
- After the crust is baked, grease the exposed sides that will touch the cheesecake batter with oil spray or by brushing a bit with neutral oil.
Biscoff Cheesecake Batter
- Beat the cream cheese for 3 minutes with a mixer at medium speed, until creamy.
- Add the brown sugar and granulated sugar to the cream cheese and beat for another 2 minutes at medium speed.
- Scrape the bowl and beat for another 30 seconds.
- Add the sour cream and biscoff cookie butter to the bowl, and mix to combine. Scrape the bowl.
- Add the vanilla, salt, and mix.
- Make sure to scrape the bowl a few times during the mixing process, to avoid the cream cheese from forming lumps in the batter.
- Add the eggs to the batter, mix just until combined. It’s best to add one egg at a time, waiting for one egg to be incorporated before adding the next one.
- Avoid over mixing once the eggs are added, to prevent cracking of the cheesecake.
- Pour the cheesecake in the pan, over the baked and cooled crust. Some cheesecake pans, such as my own, require the sides to be greased before adding the batter in, or the cheesecake sticks, so I always spray the sides of my pan with oil before pouring the cheesecake batter in.
- Wrap the bottom of the pan with a few layers of foil.
- Place the pan in a larger roasting pan, and add hot water to the roasting pan, to form a water bath. This is very important so the cheesecake doesn’t crack.
- Bake the cheesecake in the pre-heated 325ºF oven for 60 to 70 minutes.
- To check if the cheesecake is done baking, give the pan a little wiggle, it should jiggle slightly in the center, but the edges should look set.
- Turn the oven off, and leave the cheesecake in there for 1 hour.
- Remove the cheesecake from the oven and place it in the fridge for at least 6 hours.
To decorate
- Melt the biscoff cookie butter in the microwave for a few seconds until it’s runny.
- Pour over the cheesecake and spread with a spatula.
- Spread biscoff cookie crumbs around the edges of the cheesecake.
Great, Thanks for sharing your recipe. I made it for my manager’s birthday and she loves it! I always make cheesecake for my colleagues birthday and this is the trending flavour at this time. Some of them wants to order for their love one birthday 💜😇 I wish i can share the picture of it? 🎂
Aw I also wish you could share a picture! I’m going to look into getting that feature so I can see pics of things people bake because it makes me so so happy! Thank you so much for making my recipe! Your friends and colleagues are so lucky!!
This was fabulous! So tastey and smooth. I baked as per the instructions and it did not crack. I left it out longer on a cooling rack on top of the stove before I placed it in the fridge (it was too warm to put in the fridge after an hour). I decorated the next day and the Biscoff cookie butter became thick very quickly on the cold cheesecake. So next time I would make my cookie butter a little warmer. I also used parchment on the bottom of my springform pan and had no problems with the crust. It came off the parchment easily and I lifted it onto my serving plate. Decorated and placed back in the fridge. I would definitely make this recipe again.
I can’t add a picture but this was a wonderful recipe!
I tested it out for an upcoming friend’s birthday. So I shared the small batch with neighbors and other friends. Everyone loved it. I 100% will make a big batch for the party. I made the cupcake version. I used the tall cupcake liners so everything fit. It was phenomenal. I added a dolop of homemade whip cream on top of the cookie spread and put crushed cookie around it. 10/10.
I may sweeten the cream a touch more but it was all wonderful!
How come nowhere is there a recipe for biscoff cookie butter In this recipe
Because you buy it at the store, already made. I haven’t tried making my own yet, I guess it would be a fun experiment.
Hi!! I lived this recipe so much! how would you recommend i make it but as a strawberry cheese cake? i love how the biscoff one came out but want to try something new without using a different recipe/process.
You want to add strawberry to the biscoff cheesecake or make a separate just strawberry cheesecake?
a separate strawberry cheesecake but in the way you would make it. i really loved the biscoff recipe and wanted something similar but strawberry.
I haven’t made this recipe yet but if i’m trying to 1/4 it, how long should I put the cheesecake in the oven for?
It depends on the pan size. I’d start checking at 15-20 minutes depending on the pan. If it’s a large pan and the layer of cheesecake is shallow, it can bake really quick. If it’s in a 6 or 4″ pan, it can take 20-30 minutes (or more). I’d check every 5 to 10 minutes, until the center is slightly jiggly but the top of the cheesecake is set. like a jello consistency.
I’ve never had Biscoff before but made this cheesecake for the first time today. The recipe was simple and was easy to follow. The flavor…1,000,000 stars! Creamy, buttery just omg so good! Will be making this again and again!
Wow, I love that! Thanks, Melissa!
Can you make this chocolate?
You could. I’d add about 1 cup of melted and slightly cooled chocolate, and about 4 tbsp of cocoa powder. Add the cocoa powder after adding the sugar. add the melted chocolate before adding the eggs. I’d also add 1/2 cup of heavy cream to the batter to balance out the texture from becoming too dry or crumbly. Another thing to consider is you’ll have more batter and it won’t fit in the 9 or 8 inch pan. You could scale all these measurements to use 3 blocks of cream cheese instead. I would use the following measurements:
680 g cream cheese, softened (24 oz / 3 packages)
150 g brown sugar (¾ cup)
38 g granulated sugar (3 tbsp)
90 g sour cream (6 tbsp / scant ½ cup)
180 g Biscoff cookie butter (¾ cup)
2 tsp vanilla extract
scant ¼ tsp salt
3 large eggs, room temp
¾ cup melted chocolate
6 tbsp heavy cream
3 tbsp cocoa powder
I havent experimented with these measurements but if I wanted to adapt this recipe for chocolate this is what I’d try it out. But now im adding a Biscoff Chocolate Cheesecake recipe to my list because I love that idea. So if you wait a bit, might be posted soon! lol!!! Thank you so much!!!
great recipe but “if using an 8″ it must be tall” be more specific, I use a daddios 8×3 and NO WAY 4 bars are fitting in an 8″
If using an 8″, half most of this recipe.
That’s most definitely the pan I used for this recipe, the fat daddio 8×3 springform pan.
Followed this recipie to a T, left it in the fridge over night. Just got it out and glazed it with the cookie butter. It looked absolutely amazing, no cracks browned outer edge and the spring form pan came off so easily. BUT, I just cut a slice and the center did not cook fully, it’s mushy while the outer edges are firm, the cookie crumb crust stuck to my pan so when I tried to cut a slice out the cheesecake separated from the crust. I’m not sure what I could have done wrong, I had the water bath, greased the sides of the pan after baking the crust slowly mixed in the eggs baked it for 70 minutes after I checked at the 60 minute mark and the whole thing was jiggling still, waited to turn off the oven till the center was jiggling slightly and the edges were set then left it in for an hour before transferring to fridge overnight. I’m soooo sad it turned out this way because it looked perfect 😞
(Also just want to add, I ate the outer edges of the cake because they were cooked perfectly and yes this cheesecake tastes absolutely heavenly)!
What if I only have a 7 1/2 X 2 1/2inch pan?? Should I just put less mixture in?
Yes, do put less mixture in. You can bake the leftovers in small ramekins, or cupcake pans.