Best Cheesecake Tips
Welcome to my best cheesecake tips! There’s something undeniably irresistible about a perfectly made cheesecake. Creamy, rich, and deliciously decadent, it’s a dessert that has stood the test of time.
Whether you’re a seasoned baker or a novice in the kitchen, this guide will help you create the perfect cheesecake every time.
Here on the blog I have tons of recipes for different variations of cheesecakes, but this post will help give you a detailed understanding of this delicious dessert and the best tips for you to have in mind when baking, to ensure success.
This post may contain affiliate links. I earn a commission from qualified purchases. Please read our Privacy policy here.
Guide to making the perfect cheesecake
Being successful at making cheesecakes is a matter of paying attention to the small details. I try to be as thorough as possible on the recipes when I write the instructions, but it can take a few times practicing until you are able to incorporate all the tips given.
Eventually, all the individual elements combined will become second nature to you, and you will be able to easily make a perfect cheesecake.
A Brief History of Cheesecake
Cheesecake has a rich history that dates back to ancient Greece, where it was served to athletes during the first Olympic Games. The dessert eventually made its way to America with European immigrants and gained significant popularity in the late 19th century, especially in New York.
Arnold Reuben, a New York restaurateur, is credited with developing the modern New York-style cheesecake using cream cheese, which gives it a rich and creamy texture.
Today, people worldwide enjoy cheesecake in a variety of flavors and styles, from traditional baked versions to innovative no-bake creations. Now that you know a little bit more about the history of cheesecake, let’s dive into my essential tips for making it!
Choosing the Right Pan and Tools
When embarking on a cheesecake recipe, you want to make sure you have the right tools. Besides the obvious which is bowls, spatulas, measuring cups, below are some of the main tools you will need to make cheesecake.
Cheesecake Pan
Let’s start with the pan. Most cheesecake recipes call for a 9″ springform pan. I personally use a 8″ springform pan that is 3″ deep, so any recipes made on a 9″ pan will also work on the 8″. The pan I use is from Fat Daddio, I love their cheesecake pans.
If you do use an 8″ pan from a different brand, make sure it’s at least 3 inches deep.
Moreover, I prefer a springform pan over a push-bottom cheesecake pan. Usually, the push-bottom cheesecake pans will have the removable bottom, but you have to push the cake up from the bottom of the pan, which sometimes causes it to rub against the sides of the pan on the process and damage the sides. And that’s why I prefer springform pans, because the actual side of the pan is removable, so the process of removing the cake from the pan won’t cause any damage.
Using the right pan is very important for making a good cheesecake.
Cake lifter
To transfer the cheesecake from the springform pan bottom to a plate, simply use a cake lifter, also known as cake transfer tool, which is a wide and thin metal tool that you can slide under the cake, lift, and then slide the cake onto the serving plater.

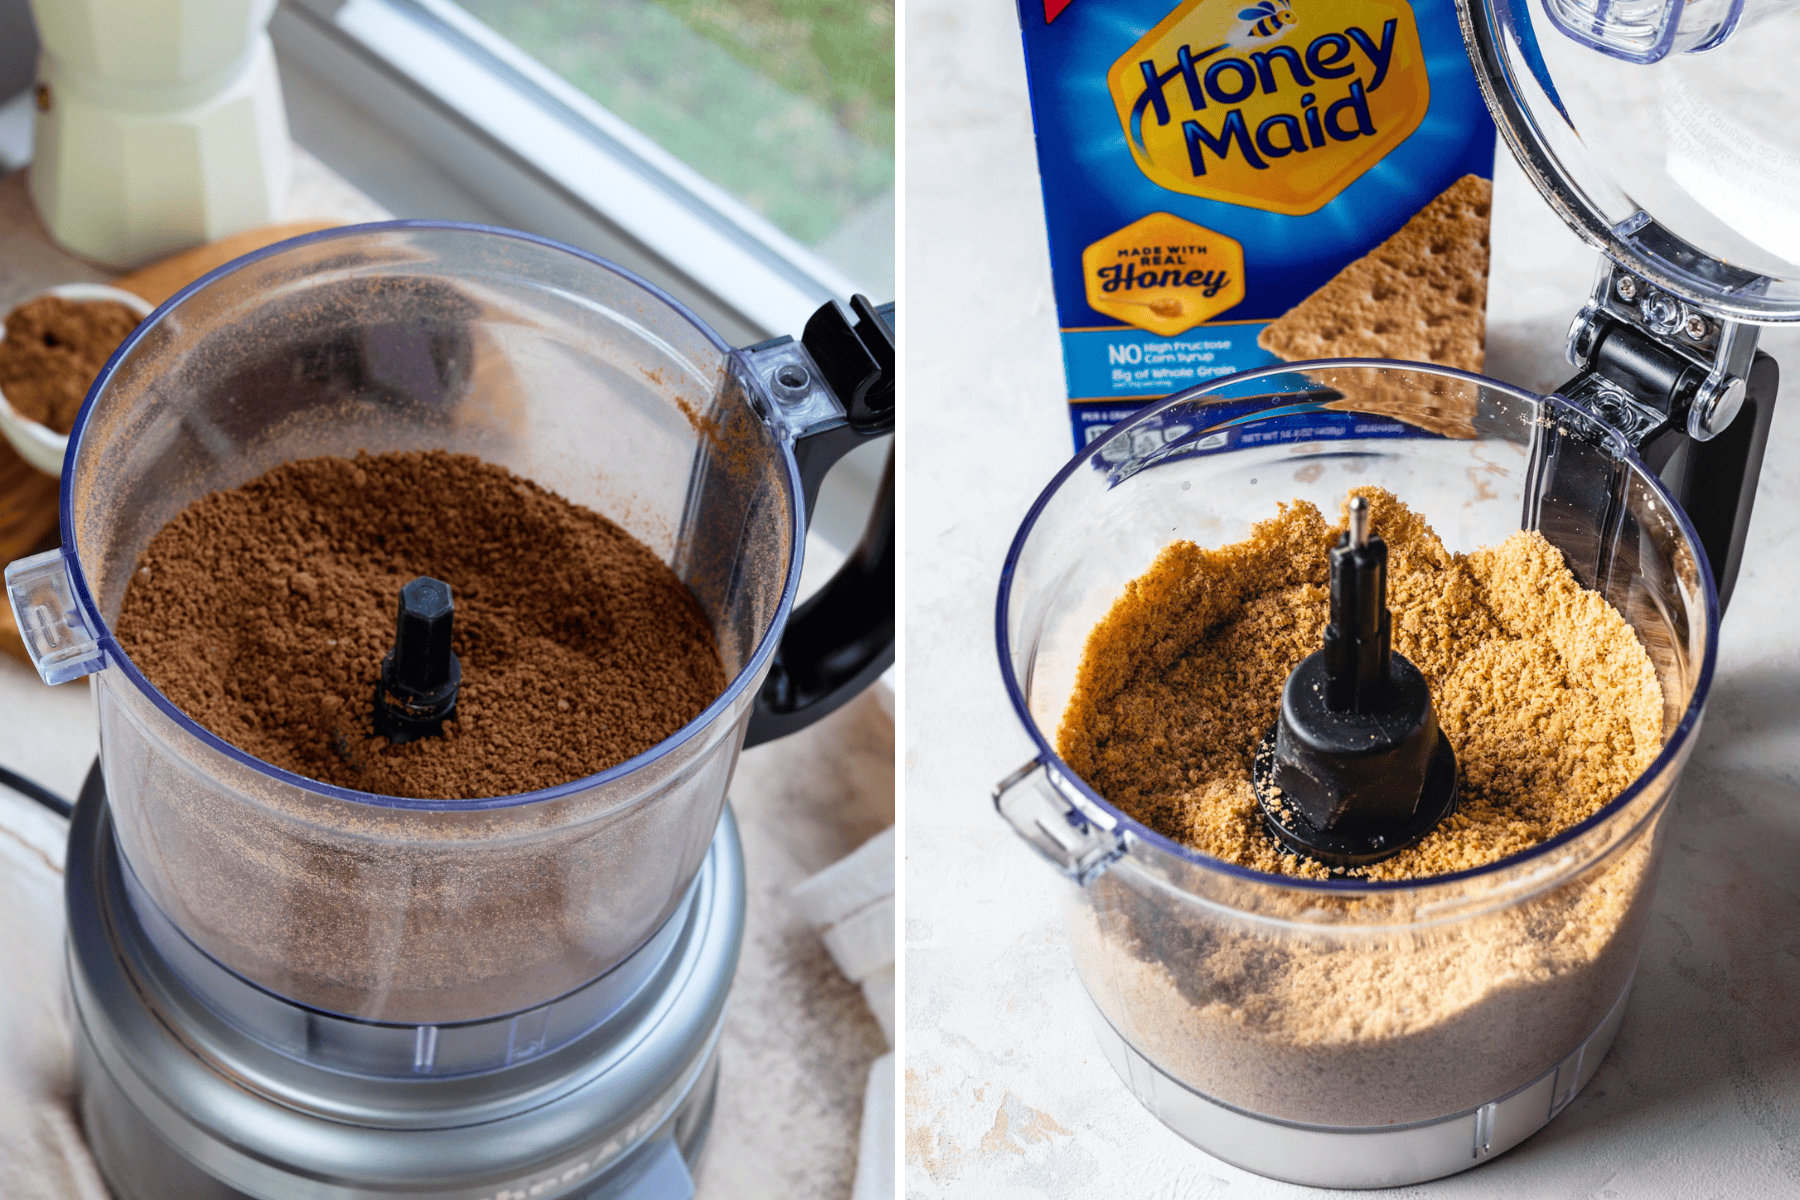
Food processor
Another tool you might need is a food processor, to form the crumbs for the crust. I find that this kitchen tool is essential for many different recipes so it’s a worthwhile investment.
If you are in the US you can purchase the crumbs already processed, but sometimes they are out at the store, and if you are using a different cookie than graham crackers to make the crust, this option won’t be available.
You can still make the crumbs without the food processor, simply place the crackers in a ziplock bag and smash them with a rolling pin until they become a fine crumb. While this method works, it is not optimal since the crumbs will be uneven and often times too large.
The food processor will ensure you get a uniform crust with no large chunks.
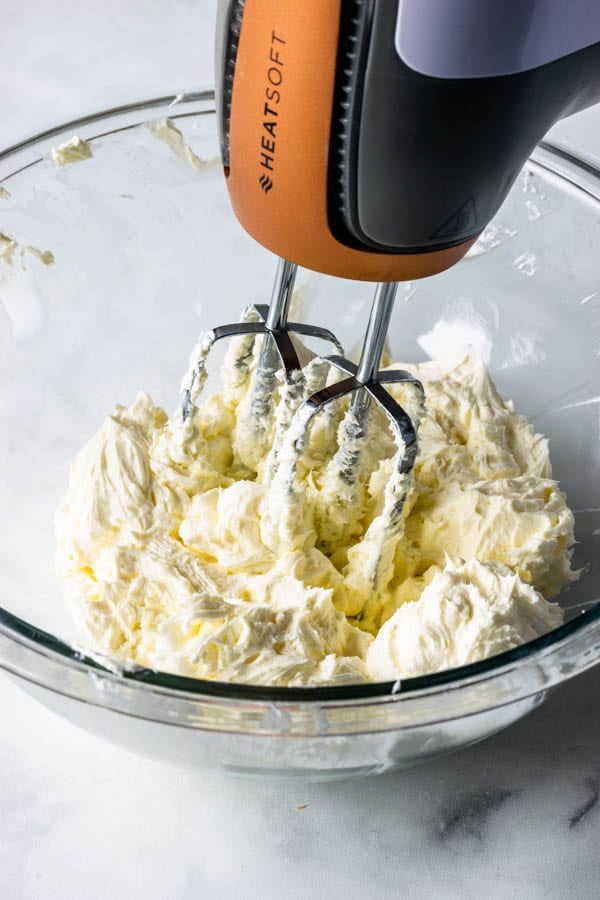
Electric mixer
It’s highly recommended to use a mixer to make cheesecake, it’s the only way to ensure the cream cheese will become fluffy and smooth. The mixer is the best way to incorporate enough air to give the cheesecake its airy and creamy texture.
Personally I prefer using a hand mixer to make cheesecake over a stand mixer. A stand mixer bowl is too deep, not wide enough, and the paddle doesn’t reach all the way around the sides of the bowl. This can lead to the batter becoming lumpy. To remedy this issue with a stand mixer, you can scrape the bowl several times during the mixing process to try and avoid lumps.
The Crust
The foundation of any great cheesecake is its crust.
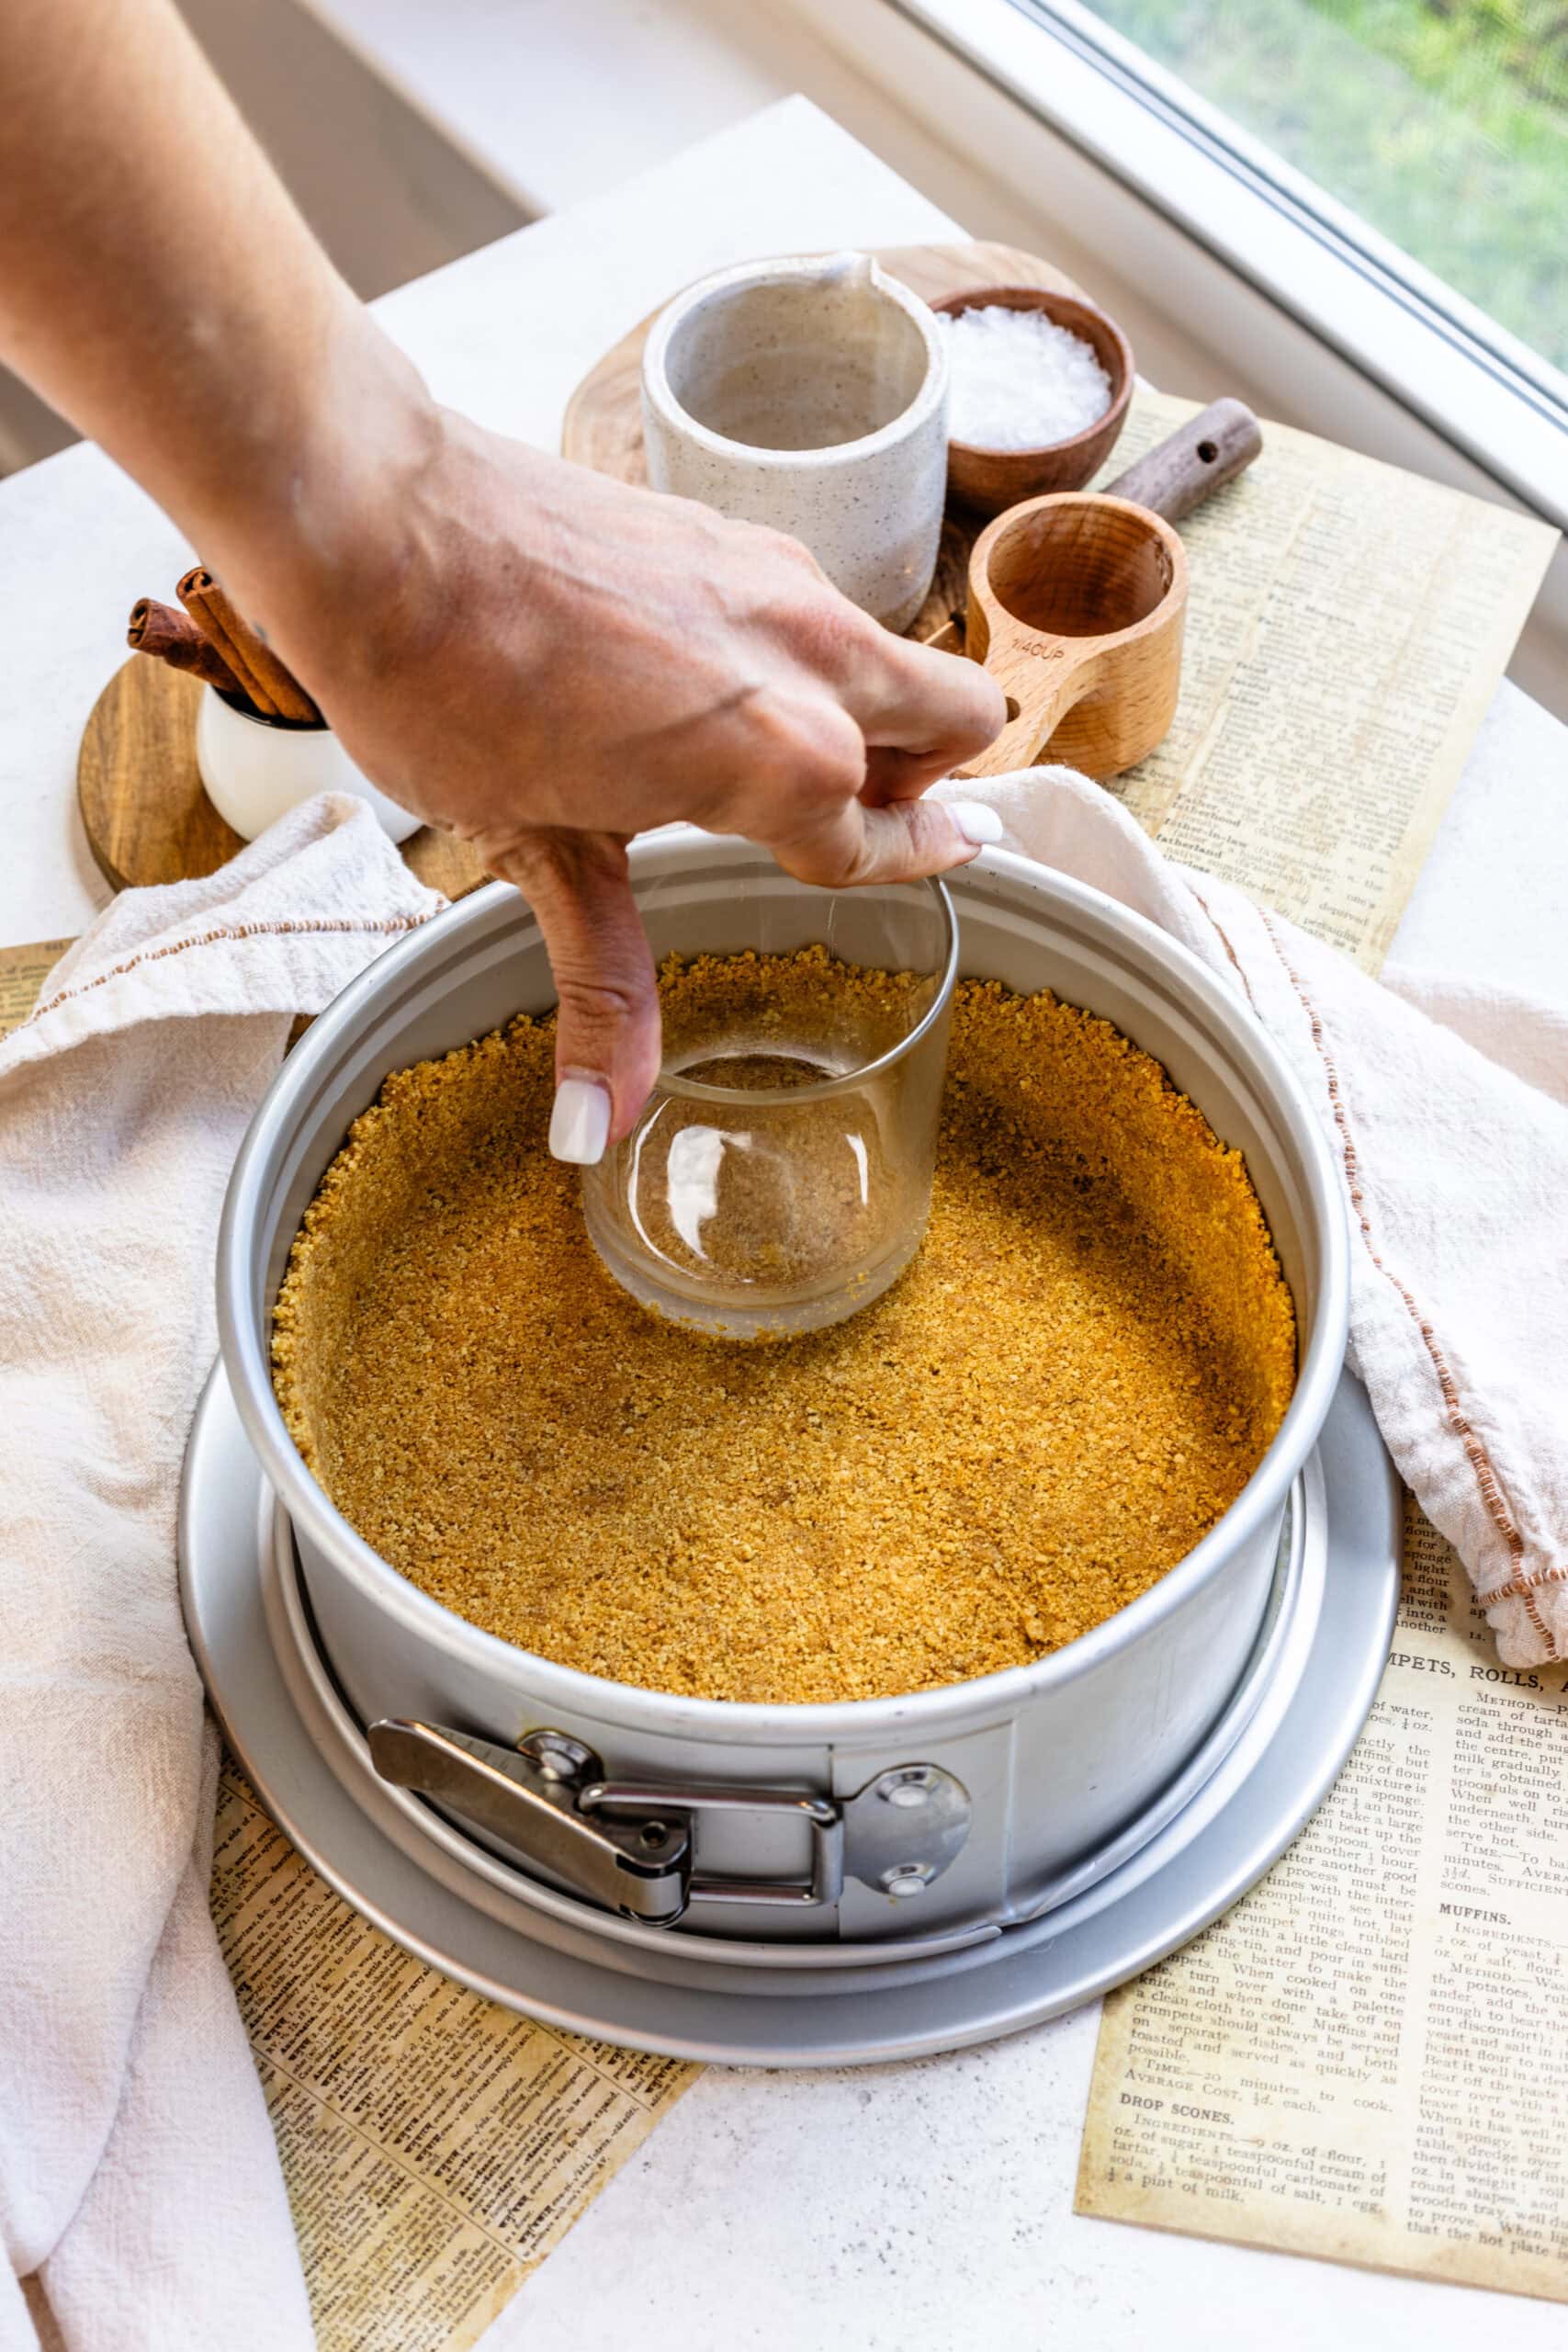
For a classic cheesecake, a graham cracker crust with melted butter is the go-to choice using crushed graham crackers. The key to a perfect crust is achieving the right texture, similar to wet sand, by mixing the graham cracker crumbs with melted unsalted butter and a bit of sugar. You can use brown or granulated sugar.
Then, one must press the mixture firmly into the bottom and up the sides of a springform pan to form an even base. Pre-baking the crust helps set it and prevents it from becoming soggy once the filling is added.
An important tip: don’t grease the pan before adding the crust in, do so after, to prevent the crust from becoming soggy. Once the crust has been baked, you can grease the sides of the pan that are exposed, to prevent the cheesecake batter from sticking.
A cheesecake crust is like a blank canvas! Feel free to add different elements like chopped nuts, cocoa powder, blended cookies, and spices to give it your own twist.
Here are some other recipes with different variations of delicious crusts: Nutella Cheesecake with Chocolate Crust, Pistachio Cheesecake with Pistachio Crust, Biscoff Cheesecake with Biscoff Cookie Crust, Pecan Pie Cheesecake with Pecan Graham Cracker Crust.
Bake or No-Bake Cheesecake
You can make cheesecakes using the baked method, or the no-bake method.
Baked cheesecakes usually take cream cheese, sugar, eggs, sour cream (or heavy cream), and any flavorings you might want to add. They are also more challenging to make than no-bake cheesecakes, but ultimately so rewarding and impressive!
Baked cheesecakes often require a water bath which I’ll get more into below, but once you get it, it’s easy!
For those looking for a simpler and quicker alternative, no-bake cheesecakes are a fantastic option. No-bake cheesecakes don’t take eggs, instead, they usually rely on a mixture of cream cheese, sugar (or sweetened condensed milk), sour cream, often mixed with whipped cream, and in some cases, with gelatin to help firm up the cheesecake.
The consistency of no-bake cheesecakes is almost like a cheesecake mousse! No-bake cheesecakes are perfect for hot summer days when you want a refreshing treat without heating up the kitchen.
Try my No-Bake Cheesecake or a Strawberry Version!
Cheesecake Ingredients
Creating a smooth and creamy filling is essential for a delicious cheesecake. Having the right ingredients is key. Here are the ingredients for a traditional baked cheesecake batter:
- Cream cheese: opt for full-fat cream cheese for a creamier and more dense cheesecake. Low fat cream cheese often will make a less thick and firm filling. Don’t use spreadable cream cheese from a tub, but the block cream cheese instead.
- Sugar: depending on the flavor profile of the recipe, I use granulated sugar, or brown sugar, or a combination of them.
- Sour cream: we add sour cream to the batter to give an extra tangy flavor, also to lighten up the texture a bit, adding some moisture.
- Heavy cream: instead of sour cream, some recipes will call for heavy cream instead. Cheesecakes made with heavy cream instead of sour cream will have a denser texture.
- Eggs: eggs are essential for cheesecake, they act as a setting and thickening agent, binding the ingredients together to create a dense network of dairy and sugar that holds a smooth and rich texture.
- Flavorings: vanilla, salt, chocolate, cookies, cinnamon, fruits, caramel, the flavorings vary depending on the kind of cheesecake you are making. Vanilla and salt are usually standard for any cheesecake, as they help enhance the overall delicious taste.
Making the Cheesecake Batter
The first step in making the cheesecake batter is to beat the cream cheese until it’s fluffy. Then add the sugar, and beat for another couple of minutes. The sugar crystals will help further break down the cream cheese and incorporate air into it, making it even smoother.
Remember to scrape the bowl a few times while doing this, to ensure any lumps are incorporated with the rest. It’s important to ensure the batter is lump-free before you start adding the eggs, so really scrape the bottom and the sides of the bowl.
Add the sour cream, or heavy cream, depending on the recipe you are using, and mix to combine.
Add the eggs one at a time, mixing just until each egg has been incorporated, and scraping the bowl in between each addition. You don’t want to over mix once the eggs have been added, because that can cause the batter to later expand in the oven too much, which will make it deflate and crack.
Then it’s usually time to add the vanilla extract, salt and any other flavorings you might be using!
Ensure all your ingredients, especially the full-fat cream cheese, large eggs, and sour cream (or heavy cream), are at room temperature before mixing. This helps to create a smooth, lump-free batter.

Mix-Ins for the Filling
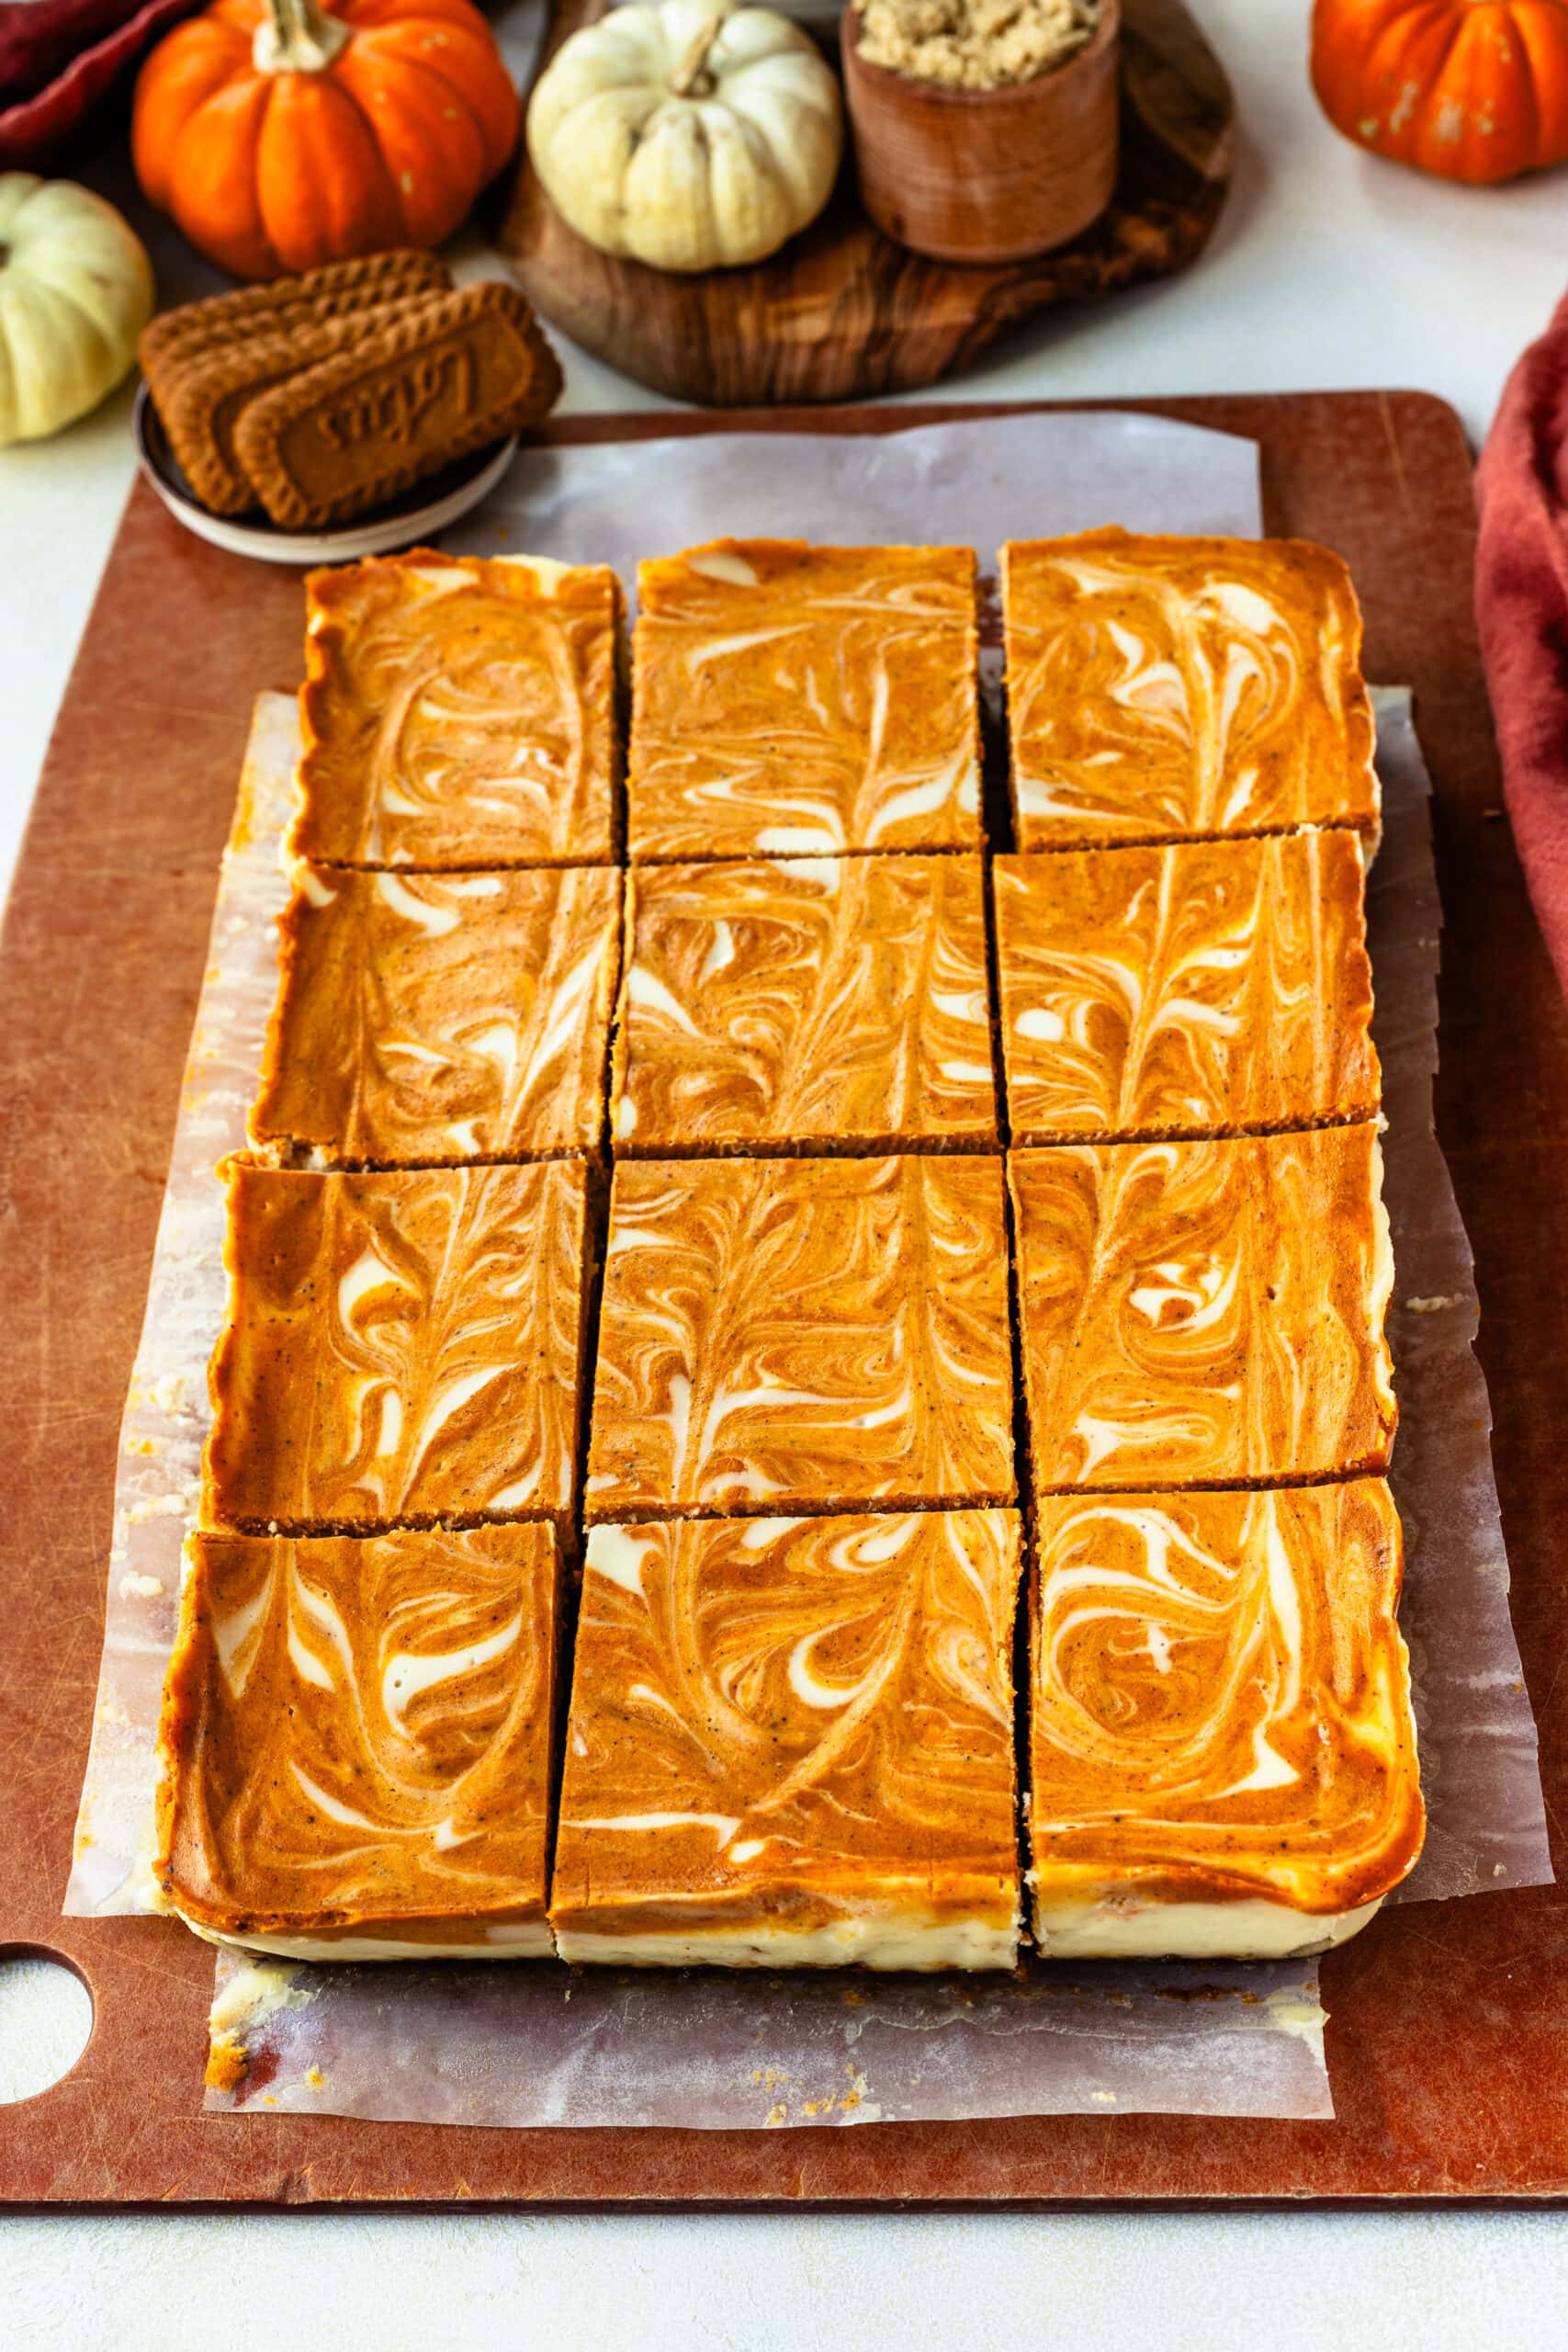
Adding mix-ins to your cheesecake filling is a great way to customize flavors and add interesting textures. You can fold in chocolate chips, swirls of fruit puree, or even chunks of your favorite candy bars. For a marbled effect, swirl in some melted chocolate, Nutella, or fruit puree using a knife. Be mindful not to over mix, as this can incorporate too much air and lead to cracks.
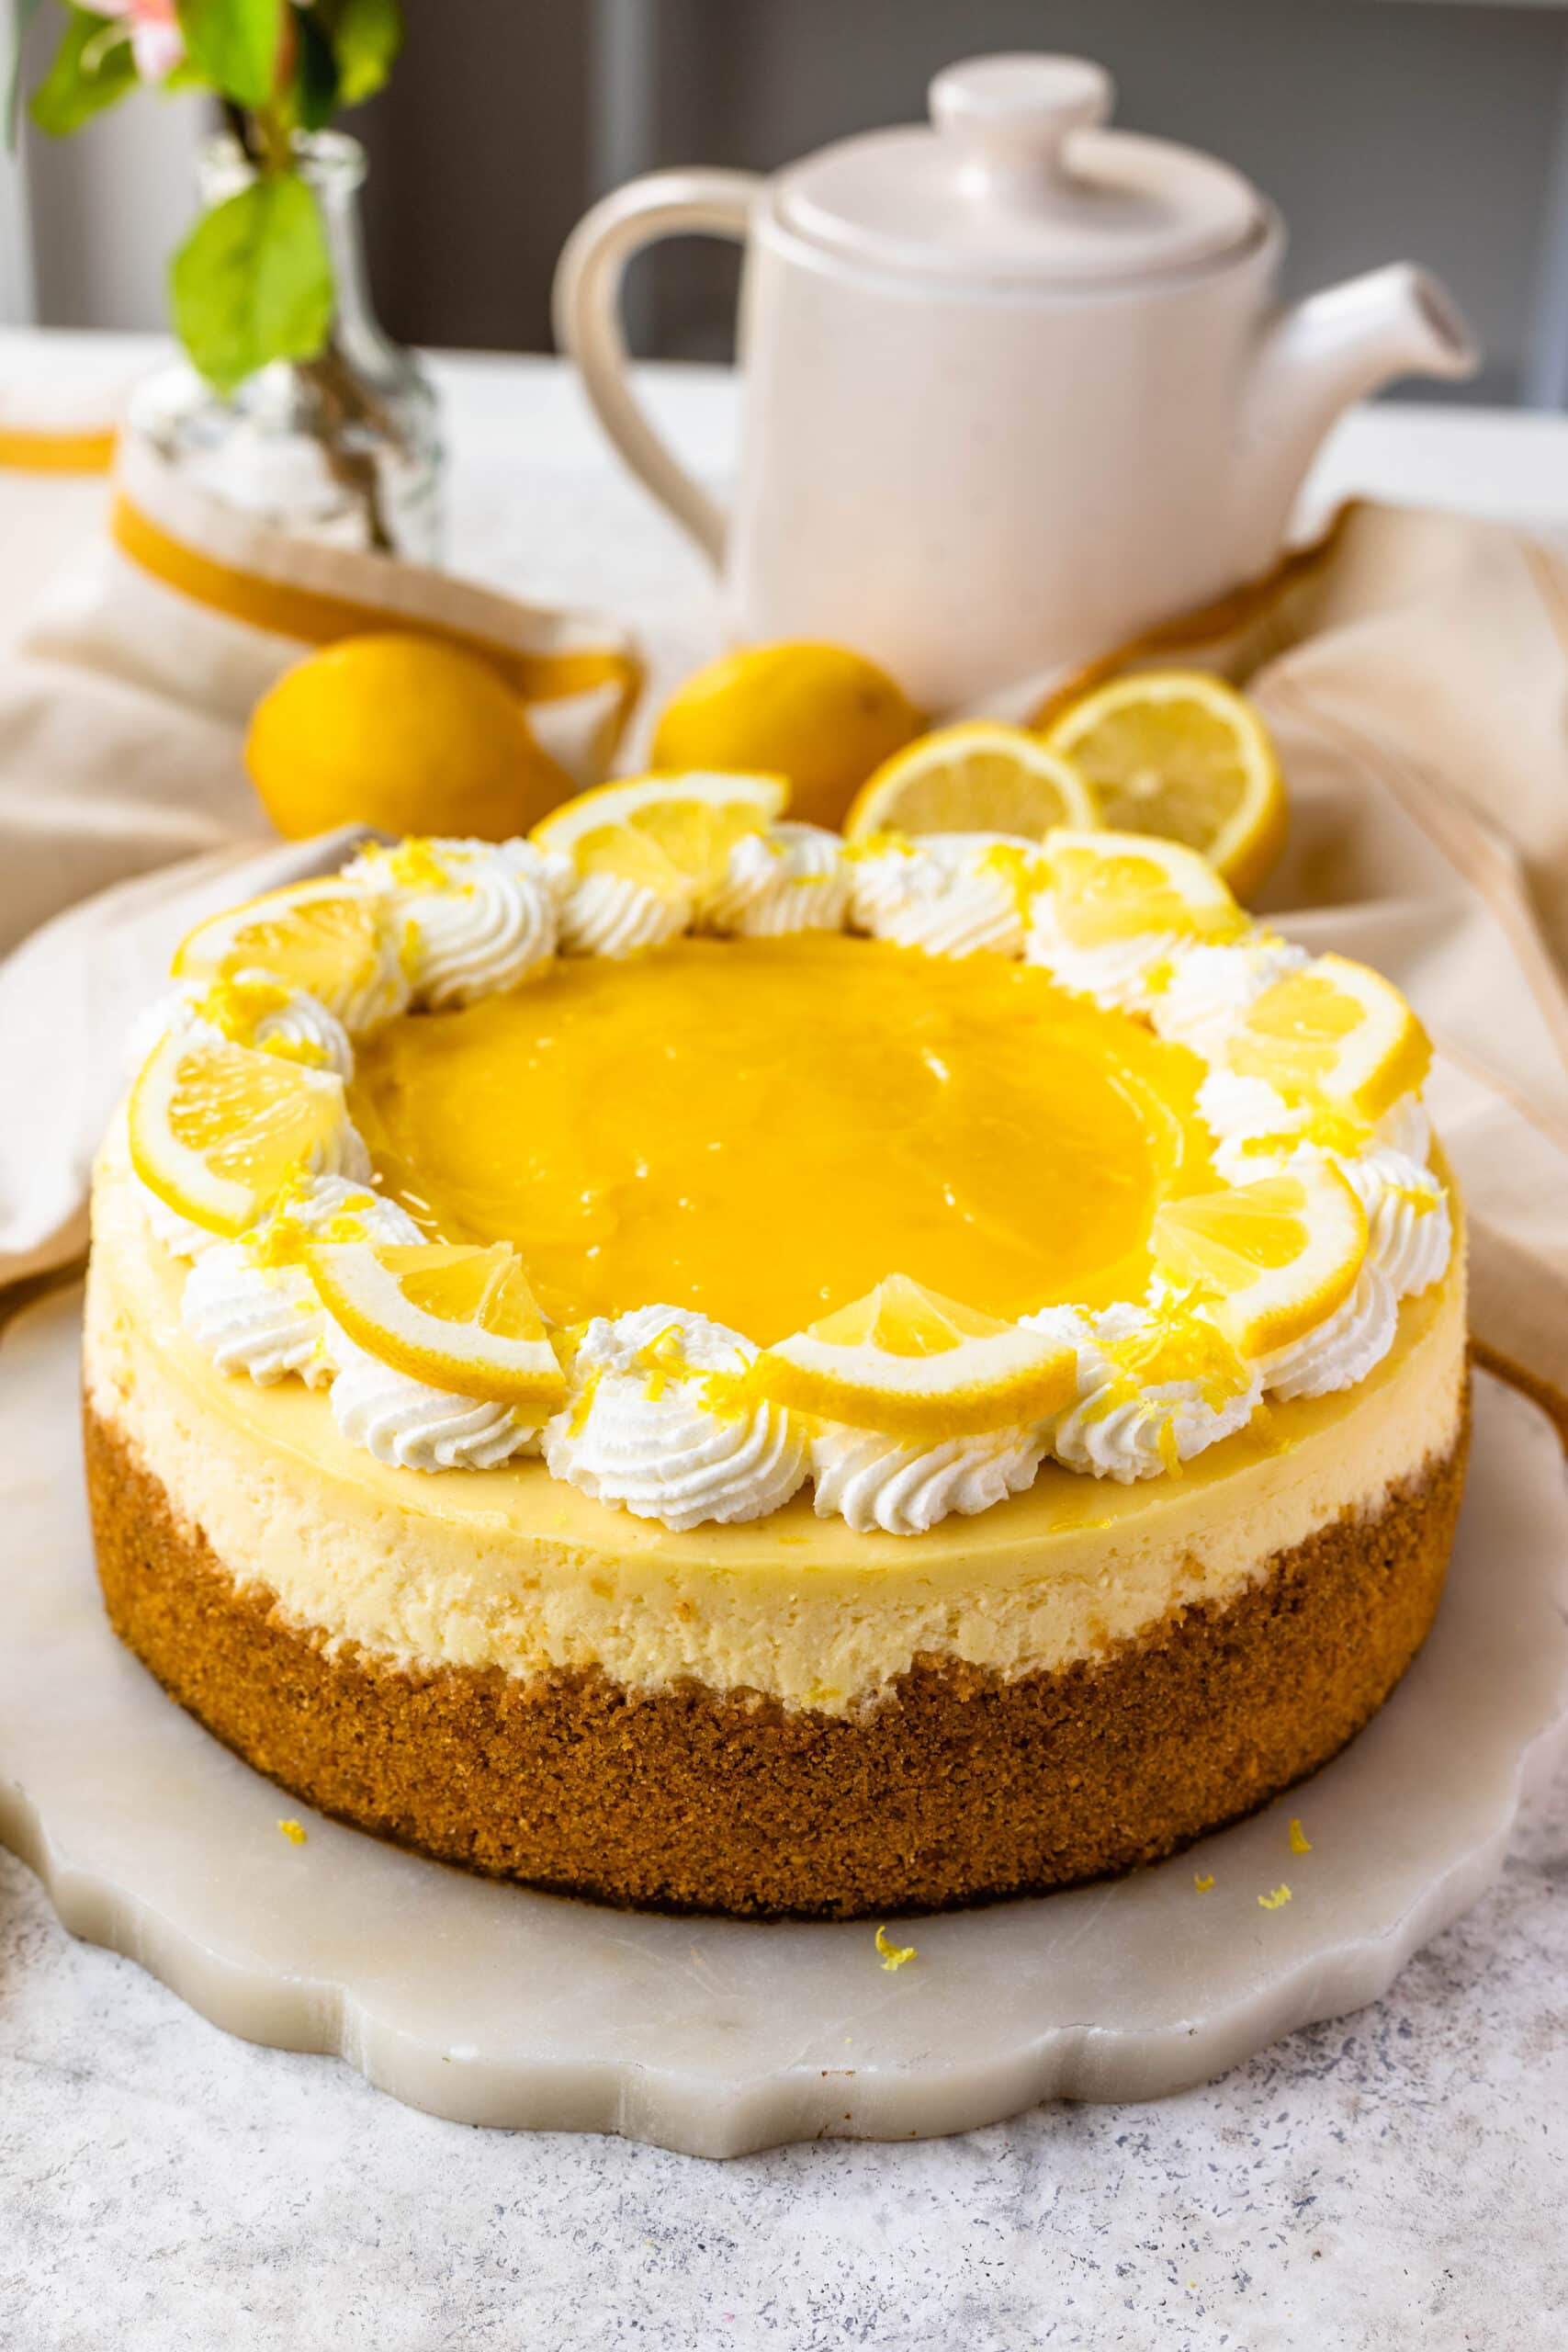
Try out these variations: Lemon Cheesecake, Blackberry Cheesecake, & Carrot Cake Cheesecake.
The Importance of the Water Bath
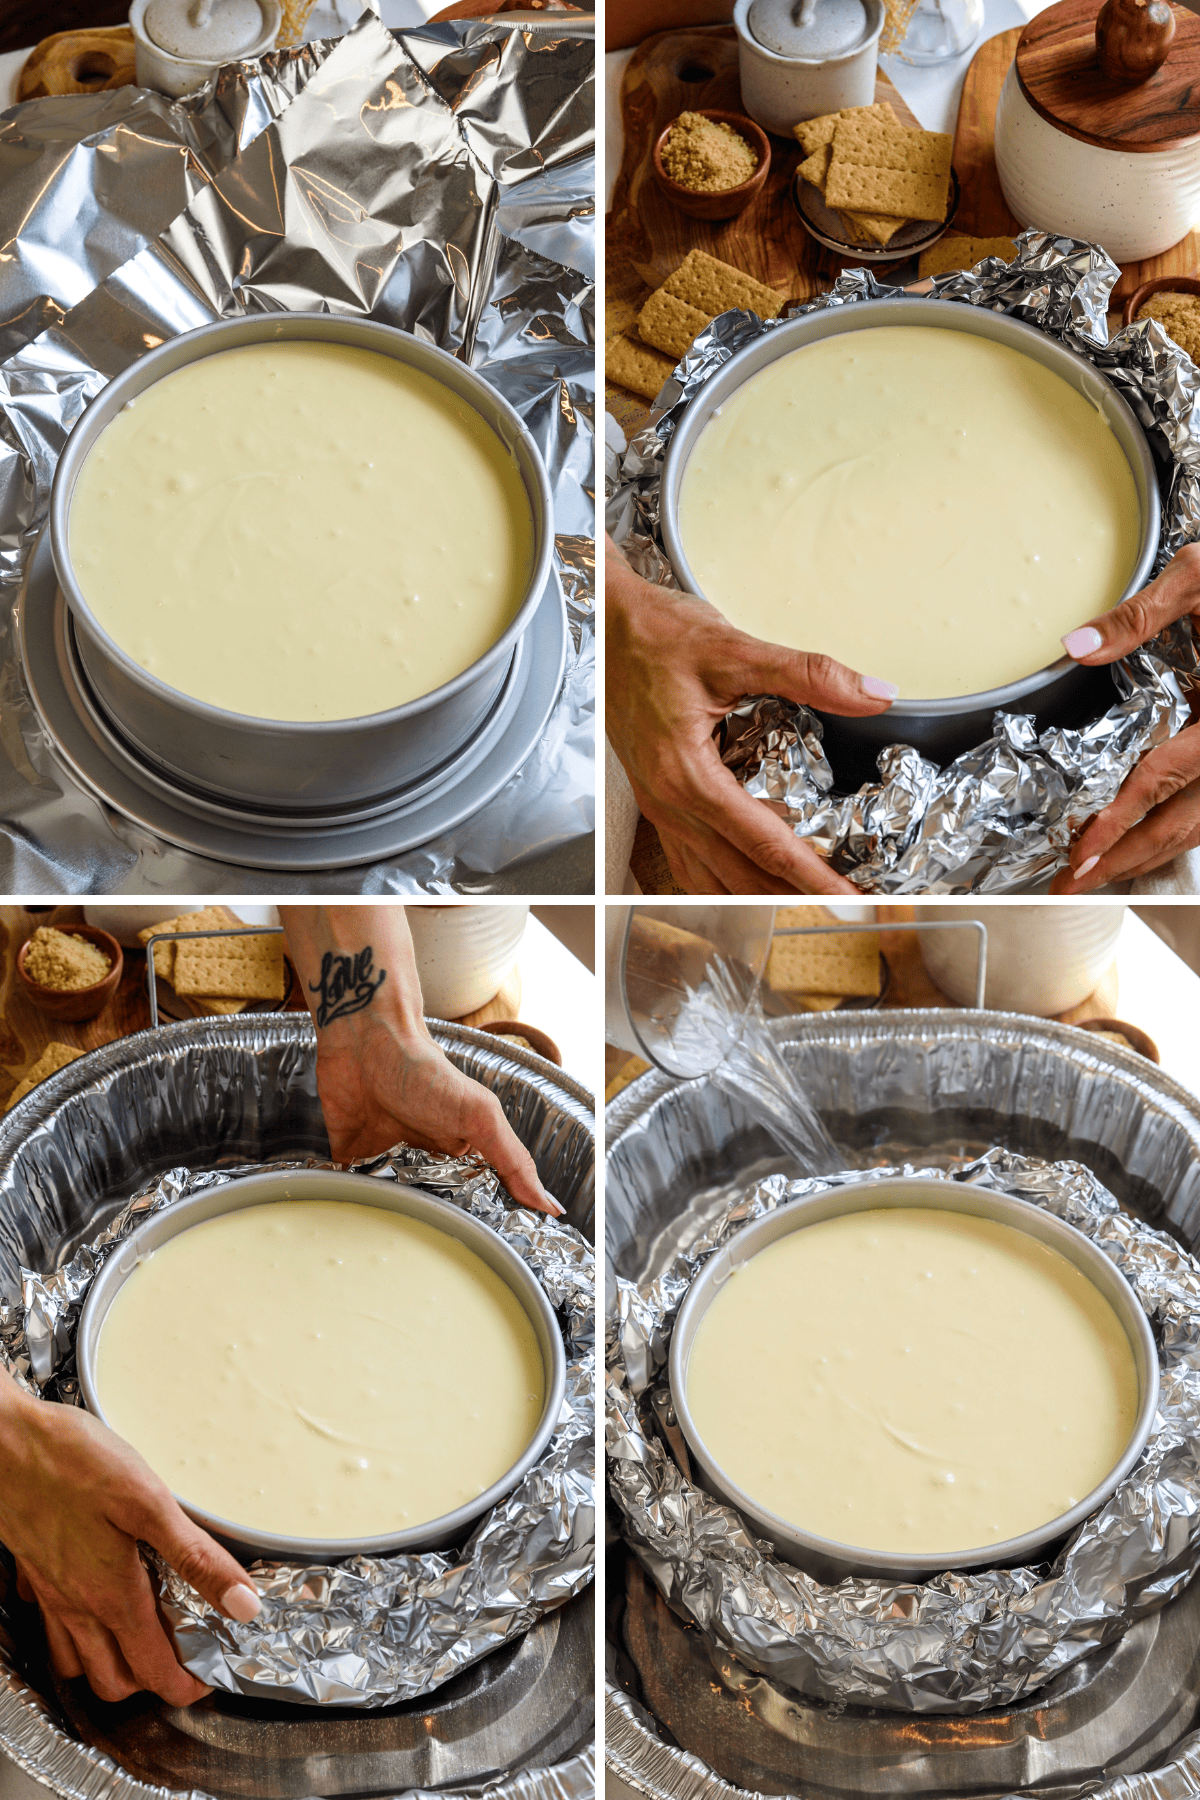
Using a water bath, or bain-marie, is crucial in baking a cheesecake evenly and gently. This method helps prevent the edges from cooking faster than the center and reduces the risk of cracks.
Before baking the cheesecake in the oven, wrap the outside of the pan with aluminum foil. I like to use the widest type of foil, I cut three big strips of foil and lay them on the counter, the first two crosswise, and the last one diagonally on top. Then place the cheesecake pan right in the center where the three strips meet, and fold them over the pan. This will help prevent water from seeping into the cheesecake.
Anytime I only use two strips of foil to wrap the pan instead of two, or if I use the narrow foil, water inevitably seeps in, which is why I take my time with this step, to prevent a soggy cheesecake crust that is soaked in water.
Place the springform pan with the prepared filling in a large roasting pan. Boil water in a kettle and then fill the roasting pan with the hot water until it reaches halfway up the sides of the springform pan. This water bath ensures that the cheesecake bakes at a consistent temperature, resulting in a smooth and creamy texture.
You can use any pan that your wrapped cheesecake pan would fit. I personally love using these disposable roasting pans from the store. I use them more than once when making cheesecake, since they don’t get dirty, just wet with the water from the bain-marie.
Baking
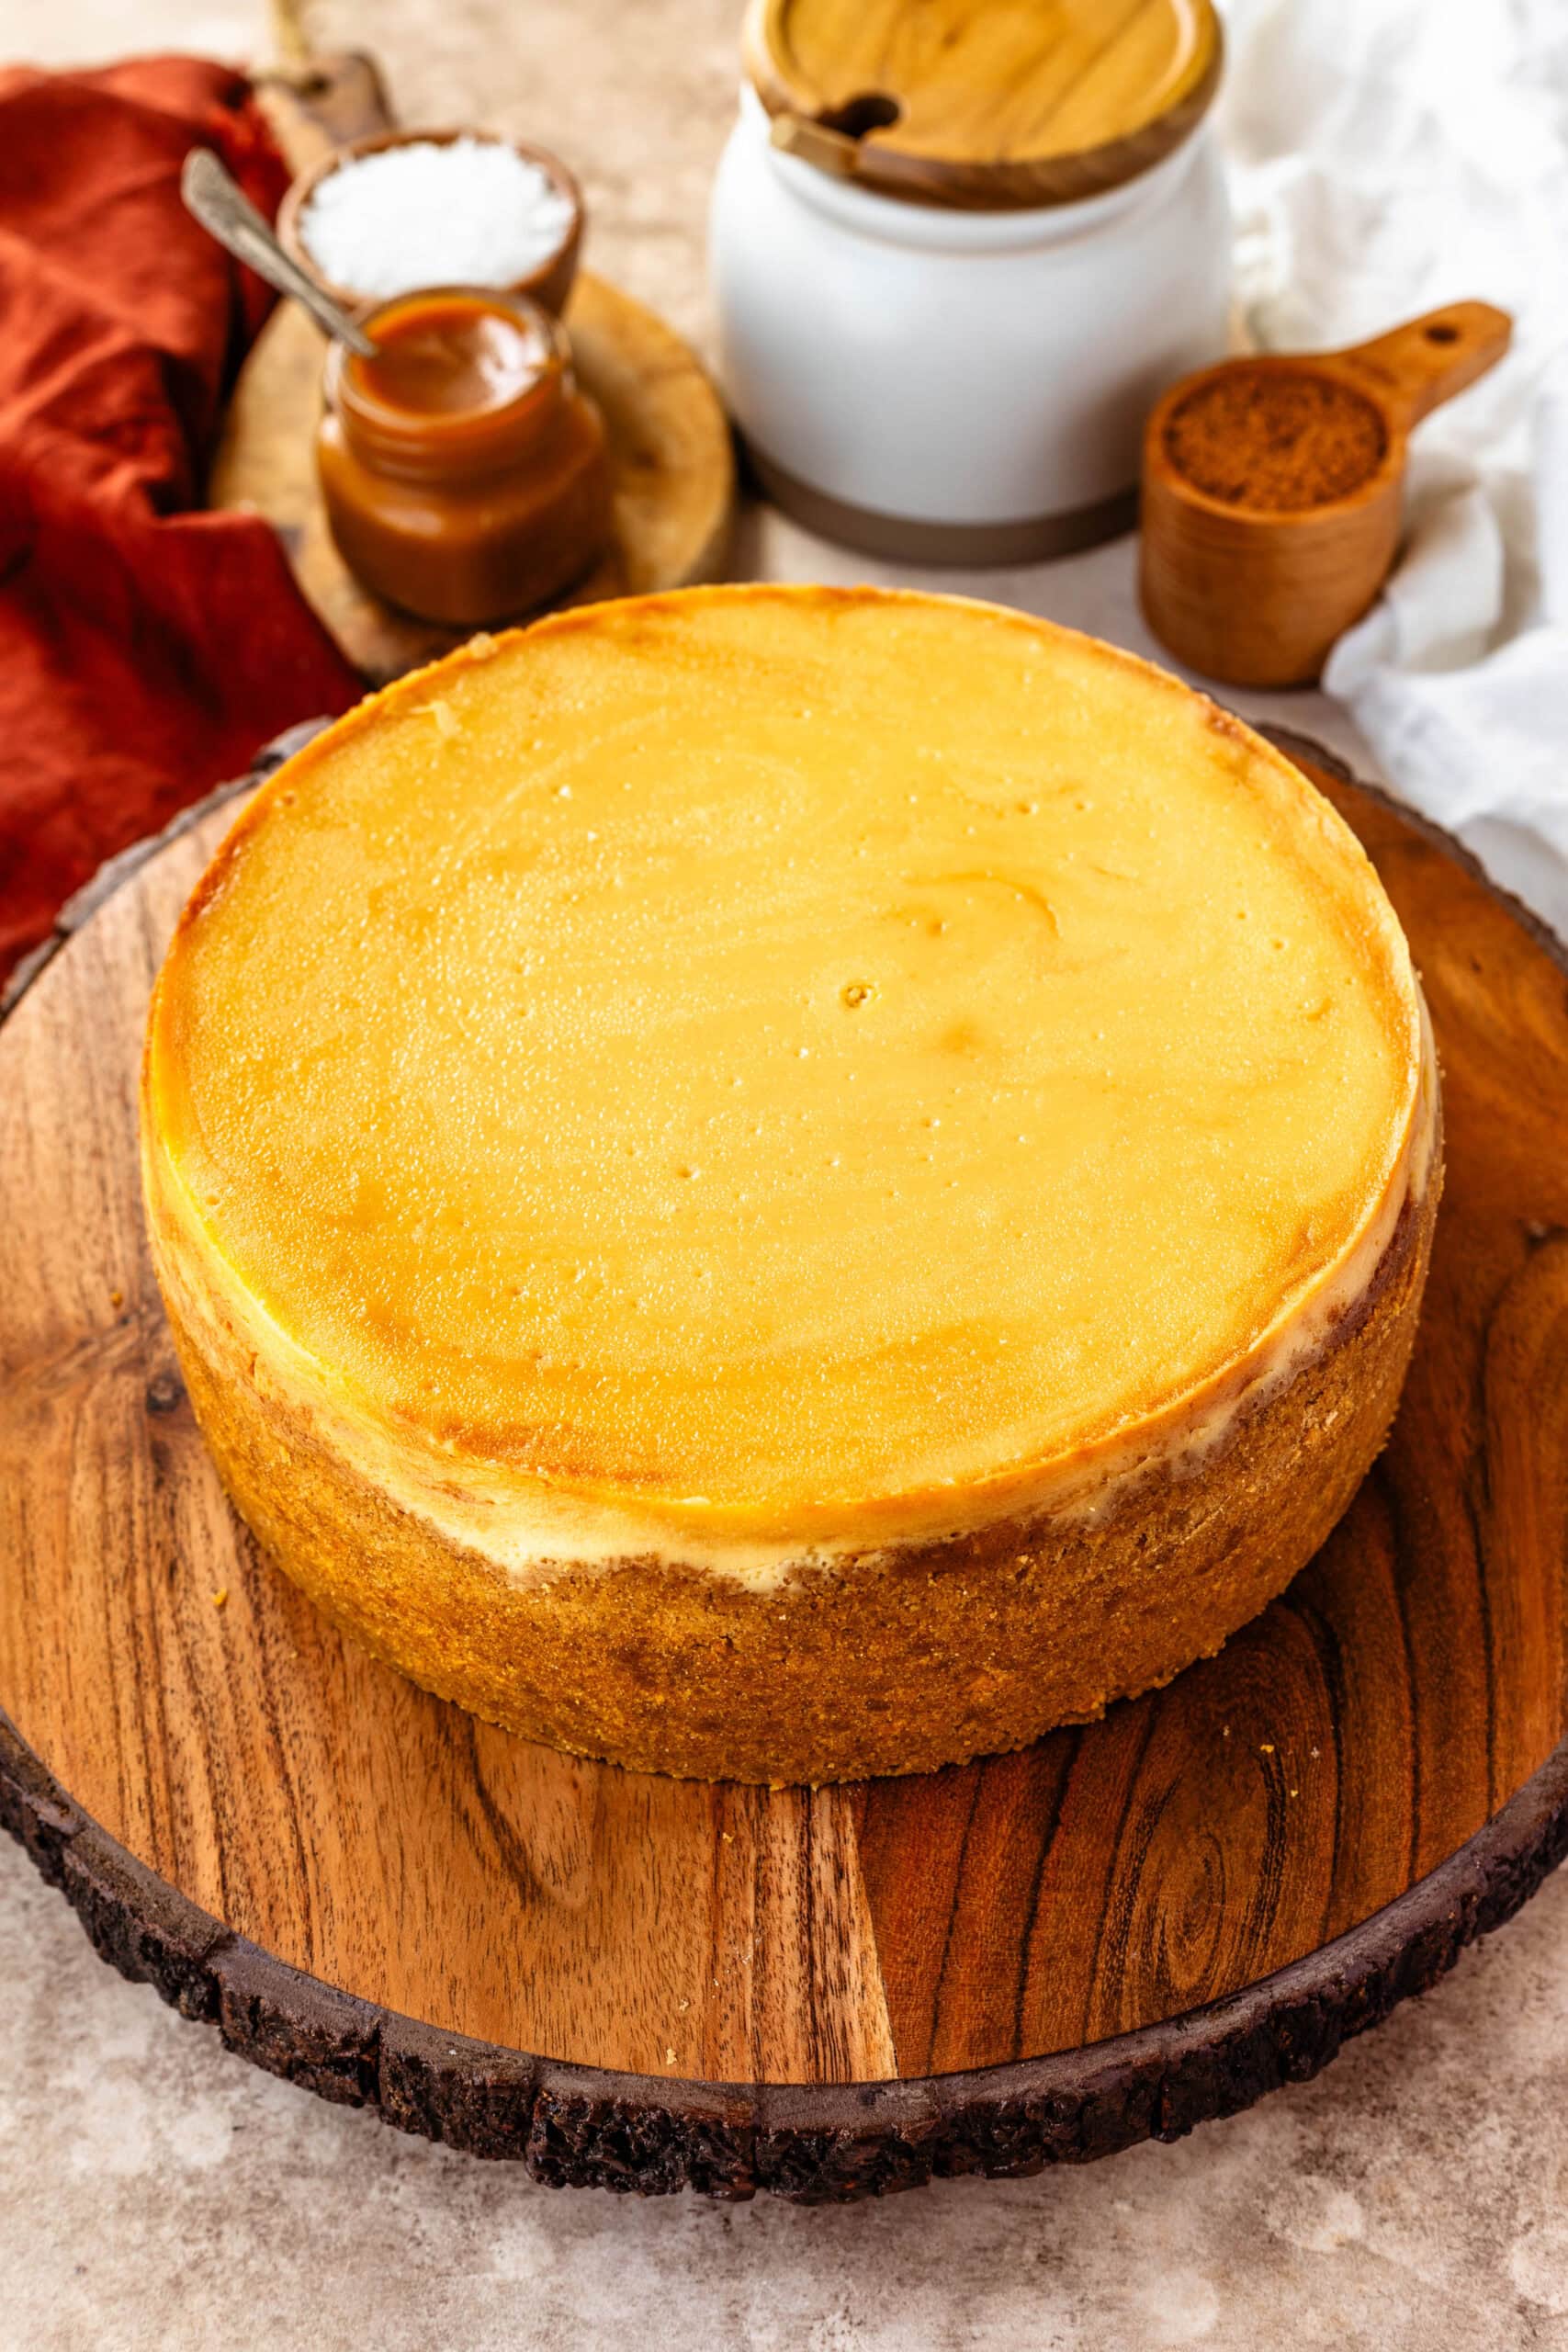
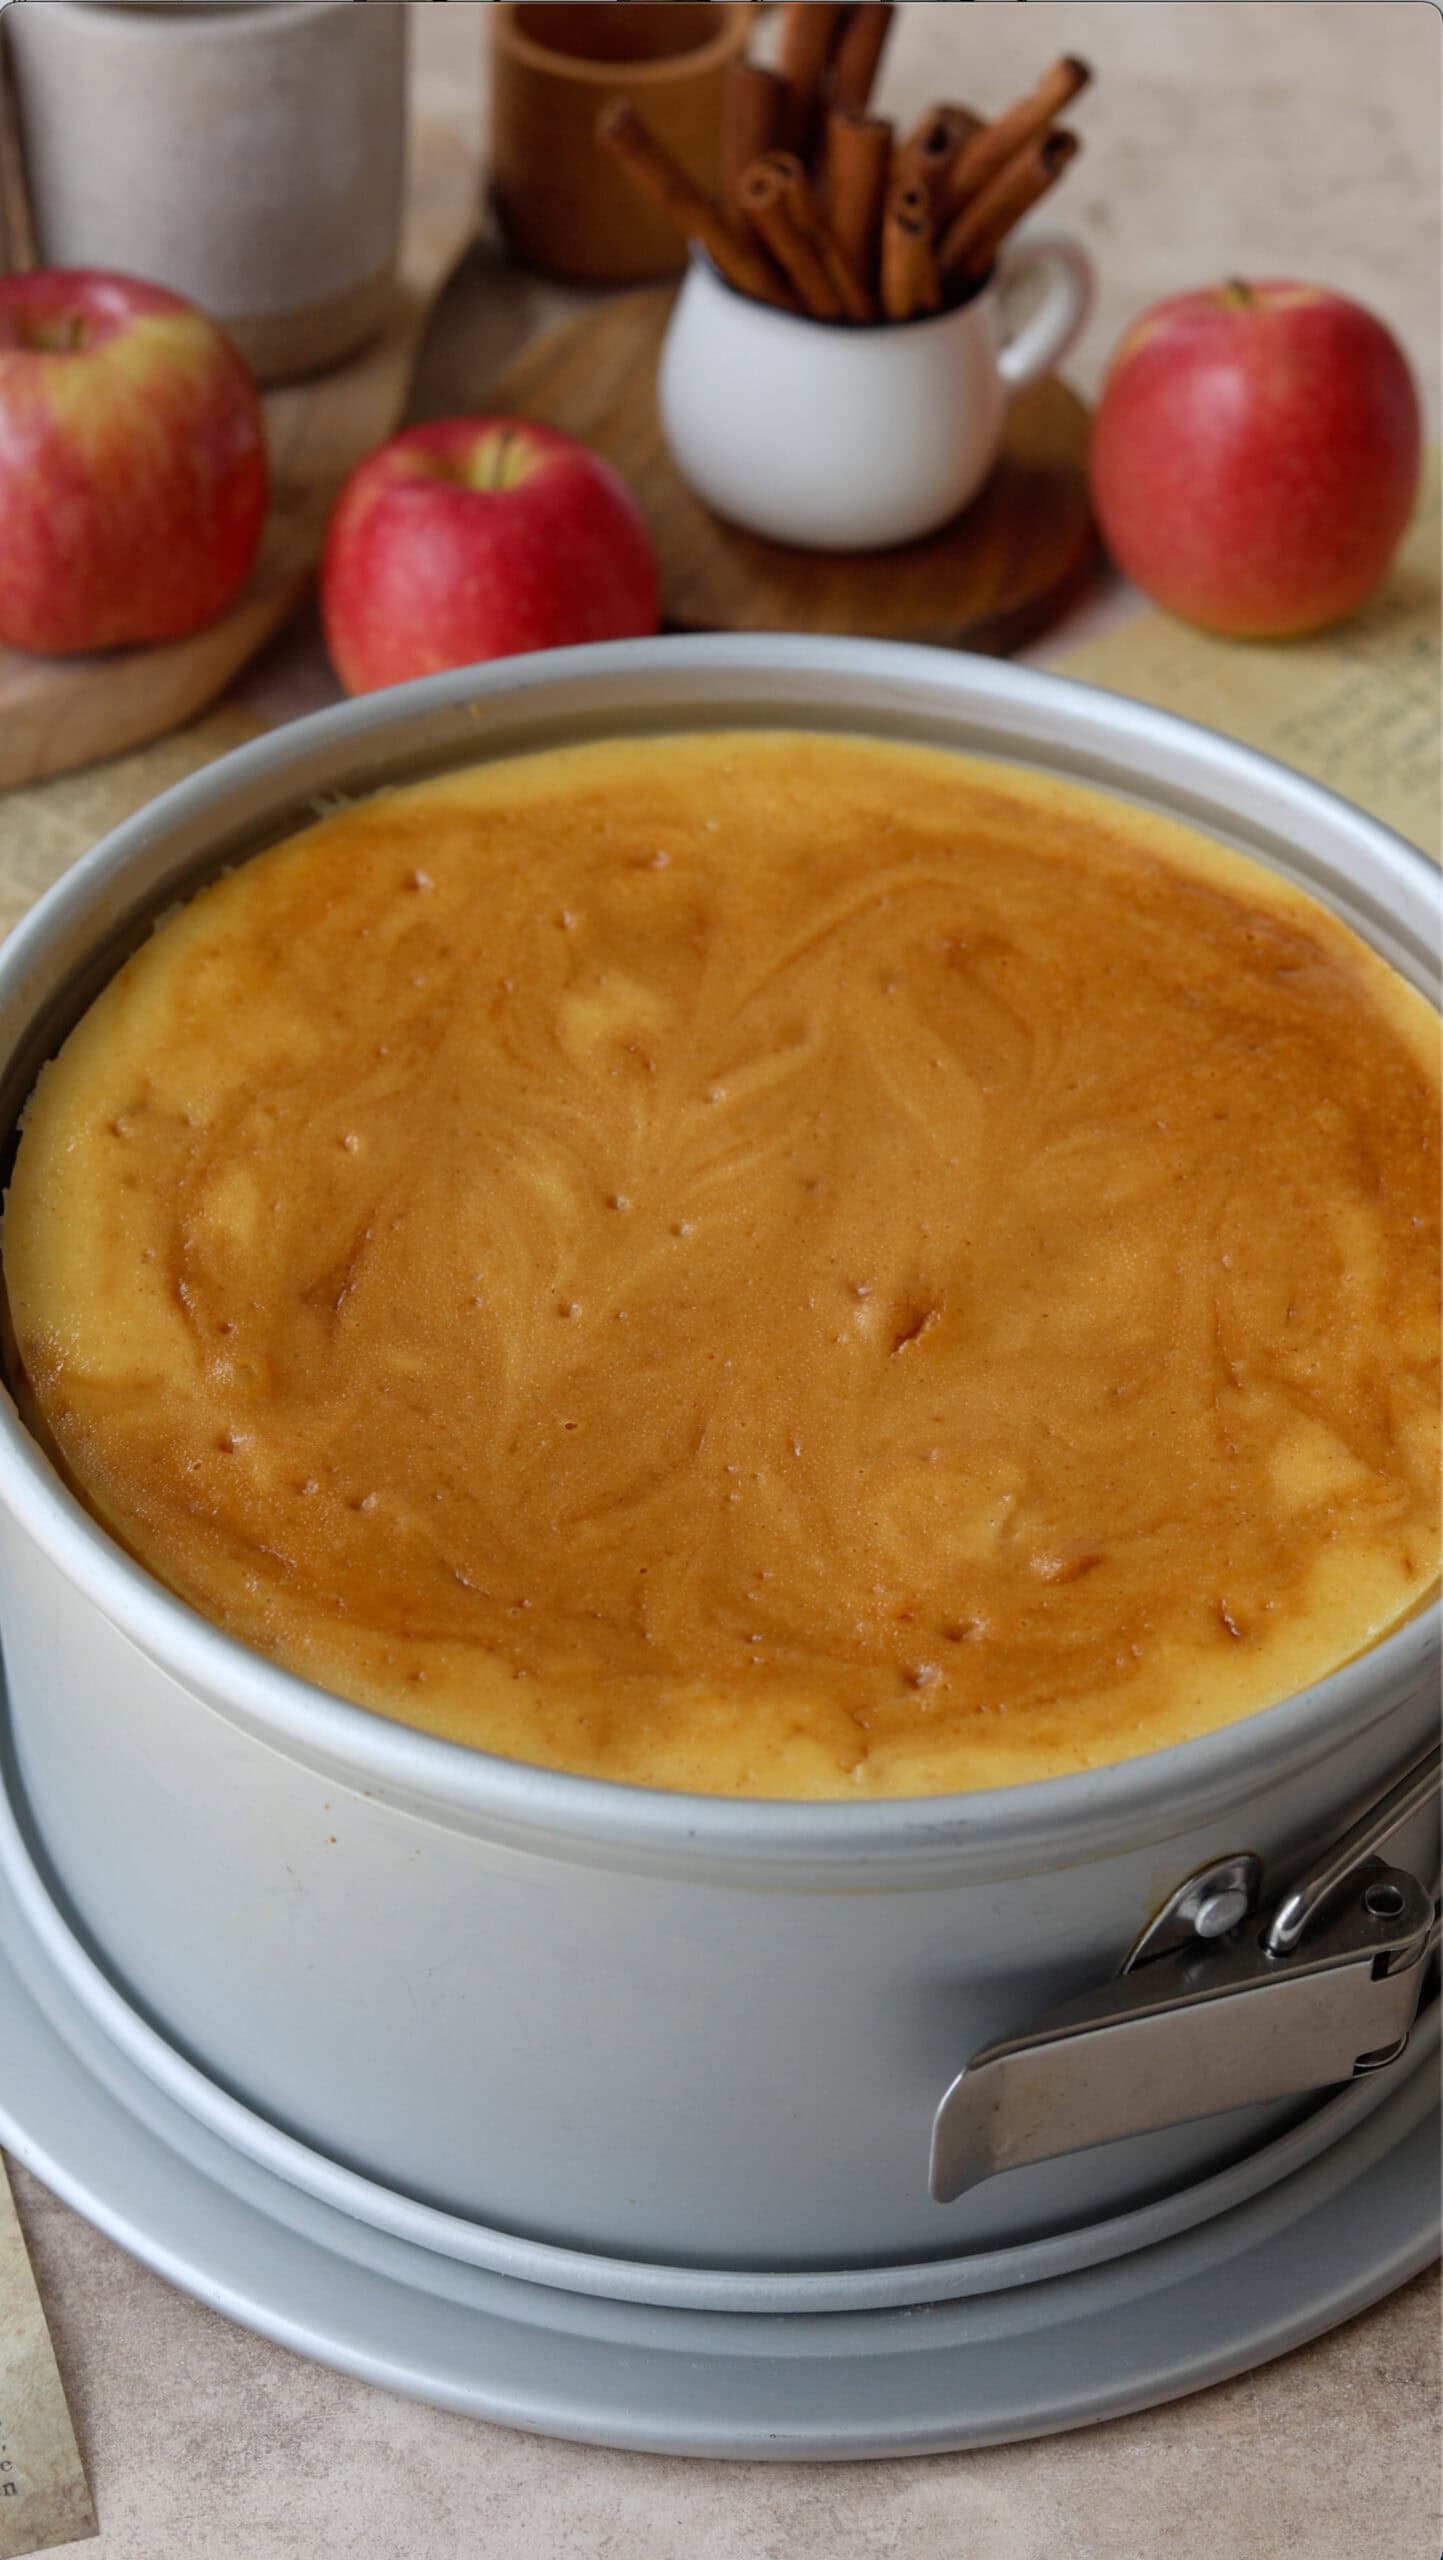
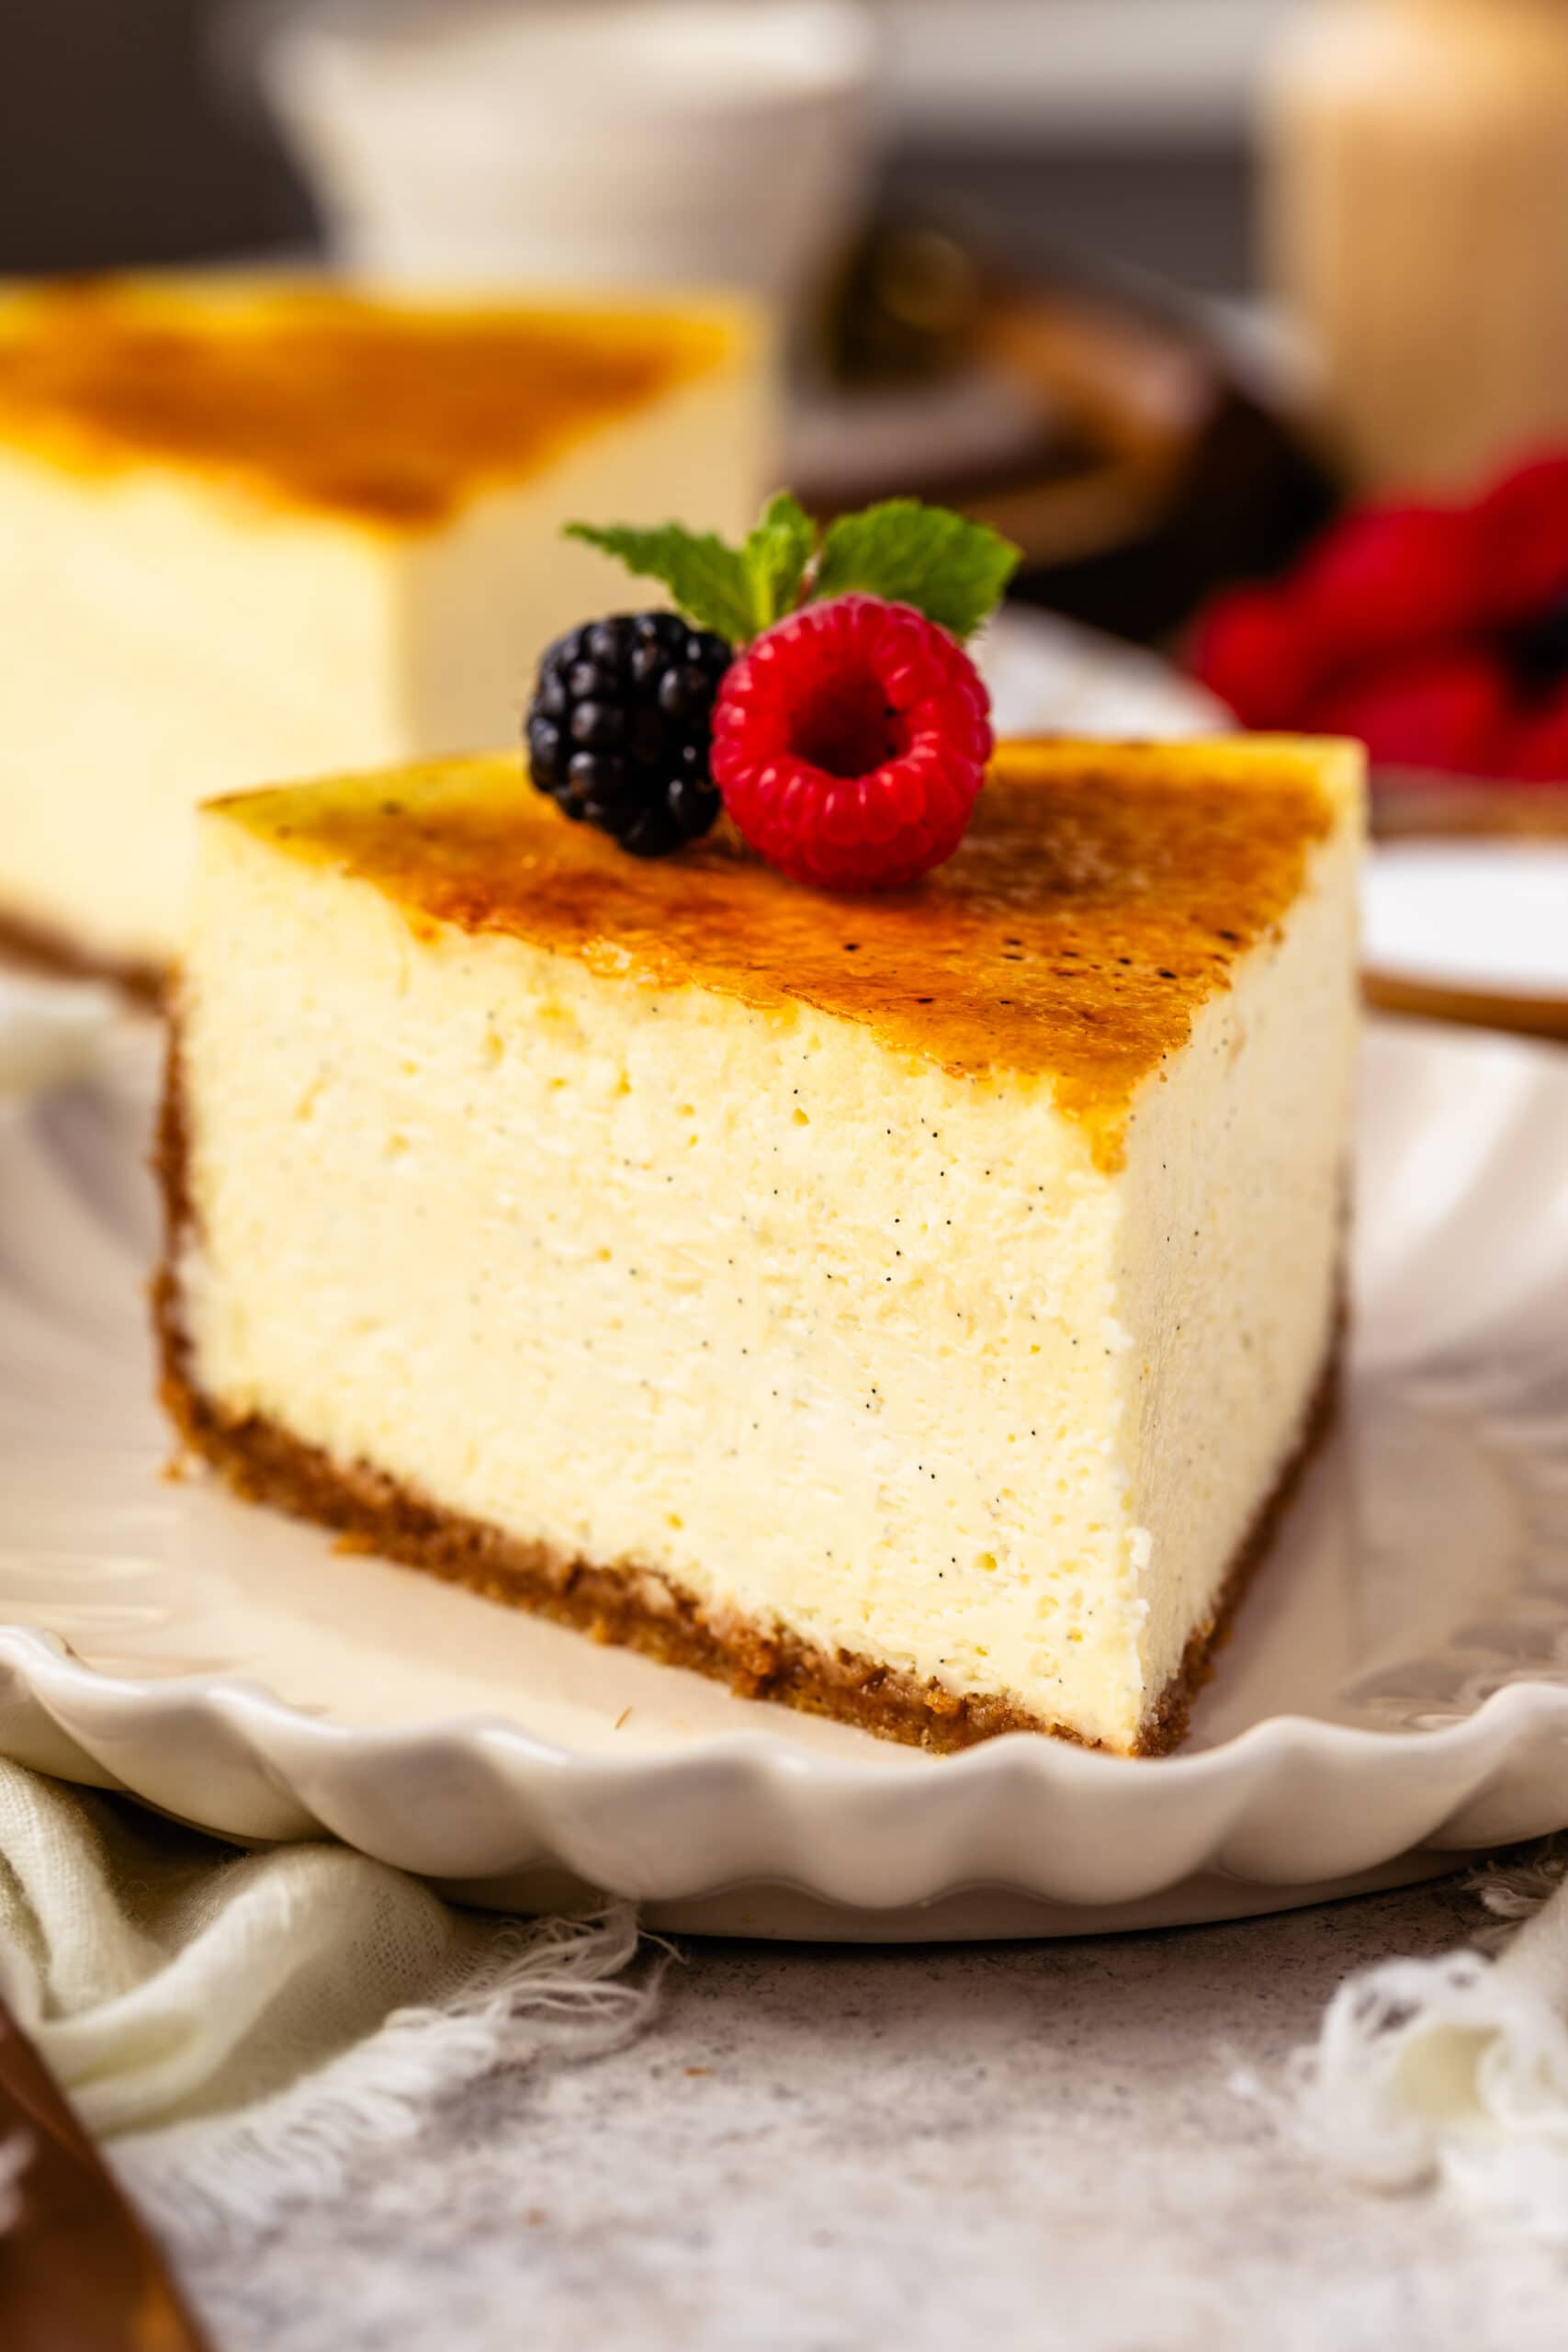
Baking the cheesecake at the right temperature and for the right amount of time is key. Bake until the edges are set but the center still has a slight jiggle.
Over baking can cause cracks, and under baking can make the cheesecake too soft and runny.
With time you will become better at realizing what the jiggle of the cheesecake is supposed to look like. In this video on Youtube, where I am making my Pistachio Cheesecake, you can see the perfect jiggle at 1:09.
Letting It Cool in the Oven
Once you’ve identified the perfect jiggle in the cheesecake, turn off the oven and let the cheesecake sit in it for one hour. This gradual cooling process helps prevent cracks. If you remove the cheesecake from the oven immediately, the sudden temperature change will cause it to deflate and crack. Also, this residual time sitting in the oven is crucial to finish cooking the center of the cheesecake to the optimal texture and firmness.
After the time has passed, remove the cheesecake from the oven, and carefully remove the foil, watching for any water that may have accumulated in between the creases, so it doesn’t go into the cheesecake.
After the cheesecake has cooled to room temperature, place it in the fridge for at least several hours, or overnight. This chilling time allows the flavors to meld and the texture to set perfectly.
Don’t remove the ring from the pan until after the cheesecake has chilled thoroughly in the fridge for at least 6 hours or overnight. Patience is crucial here; cutting into the cheesecake too soon can result in a runny center.
Cheesecake Toppings
Cheesecakes really are the perfect canvas for all of your favorite toppings. A classic cheesecake recipe will feature delicate whipped cream and maybe some fresh fruit. But some more creative options will feature toppings like chocolate ganache, cookie crumbles, caramelized pecans, or Dulce de Leche. The variations are endless here, so get creative.
Some of my more creative cheesecake recipes can be found here: Ube Cheesecake, Dulce de Leche Cheesecake, Cinnamon Roll Cheesecake, & more!
Cheesecake Bars
If you’re looking for a slightly easier option that can please a crowd, cheesecake bars are a great option too! Cheesecake bars offer all the rich, creamy goodness of traditional cheesecake in a convenient, portable form. Baked in a rectangular pan and cut into individual squares, these bars are perfect for picnics, potlucks, and parties. They’re easy to make, easy to serve, and easy to eat. Customize them with your favorite flavors, from classic vanilla to swirls of fruit puree or chocolate.
Here are some of my favorites: Pecan Pie Cheesecake Bars, Pumpkin Cheesecake Bars, and Chocolate Pumpkin Mini-Cheesecakes.
Storage and Serving
Whenever storing cheesecake, sometimes I like to cut into slices, to make it easier to place in an airtight container in the fridge or freezer. I make sure to wrap each slice in plastic wrap, or place a couple of pieces of parchment on each side of the slice, to prevent it from drying out.
Refrigeration
Store the cheesecake in an airtight container to prevent it from absorbing other flavors in the fridge. The shelf life of cheesecake in the fridge is about 4-5 days.
Freezing
Cheesecake can be frozen for up to three months in the freezer by wrapping tightly in plastic wrap and aluminum foil before freezing. Thaw in the refrigerator overnight before serving, or on the counter for an hour or so.
Serving Tips
Use a sharp knife dipped in hot water for clean slices and serve slightly chilled for the best texture. Clean the knife in between each slice you cut.
Troubleshooting Common Issues
Cracks in the Cheesecake
What can cause a cheesecake to crack? This is probably one of the most common cheesecake issues.
One of the reasons could be due to over baking. Opening the oven door too often, or removing the cheesecake from the oven as soon as it’s done baking can also cause it to crack due to the sudden temperature change.
Prevent this by baking for the correct time, using a water bath, and cooling gradually. Beating the batter too much, specially once the eggs have been added can also cause the cake to crack.
Cracks in the cheesecake can also happen if you don’t grease the sides of the pan well enough. The batter can stick to the side of the pan, and once the cake naturally shrinks as it cools, it can cause it to crack.
Soggy Crust
A soggy crust can happen if you don’t properly seal the bottom of the springform pan. Make sure to wrap the pan in foil when using a water bath, as I described above.
Under baking the crust may also cause a soggy crust.
And finally, if you grease the pan before adding the crust to it, the excess grease and moisture from the oil/butter can cause the crust to become soggy.
Lumpy Filling
Lumpy cheesecake batter can occur if you use cold ingredients, don’t scrape the bottom of the bowl enough, or don’t beat the cream cheese long enough. To make sure your batter is smooth, use room temperature ingredients, scrape the bottom and sides of the bowl often during the mixing process, and beat the cream cheese enough by itself and with the sugar.
Additionally, you can prevent a lumpy filling by using a hand mixer versus a stand mixer. I explained above why that is my preference, due to the stand mixer bowl being too deep and not wide enough, which usually causes the cream cheese to form clumps on the bottom that you may miss with the spatula as you scrape the sides of the bowl.
Sunken Center
Under baking the cheesecake will cause a sunken center. Bake until the edges are set and the center has a slight jiggle.
Final tips
This is the tl;dr sum up of the tips in this article. I do recommend you read the whole article, but if you take anything away from this post, let it be the following tips:
- Don’t grease the pan before adding the crust, that will make the crust soggy. Only grease the sides of the pan after baking the crust, and before adding the batter to the pan.
- Make sure the ingredients such as cream cheese, eggs, and sour cream are room temperature before making the batter.
- Scrape the bowl often while mixing.
- Don’t over mix once the eggs have been added to the bowl.
- Bake until the center is slightly jiggly and the edges of the cake are set, then let the cheesecake sit in the oven for one hour before removing.
- Don’t skip the water bath, and use 3 pieces of wide foil to wrap the cheesecake pan.
- You can run a knife around the edges of the cheesecake right after baking if you notice it is stuck to the side, to help loosen it from the sides.
- Only remove the ring from around the cheesecake pan after chilling in the fridge.
- Store the cheesecake slices in an air-tight container, preferably covered in plastic wrap as well.
You’ll become a Cheesecake Pro!
With these tips, you’re well on your way to making a cheesecake that’s creamy, smooth, and utterly delightful. Happy baking!
Check all of my cheesecake recipes here.
Is there a specific internal temperature to which the cheesecake is cooked that gives it the perfect jiggle? Thank you.
About 150F to 160F 🙂
Thank you!
I originally bought an 9 inch pan fat daddio and was using a metal roasting pan but just switched to the 8 inch fat Daddio and using the disposable roasting pan. I know it says 60-75 minutes but how long do you typically bake for with the 8 inch?
Hi Natalee. We talked this morning lol!! 🙂 But I’ll reply here in case it can help anyone reading it. My oven runs a bit weak, so depending on the cheesecake and what I swirl into it, it can take me up to 90 minutes. A stronger oven or a convection oven usually falls closer to 65–75 minutes.
For a plain cheesecake, I typically start checking around 65 minutes, then check every 10 minutes so it doesn’t overbake.
The best guide is the jiggle, not the clock. The edges should be set and the center should wobble like firm Jell-O. Because ovens and fillings vary so much, the visual cue is more reliable than any exact time.